
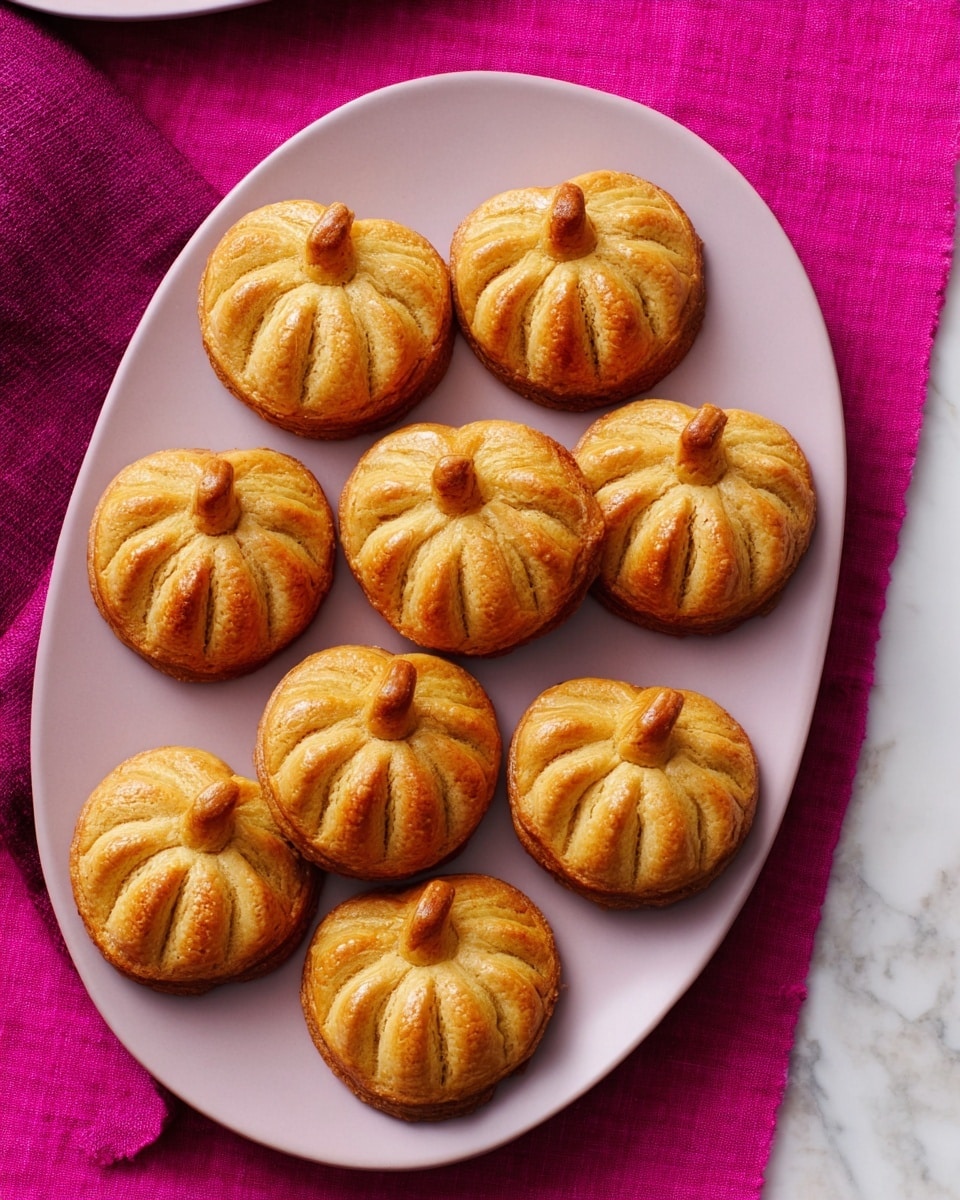
If you’re on the hunt for a cozy, portable fall treat that hits all the right notes of pumpkin spice and buttery crust, you’re going to want to try this Pumpkin Hand Pies Recipe. I absolutely love how these hand pies come together with a flaky, tender pastry that’s filled with a slightly creamy, warmly spiced pumpkin filling — it’s like having a little pumpkin pie you can hold in your hand! Whether you’re baking for a crowd or just craving a homemade fall dessert, these pies are fan-freaking-tastic and totally doable.
Why You’ll Love This Recipe
- Perfectly Flaky Crust: The butter and ice-cold water in the dough create a tender, crumbly pastry that melts in your mouth.
- Rich Pumpkin Filling: The spice blend and cream cheese add creaminess and depth, giving it that signature fall flavor we all crave.
- Portable & Shareable: These individual pies are ideal for parties, lunchboxes, or a cozy snack anytime you want pumpkin goodness on the go.
- Make-Ahead Friendly: You can prep the dough and filling ahead of time, making busy fall days much easier.

Ingredients You’ll Need
The ingredients here are pretty straightforward, but each plays an important role. You’ll want to use good-quality butter for that tender texture, and canned pumpkin puree makes this recipe super convenient and consistent every time. Plus, the blend of spices is what really makes the filling sing!
- All-purpose flour: This is the base for your pie dough — makes it tender yet strong enough to hold the filling.
- Granulated sugar: Adds a subtle sweetness to the crust without overpowering it.
- Kosher salt: Enhances all the flavors and balances the sweetness.
- Unsalted butter: Cold and cubed—this is the secret to that flaky crust everyone loves.
- White vinegar: Helps keep the crust tender while adding a bit of structure.
- Ice-cold water: Binds the dough ingredients together without melting the butter.
- Pumpkin puree: The star of the show — make sure it’s pure pumpkin, not pumpkin pie filling.
- Dark brown sugar: Gives the filling a deep molasses flavor that pairs beautifully with pumpkin.
- Ground cinnamon, ginger, allspice, nutmeg: Warm fall spices that create that classic pumpkin pie flavor.
- Pure vanilla extract: Adds a lovely aroma and sweetness to the filling.
- Cream cheese: Small pieces melted into the filling make it extra creamy and smooth.
- Egg yolks: Help thicken the filling and give richness.
- Beaten egg (for brushing): Gives the tops a beautiful golden color and sheen.
Variations
I love making this Pumpkin Hand Pies Recipe my own with little tweaks here and there. Once you get comfortable with the basic version, feel free to experiment! That’s the fun part of baking, right?
- Spiced Up: I sometimes add a pinch of ground cloves or cardamom to the filling for an extra layer of warmth and complexity.
- Dairy-Free Version: Swap the butter for coconut oil and replace cream cheese with a dairy-free alternative—your crust will be just as flaky, and the filling still creamy.
- Maple Twist: Replace brown sugar with pure maple syrup in the filling for a subtly sweet and earthy flavor.
- Mini Hand Pies: For parties, I cut the dough into smaller shapes to make bite-sized treats that disappear fast.
How to Make Pumpkin Hand Pies Recipe
Step 1: Make the Flaky Pie Dough
Start by pulsing together the flour, sugar, and the larger portion of salt in your food processor. If your processor is small, no worries—you can split the dough into two batches. Then, add the cold cubed butter and pulse until you get coarse crumbs that look like little peas. This texture is key to that tender, flaky crust. Next, pour in the vinegar and super cold water a tablespoon at a time, pulsing until the dough just holds together when you squeeze a pinch. Don’t overdo it here — overmixing makes the crust tough. Once ready, divide the dough into three discs, wrap those babies tight in plastic wrap, and chill for at least an hour (or up to two days). Chilling is crucial to speed up rolling and keep the butter cold, so don’t skip this step.
Step 2: Cook the Pumpkin Filling
While your dough chills, it’s time to get the filling ready. Whisk together the pumpkin puree, brown sugar, spices, and the remaining salt in a small saucepan. Heat this over medium, stirring occasionally, until much of the moisture cooks out—this usually takes about 6 to 8 minutes. This step is so important because it prevents your hand pies from getting soggy. Off the heat, stir in the vanilla and the cream cheese bits until you get a smooth mixture, then mix in the egg yolks to thicken and enrich the filling. Let it cool down completely before filling your pies, or else the dough may get too soft to handle.
Step 3: Roll, Cut, and Fill
Preheat your oven to 375°F (190°C). On a floured surface, roll one chilled dough disk at a time to about 1/8-inch thickness. I like using a ruler to keep the thickness even—this really helps with consistent baking. Use a 3 1/2-inch pumpkin-shaped cookie cutter (or any shape you love) to cut out 28 shapes total. As you cut them, keep the dough shapes chilled in the fridge so they stay firm. Now cut 3 vertical slits in half of your cutouts—these will top the hand pies and let the steam escape when baking.
Step 4: Assemble and Bake
Arrange 7 “bottom” dough shapes on a parchment-lined baking sheet. Spoon roughly 2 tablespoons of the pumpkin filling onto each bottom, careful to leave about a ½-inch border around the edges to seal properly. Brush the edges lightly with beaten egg (this acts like glue), then top each with a slitted “top” dough piece. Press the edges firmly with a fork to seal all around—this step locks in the filling so it won’t spill out. Repeat for the rest of your pies. Brush the tops generously with the remaining beaten egg to give them that gorgeous golden sheen you’ll want to show off later. Bake for 23 to 25 minutes until beautifully golden and fragrant. Let your pies cool slightly before digging in—that warm filling is pure autumn bliss!
Pro Tips for Making Pumpkin Hand Pies Recipe
- Keep Ingredients Cold: Chilling the dough discs well before rolling ensures buttery flakes and easy handling without stickiness.
- Don’t Overfill: I learned the hard way that too much filling makes sealing tricky and can cause leaks during baking.
- Use Parchment Paper: This stops your hand pies from sticking and helps them bake evenly on the tray.
- Brush Edges with Egg Wash: This little trick really locks in your pies so no filling escapes and gives you a nice golden finish.
How to Serve Pumpkin Hand Pies Recipe
Garnishes
I love dusting just a little powdered sugar on top for a pretty finishing touch and an extra hint of sweetness. Sometimes, I drizzle a bit of warm caramel sauce over the pies when serving for that decadent café vibe—totally indulgent and irresistible.
Side Dishes
These hand pies stand perfectly on their own, but if you want to turn it into a brunch or dessert spread, pair them with a scoop of vanilla ice cream, a dollop of whipped cream, or even a hot cup of spiced chai or coffee for cozy comfort.
Creative Ways to Present
For special dinners or holiday gatherings, I like to serve these pies arranged on a pretty wooden board with little bowls of whipped cream and chopped toasted nuts on the side. You could also wrap them individually in parchment and tie with twine for a charming take-home treat for guests.
Make Ahead and Storage
Storing Leftovers
Your Pumpkin Hand Pies keep nicely stored in an airtight container at room temperature for 1-2 days. After that, I recommend moving them to the refrigerator to keep them fresh up to 4 days. Just be sure to warm them gently before serving to revive that flaky crust.
Freezing
I always freeze a batch of these pies right after assembling but before baking. Just place them on a baking sheet to freeze individually, then transfer to a freezer-safe bag for up to 2 months. When you want to bake, just add a few extra minutes to the baking time—super convenient for last-minute pumpkin cravings.
Reheating
To reheat, pop the pies in a 350°F oven for about 10 minutes or until warmed through and crispy again. Avoid microwaving if possible, since that can make the crust soggy. I love reheating these pies to get that fresh-baked feeling all over again.
FAQs
-
Can I use homemade pumpkin puree for the filling?
Absolutely! If you roast and puree your own pumpkin, it can add a wonderful fresh flavor. Just be sure to cook the filling well to remove extra moisture so your pies don’t get soggy.
-
What if I don’t have a food processor?
No problem! You can make the dough by hand using a pastry cutter or two forks to cut the butter into the flour until it looks like coarse crumbs. Then stir in the liquids slowly until the dough holds together.
-
Can I freeze baked Pumpkin Hand Pies?
You can freeze baked pies, but I find freezing unbaked ones yields better texture after baking. If freezing baked pies, thaw overnight in the fridge and reheat in the oven for best results.
-
How do I prevent the crust from getting soggy?
The key is cooking out moisture from the pumpkin filling before assembling and brushing the edges of the dough with egg wash to properly seal the pies. Also, chilling the assembled pies before baking helps maintain shape and texture.
Final Thoughts
This Pumpkin Hand Pies Recipe holds a special place in my fall baking rotation. It’s the kind of recipe that fills your kitchen with the warmest scents and leaves everyone asking for seconds. The flaky crust paired with that luscious, spiced pumpkin filling is just pure comfort in every bite. Give it a try—you’ll enjoy making these as much as you’ll love sharing them with friends and family. Happy baking and pumpkin season!
Print
Pumpkin Hand Pies Recipe
- Prep Time: 40 mins
- Cook Time: 35 mins
- Total Time: 1 hr 15 mins
- Yield: 14 hand pies
- Category: Dessert
- Method: Baking
- Cuisine: American
- Diet: Vegetarian
Description
Delight in these charming Pumpkin Hand Pies that combine a flaky, buttery crust with a spiced pumpkin and cream cheese filling. Perfect for autumn gatherings or a cozy treat, these hand-held pies are baked to golden perfection with a blend of warming spices and a creamy texture that melts in your mouth.
Ingredients
Dough:
- 3 3/4 cups all-purpose flour
- 3 Tbsp. granulated sugar
- 1 1/2 tsp. kosher salt, divided (1 1/2 tsp. plus 1/4 tsp.)
- 1 1/2 cups (3 sticks) unsalted butter
- 3 Tbsp. white vinegar
- 3 Tbsp. ice-cold water (plus extra if needed)
Filling:
- 1 15-oz. can pumpkin puree
- 1/4 cup packed dark brown sugar
- 3/4 tsp. ground cinnamon
- 1/2 tsp. ground ginger
- 1/4 tsp. ground allspice
- 1/4 tsp. ground nutmeg
- 1/2 tsp. pure vanilla extract
- 4 oz. cream cheese, cut into small pieces
- 2 large egg yolks
Other:
- 1 beaten egg, for brushing
Instructions
- Prepare the Dough: In a food processor, combine the all-purpose flour, granulated sugar, and 1 1/2 teaspoons kosher salt. If your food processor is 7 cups or smaller, divide the mixture and process in two batches. Pulse in the cold, cubed unsalted butter until the mixture resembles coarse crumbs.
- Add Liquid Ingredients: Add the white vinegar and ice-cold water to the flour and butter mixture. Pulse until the dough is crumbly but holds together when squeezed. Add additional water one teaspoon at a time if necessary, but avoid overmixing. Shape the dough into three disks about 1 inch thick, wrap tightly in plastic, and chill in the refrigerator for at least 1 hour or up to 2 days.
- Make the Pumpkin Filling: While the dough chills, whisk together pumpkin puree, dark brown sugar, cinnamon, ginger, allspice, nutmeg, and the remaining 1/4 teaspoon kosher salt in a small saucepan. Cook over medium heat, stirring occasionally, until moisture reduces, about 6 to 8 minutes. Remove from heat, stir in vanilla extract and cream cheese until smooth, then mix in the egg yolks. Transfer to a bowl and allow to cool.
- Preheat Oven and Roll Dough: Preheat the oven to 375°F (190°C). On a lightly floured surface, roll one chilled dough disk at a time to about 1/8 inch thickness. Cut out twenty-eight 3 1/2-inch pumpkin-shaped cutouts, placing them in the refrigerator as you work. Cut three vertical slits in half of the cutouts to form the tops of the pies.
- Assemble the Hand Pies: Arrange seven pumpkin-shaped “bottom” cutouts on a parchment-lined baking sheet. Spoon about 2 tablespoons of the cooled pumpkin filling onto each bottom, leaving a 1/2-inch border. Lightly brush the border with beaten egg. Place a slitted pumpkin-shaped cutout on top and seal the edges by pressing with a fork. Repeat with remaining dough and filling.
- Brush and Bake: Brush the tops of all hand pies with the remaining beaten egg. Bake in the preheated oven until golden brown, approximately 23 to 25 minutes. Remove from oven and cool slightly before serving.
Notes
- Ensure the butter and water are very cold to create a flaky pie crust.
- If your food processor is small, work in two batches to avoid overworking the dough.
- You can prepare the dough up to 2 days in advance and keep it refrigerated.
- For best results, do not overfill the pies to prevent leaking during baking.
- Allow pies to cool slightly before handling as the filling will be hot.
Nutrition
- Serving Size: 1 hand pie
- Calories: 310
- Sugar: 10g
- Sodium: 210mg
- Fat: 18g
- Saturated Fat: 10g
- Unsaturated Fat: 6g
- Trans Fat: 0.3g
- Carbohydrates: 32g
- Fiber: 2g
- Protein: 4g
- Cholesterol: 65mg

