
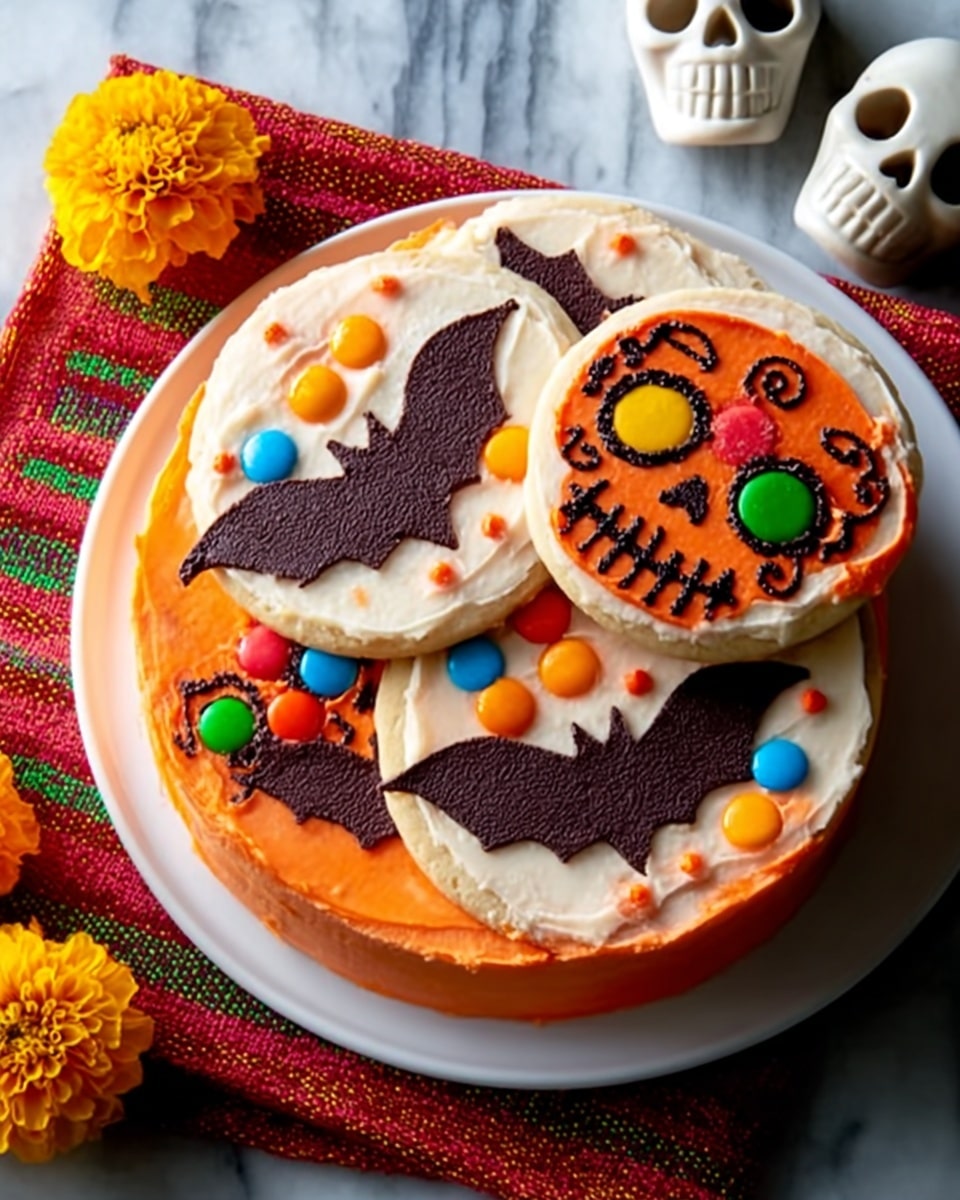
If you’re looking for a fun, festive dessert that’s as easy as pie (or should I say cake?), then you’re going to fall head over heels for my So-Easy-It’s-Spooky Bat Cake Recipe. Seriously, this cake is a total showstopper — spooky, sweet, and simple enough to whip up even if you’re not a seasoned baker. I’ve made this for a few Halloween parties, and every time, folks are amazed—and they always want the recipe. Let me walk you through it so you can impress your friends and family with zero stress!
Why You’ll Love This Recipe
- Simplicity: It uses cake mixes and straightforward ingredients, making it approachable for all skill levels.
- Festive Fun: The bat design is adorable and adds a perfect Halloween vibe without needing fancy tools.
- Moist, Delicious Layers: With devil’s food or orange cake options and rich frosting, it’s both visually and tastefully impressive.
- Customizable: You can easily switch up cake flavors and frostings to make this your own signature spooky delight.

Ingredients You’ll Need
This recipe cleverly balances classic boxed cake mixes with pantry staples for frosting and fun add-ins. Using store-bought cake mix is a time-saver, and the peanut butter cups sprinkled inside add a lovely surprise in every bite.
- Devil’s food or orange cake mix: Using a good-quality mix will make your cake moist and flavorful; orange cake with food coloring amps up the Halloween vibes.
- Orange food coloring: Optional, but perfect if you’re going for an eye-catching orange cake color.
- Confectioners’ sugar: Essential for smooth, creamy frosting with that perfect sweetness.
- Butter: Make sure it’s softened to room temperature for easy mixing without lumps.
- Vanilla extract: Adds warmth and depth to your frostings.
- 2% milk: Adjusts frosting consistency so it spreads beautifully without being runny.
- Baking cocoa (for chocolate frosting): Use Dutch-processed for that rich, smooth chocolate taste.
- Peanut butter cups: Finely chopped, these add texture and nuttiness inside your cake layers.
- Dutch-processed cocoa or confectioners’ sugar (for dusting): Creates the bat silhouette with a professional finish.
Variations
I love tweaking this So-Easy-It’s-Spooky Bat Cake Recipe depending on the occasion or who I’m baking for—you can really make it your own without losing the spooky charm.
- Gluten-Free Version: Swap the cake mix for a gluten-free option and check your frosting ingredients; it still comes out moist and delightfully spooky.
- Vegan Twist: Use vegan cake mix and substitute butter with coconut oil or vegan margarine, plus plant-based milk for the frosting.
- Flavor Variations: I’ve tried this with red velvet cake as well, swapping the orange food coloring and frosting—works like a charm and looks fantastic!
- Decorative Enhancements: Adding edible glitter or candy eyeballs on the bat’s wings adds a playful dimension for kids’ parties.
How to Make So-Easy-It’s-Spooky Bat Cake Recipe
Step 1: Bake Your Cake Layers with Care
Start by prepping your cake mix as directed on the package—remember to add that orange food coloring if you’re going for the bright, festive orange option. Pour the batter evenly into two 9-inch round pans and bake them just until a toothpick comes out mostly clean—be cautious of overbaking, since that dries the cakes out and that’s the last thing we want! Once baked, let them cool completely on wire racks. I learned early on that chilling the cakes after they cool helps them settle and reduces crumbs when icing later.
Step 2: Frosting Fundamentals
For devil’s food cake, whip up the orange frosting—beat confectioners’ sugar with softened butter, vanilla, orange food coloring, and milk until dreamy and spreadable. If you baked orange cake instead, prepare the rich chocolate frosting the same way by adding cocoa. A handy tip is to add milk gradually—you want a creamy texture that spreads without sliding off.
Step 3: Time to Assemble Your Bat Cake
Using a long serrated knife, gently level off any domed tops of your cakes so the layers stack evenly—this keeps your bat silhouette crisp and clean. Place the first cake layer on your serving plate, spread about a cup of frosting evenly, then sprinkle the chopped peanut butter cups over it for a surprise crunch. Carefully add the next layer, flipping it bottom-side-up (the flat side), and cover the whole cake with the remaining frosting, smoothing it all around. Pop it in the fridge for about 30 minutes to set up and make it easier when dusting your bat design.
Step 4: Create Your Spooky Bat Silhouette
Before you dust, cut out a bat shape from cardstock and wrap it tightly in foil to keep it clean and easy to lift. Place your bat pattern gently on top of the chilled cake. Using a fine-mesh strainer, sprinkle a thin layer of Dutch-processed cocoa powder (if frosting is orange) or confectioners’ sugar (if frosting is chocolate) evenly over the pattern. Slowly lift your bat stencil off, revealing the perfect spooky silhouette. This simple step always wows my guests—and shows that fun Halloween treats don’t have to be complicated.
Pro Tips for Making So-Easy-It’s-Spooky Bat Cake Recipe
- Use Room Temperature Butter: This makes frosting silky smooth and easier to spread evenly without tearing your cake layers.
- Level Your Cakes Precisely: Keeping layers flat helps your bat design look neat and professional, trust me—it’s worth the extra attention.
- Chill Before Dusting: Cooling your frosted cake firms up the icing and prevents smudging when you add the cocoa or sugar dusting cosplay.
- Sift Powdered Toppings: Sifting ensures an even, light dusting that brings the bat silhouette to life instead of clumps that blur the edges.
How to Serve So-Easy-It’s-Spooky Bat Cake Recipe
Garnishes
I usually keep garnishes simple so the bat design stays the star. A few extra chopped peanut butter cups around the base or a small scattering of black and orange sprinkles adds just the right festive touch. If you’re feeling extra, a couple of candy eyeballs on the bat’s wings brings some playful spookiness that kid guests adore.
Side Dishes
This cake pairs perfectly with classic Halloween snacks like candied apples or spiced pumpkin seeds, but I also love serving it alongside a cozy cup of hot cocoa—your guests will love the sweet and chocolatey combo!
Creative Ways to Present
For an extra touch of fun, try serving individual slices with mini bat picks or place the whole cake on a tiered Halloween dessert stand surrounded by tiny plastic spiders and fake cobwebbing. I once wrapped the dessert table in black tulle and added purple LED lights, making the bat cake the centerpiece that stole the show.
Make Ahead and Storage
Storing Leftovers
Once decorated, I cover the cake loosely with plastic wrap and keep it in the fridge. It holds up really well for 3-4 days, and the flavors actually deepen, making leftovers just as tasty.
Freezing
If you want to freeze the cake, I recommend freezing it before frosting. Wrap each unfrosted layer tightly in plastic wrap, then foil, and freeze. When ready, thaw layers overnight in the fridge, then assemble and frost fresh for best results.
Reheating
Since it’s a cake, reheating isn’t necessary—but bringing slices to room temperature before serving really lets the frosting soften and flavor shine through.
FAQs
-
Can I use homemade cake instead of boxed mix for this So-Easy-It’s-Spooky Bat Cake Recipe?
Absolutely! While I recommend cake mixes for speed and consistency (especially when you want reliability), you can use your favorite homemade devil’s food or orange cake recipe. Just make sure your layers are about 9 inches in diameter and baked evenly to maintain the bat shape and size.
-
How do I avoid crumbs in my frosting when assembling the bat cake?
The trick I learned is to chill your cake layers briefly after trimming domes, and applying a thin crumb coat of frosting first before your final layer of frosting. Chilling again before the final icing application helps keep the crumb bits locked in.
-
What if I don’t have Dutch-processed cocoa for the bat silhouette?
No worries! You can use regular unsweetened cocoa powder or confectioners’ sugar depending on your frosting color. Just keep in mind that Dutch-processed cocoa is less bitter and smoother, which gives a nicer finish.
-
Can I make this cake vegan?
Yes! Use a vegan cake mix, swap butter for vegan butter or coconut oil, and use a plant-based milk like almond or oat milk. The texture will be just as delightful, though the flavor might have subtle changes depending on your ingredients.
Final Thoughts
This So-Easy-It’s-Spooky Bat Cake Recipe has become my go-to for Halloween festivities because it hits the perfect balance between festive flair and fuss-free baking. I love how it brings people together—whether it’s the kids marveling at the bat silhouette or adults sneaking second slices behind the scenes. I can’t recommend this enough if you want a showstopper dessert without the typical baking stress. So grab your cake mix, get your bat stencil ready, and have some fun with your next spooky celebration—you’ll be so glad you did!
Print
So-Easy-It’s-Spooky Bat Cake Recipe
- Prep Time: 25 minutes + chilling
- Cook Time: 25 minutes
- Total Time: 1 hour 20 minutes (including chilling and cooling time)
- Yield: 16 servings
- Category: Dessert
- Method: Baking
- Cuisine: American
Description
This So-Easy-It’s-Spooky Bat Cake is a fun and festive dessert perfect for Halloween parties or any spooky celebration. Made from a devil’s food or orange cake mix and decorated with either vibrant orange or rich chocolate frosting, this cake is topped with a striking bat design created by dusting cocoa or confectioners’ sugar over a bat-shaped stencil. Topped with chopped peanut butter cups for an extra treat, this cake not only looks impressive but is simple enough to whip up quickly.
Ingredients
Cake
- 1 devil’s food or orange cake mix (regular size)
- 1 teaspoon orange food coloring (optional, for orange cake)
Orange Frosting (for devil’s food cake)
- 4-2/3 cups confectioners’ sugar
- 1 cup butter, softened
- 2 teaspoons vanilla extract
- Orange food coloring (to desired color)
- 6 to 7 tablespoons 2% milk
Chocolate Frosting (for orange cake)
- 4 cups confectioners’ sugar
- 2/3 cup baking cocoa, sifted
- 1 cup butter, softened
- 2 teaspoons vanilla extract
- 6 to 7 tablespoons 2% milk
Topping
- 10 peanut butter cups, finely chopped
- Dutch-processed cocoa or confectioners’ sugar (for dusting)
Instructions
- Prepare and Bake Cake: Follow the package directions on your chosen cake mix to prepare the batter. If making an orange cake, add 1 teaspoon of orange food coloring to the mix before baking. Pour the batter into two 9-inch round baking pans and bake for about 25 minutes, or until a toothpick inserted in the center comes out clean. Allow the cakes to cool completely as directed on the package.
- Create Bat Pattern: While the cake cools, cut a bat-shaped stencil out of cardstock and wrap it in foil to create a solid surface for dusting cocoa or sugar. This will be used to decorate the cake after frosting.
- Make Frostings: For devil’s food cake, prepare the orange frosting by beating together confectioners’ sugar, softened butter, vanilla extract, orange food coloring, and enough 2% milk (6 to 7 tablespoons) to reach a smooth, spreadable consistency. For orange cake, prepare the chocolate frosting by mixing confectioners’ sugar, sifted cocoa, softened butter, vanilla extract, and 2% milk until smooth and spreadable.
- Level the Cakes: Using a long serrated knife, gently trim the tops of both cakes if they have domed to create flat layers for easier stacking.
- Assemble the Cake: Place one cake layer on a serving plate. Spread about 1 cup of the chosen frosting evenly over the top. Sprinkle finely chopped peanut butter cups on the frosting to add texture and flavor. Carefully place the second cake layer on top, upside down to have a flat top surface, and spread the remaining frosting evenly over the top and sides of the cake.
- Chill the Cake: Refrigerate the assembled cake for about 30 minutes to let the frosting set, which makes decorating easier.
- Decorate with Bat Design: Lay the foil-wrapped bat stencil on top of the chilled cake. Using a fine-mesh strainer, sift Dutch-processed cocoa powder or confectioners’ sugar evenly over the stencil and frosting. Carefully lift the stencil straight up to reveal a crisp bat silhouette on the cake surface.
Notes
- Use foil-wrapped cardstock to create a clean, reusable stencil for the bat design.
- You can switch frostings based on the cake choice: orange frosting complements devil’s food cake, while chocolate frosting goes well with orange cake.
- Refrigerating the cake before decorating helps the frosting firm up, making it easier to dust cocoa or sugar evenly.
- Finely chopping the peanut butter cups ensures they spread evenly without making the layers uneven.
- For a darker bat silhouette, use Dutch-processed cocoa; for a lighter bat shape, use confectioners’ sugar to dust.
Nutrition
- Serving Size: 1 slice (1/16 of cake)
- Calories: 320
- Sugar: 28g
- Sodium: 240mg
- Fat: 17g
- Saturated Fat: 10g
- Unsaturated Fat: 5g
- Trans Fat: 0.5g
- Carbohydrates: 40g
- Fiber: 2g
- Protein: 4g
- Cholesterol: 50mg


