
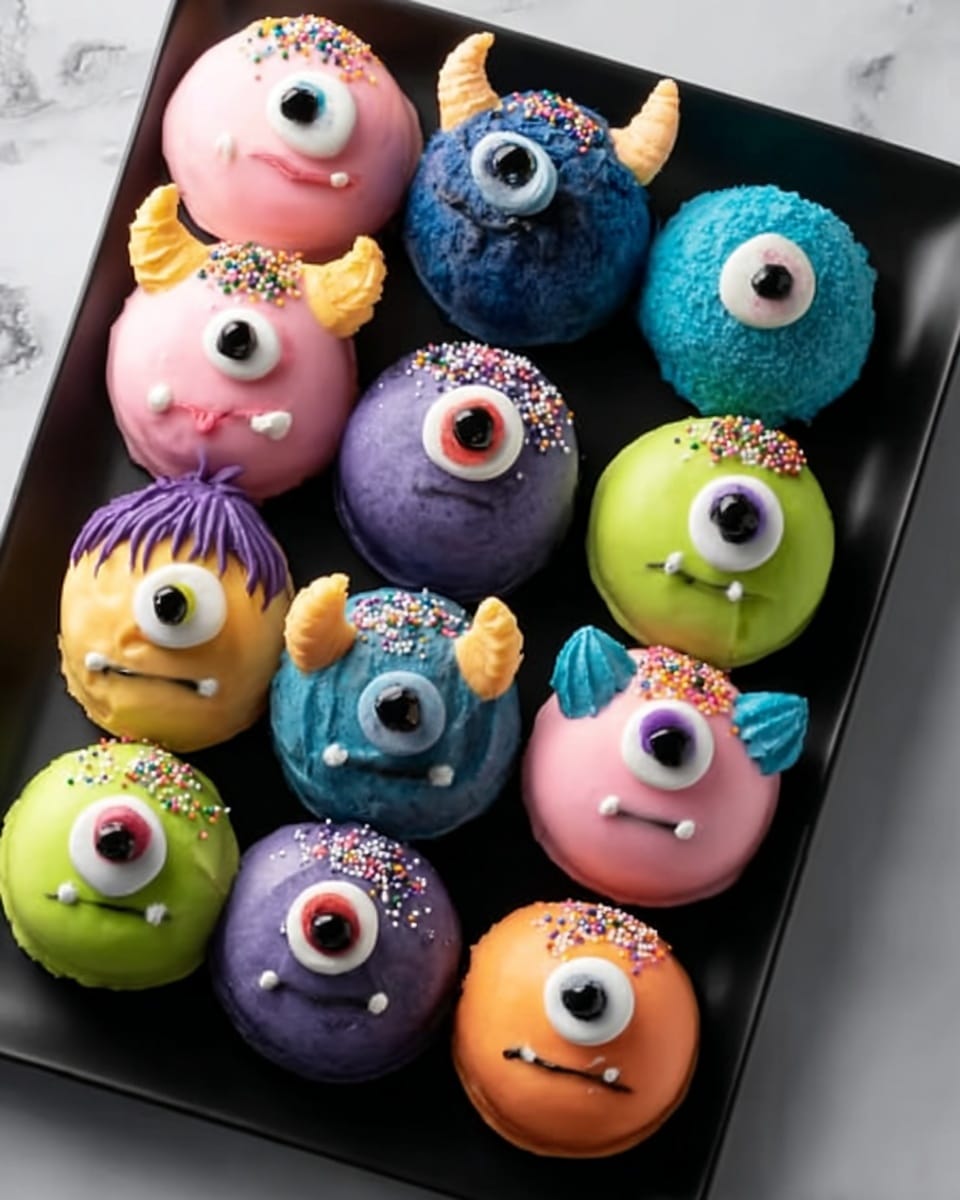
If you’re looking for a fun, festive, and downright irresistible treat, this Cake Eyeballs Recipe is absolutely the way to go. I first made these for a Halloween party, and everyone couldn’t stop talking about how delightfully creepy — and delicious — they were. Whether you’re hosting a spooky get-together or just want a quirky dessert that will wow your friends and family, these eyeball-shaped cake balls deliver on cuteness and flavor. Stick around, because I’m sharing all my tips to make sure yours come out just perfect!
Why You’ll Love This Recipe
- Fun and Festive: These cake eyeballs are perfect for Halloween or any playful occasion.
- Customizable: You can mix and match candy melts and decorations to suit your style or theme.
- No Baking Anxiety: Using a cake mix means it’s simple and reliable every time.
- Kid-Approved: My family goes crazy for these, and they’re great for involving little helpers.

Ingredients You’ll Need
These ingredients come together amazingly well, giving you moist cake bites coated with smooth, colorful candy that holds fun decorations perfectly. Pro tip: pick a cake flavor and frosting you personally love — it really shows through in the final taste!
- Cake mix: Choose your favorite flavor; I like chocolate or funfetti to keep things festive.
- Prepared frosting: This helps bind the cake crumbs; cream cheese frosting adds a nice tang if you want a twist.
- Candy melts: Pick a variety of colors – Wilton brand works great for smooth coating and vibrant hues.
- Decorations: Candy eyeballs, sprinkles, Twizzlers — go wild and get creative! I love using jumbo sprinkles for texture.
Variations
I love how customizable this Cake Eyeballs Recipe is! You can easily change up colors, decorations, or even cake flavors to match whatever vibe you’re going for — and it’s always a hit.
- Chocolate Lovers’ Variation: Use chocolate fudge cake mix and chocolate frosting for a rich, decadent bite.
- Vegan Option: Try a dairy-free cake mix and frosting, and vegan candy melts so everyone can enjoy them.
- Spooky Glow: Add edible glitter or use glow-in-the-dark sprinkles for a fun Halloween party trick I discovered recently.
How to Make Cake Eyeballs Recipe
Step 1: Bake Your Cake and Let It Cool
Follow the package directions for your cake mix and bake in a greased 13×9-inch pan. Cooling is key here — let it cool completely on a wire rack before moving on, or your cake balls will be soggy and hard to shape. I usually bake mine in the morning so by afternoon, it’s perfectly cooled and ready.
Step 2: Crumble and Mix with Frosting
Crumble the cooled cake into a large bowl, then add your frosting. I found that starting with a cup of frosting and adding more if needed helps get the perfect consistency — you want it moist enough to hold shape, but not gooey. Mix well so everything binds together nicely.
Step 3: Shape into Balls and Chill
Roll the mixture into 1 ½-inch balls (I use a small cookie scoop to get consistent sizes) and place them on baking sheets. Chill these in your freezer for at least 2 hours or in the fridge for around 3—this gives them the firmness needed to dip without falling apart. Patience here makes all the difference!
Step 4: Melt Candy and Dip
Melt your candy melts in the microwave carefully — I usually do 30 seconds at a time, stirring in between to avoid burning. Once smooth, dip each chilled cake ball, allowing excess coating to drip off. Place them back on the sheets and get ready to decorate.
Step 5: Decorate and Let Set
This is the fun part! Use candy eyeballs, sprinkles, or whatever decorations you love. I like adding a few drops of colored candy melt to make veins or spooky effects. Let the cake eyeballs stand at room temperature until the coating fully sets — this usually takes about 30 minutes to an hour.
Pro Tips for Making Cake Eyeballs Recipe
- Perfect Firmness: Chilling the cake balls well before dipping prevents cracking or falling apart.
- Candy Melts Handling: Microwave slowly and stir often — smooth melting helps an even coating every time.
- Decoration Patience: Let each layer set before adding more details to avoid smudging.
- Avoid Overmixing: Mix just until combined to keep your cake balls tender and not dense.
How to Serve Cake Eyeballs Recipe
Garnishes
I tend to stick with candy eyeballs as the star garnish because they nail the spooky-but-cute factor. Adding a touch of colored sugar or edible glitter gives a fun sparkle, and jumbo sprinkles add a bit of crunch. These simple touches really bring the eyeballs to life for me.
Side Dishes
Pair these cake eyeballs with a cool drink like spiced cider or a fun punch to balance the sweetness. For a Halloween party, a platter of mixed chocolates and candy corn makes for a festive spread. Kids especially love a little “creepy candy” vibe!
Creative Ways to Present
I once arranged mine on a tray that looked like a spider web using black licorice as the lines — it was such a hit! You could also stick each eyeball on a colorful lollipop stick for a Halloween eyeball “pop.” Presentation makes these even more fun to serve and share.
Make Ahead and Storage
Storing Leftovers
Store cake eyeballs in an airtight container in the fridge. They’ve stayed fresh for about a week in my experience, and the coating keeps them from drying out. Just make sure they’re not squished — I like using a rigid container to protect their cute decorations.
Freezing
If you want to prep early, these freeze beautifully! I wrap each cake eyeball individually in plastic wrap, then keep them in a freezer-safe container. When thawed gently in the fridge, they retain their shape and flavor perfectly.
Reheating
Since these are best served chilled, reheating isn’t necessary — just bring frozen eyeballs to the fridge overnight to thaw. If you want them slightly softer, let them sit at room temp for 15-20 minutes. They’ll still be delicious and hold their fun shape!
FAQs
-
Can I use homemade cake instead of cake mix for the Cake Eyeballs Recipe?
Absolutely! Homemade cake works great as long as it’s moist but firm enough to crumble well. Keep the same ratio of cake to frosting so your cake balls hold together perfectly.
-
What if I don’t have candy melts for coating?
You can substitute white chocolate, milk chocolate, or colored chocolate melts, but be gentle when melting to avoid seizing. If you want bright colors, candy melts really give the best smooth, vibrant finish.
-
How do I prevent the cake balls from cracking when dipping?
Make sure your cake balls are well chilled and the candy melts are properly melted but not too hot. If the coating is too hot, it can cause cracking. Also, let the excess drip off before placing down to set gently.
-
Can I make these cake eyeballs ahead of time?
Yes! These are great make-ahead treats. Store them in the fridge for up to a week, or freeze them for longer storage. Just thaw in the fridge when ready to serve.
Final Thoughts
I absolutely love how this Cake Eyeballs Recipe turns out every single time — the combination of moist cake, creamy frosting, and that vibrant candy coating is just unbeatable. When I first tried this, I was worried the eyeballs would be tricky, but with a bit of patience and my pro tips, you’ll find it’s super fun and totally doable. My family goes crazy for these, especially when I whip them out at Halloween or birthday parties. Trust me, they’re a crowd-pleaser and such a conversation starter. So grab your favorite cake mix and candy melts, and let’s get baking some spooky, scrumptious eyeballs!
Print
Cake Eyeballs Recipe
- Prep Time: 1 hour
- Cook Time: 35 minutes
- Total Time: 3 hours 35 minutes
- Yield: 2 dozen
- Category: Dessert
- Method: Baking
- Cuisine: American
Description
These colorful Cake Eyeballs are a fun and festive treat perfect for Halloween or any party. Made by baking a classic cake mix, then crumbling it and combining with frosting, these bite-sized cake balls are dipped in vibrant candy melts and decorated with fun sprinkles and candy eyes to create spooky eyeball designs.
Ingredients
Cake Base
- 1 package cake mix of your choice (regular size)
- Ingredients required by cake mix package (usually eggs, oil, water)
- 1 cup prepared frosting of your choice
Coating and Decorations
- 1 package (12 ounces) each orange, pink, blue, purple, vibrant green, black, and white Wilton candy melts
- Decorations of your choice: candy coating disks, jumbo sprinkles, candy-coated sunflower kernels, candy eyeballs, Twizzlers Rainbow Twists, Life Savers, colored sugar, and assorted sprinkles
Instructions
- Prepare and Bake Cake: Follow the package directions to prepare the cake mix, pouring the batter into a greased 13×9-inch baking pan. Bake for 35 minutes or until a toothpick inserted comes out clean. Allow the cake to cool completely on a wire rack.
- Crumble Cake and Mix with Frosting: Once cooled, crumble the entire cake into a large mixing bowl. Add 1 cup of prepared frosting and mix thoroughly until well combined to form a dough-like consistency.
- Form Cake Balls and Chill: Shape the mixture into 1.5-inch balls and place them on baking sheets. Chill the cake balls in the freezer for at least 2 hours or refrigerate for at least 3 hours until firm.
- Melt Candy Coatings: In separate microwave-safe bowls, melt each color of Wilton candy melts following package instructions, stirring until smooth.
- Dip and Decorate: Dip each chilled cake ball into the melted candy coating, allowing excess to drip off. While the coating is still wet, decorate the cake eyeballs with candy eyes, sprinkles, or other decorations as desired.
- Set Coating: Let the decorated cake eyeballs stand at room temperature until the candy coating is completely set and hardened. Serve and enjoy!
Notes
- Ensure the cake is fully cooled before crumbling to prevent a soggy mixture.
- Chilling the cake balls thoroughly before dipping helps the coating set smoothly.
- You can customize colors and decorations to fit any theme or occasion.
- Store finished cake balls in an airtight container in the refrigerator for up to 3 days.
- Use a toothpick or fork to dip cake balls for easier handling.
Nutrition
- Serving Size: 1 cake eyeball
- Calories: 120
- Sugar: 15g
- Sodium: 90mg
- Fat: 5g
- Saturated Fat: 2.5g
- Unsaturated Fat: 2g
- Trans Fat: 0g
- Carbohydrates: 18g
- Fiber: 0.5g
- Protein: 1g
- Cholesterol: 15mg

