
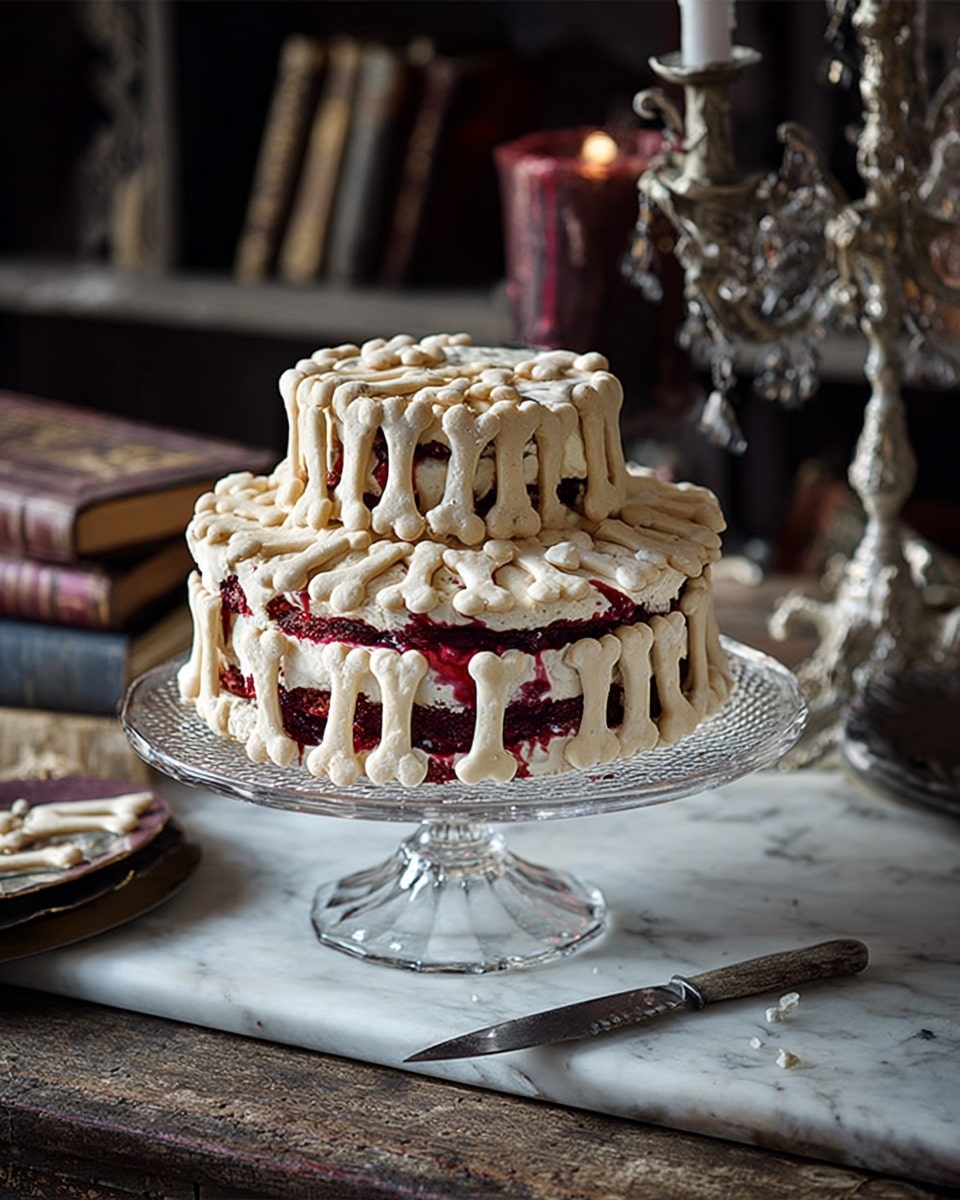
If you’re looking for a spooky, show-stopping dessert to wow your guests this season, then you’re going to absolutely love this Halloween Bone Cake Recipe. I’ve made it a few times now for Halloween parties, and honestly, it’s become the centerpiece everyone talks about—and then devours. It combines the classic rich taste of red velvet cake with crisp, delicate meringue bones that are as fun to make as they are to eat. Stick with me here, because I’m about to share everything you need to nail this bone-chilling masterpiece!
Why You’ll Love This Recipe
- Eye-Catching Design: The piped meringue bones create a spooky, yet elegant look perfect for Halloween celebrations.
- Simple Ingredients: Uses readily available products, including ready-made red velvet cakes to save time.
- Fun to Make: Piping the bones is a creative activity that feels like crafting meets baking.
- Deliciously Layered: Combines moist red velvet with crispy meringue for perfect texture contrast.

Ingredients You’ll Need
I love how this Halloween Bone Cake recipe keeps things straightforward with some pantry staples plus the star of the show — red velvet cake. The meringue bones add a delightful crunch, contrasting beautifully with the soft cake layers.
- Egg white: Make sure your bowl is squeaky clean and grease-free to get those perfect stiff peaks.
- Caster sugar: Adds sweetness and helps stabilize the meringue for those crisp bones.
- Vanilla extract: Adds subtle warmth; don’t skip it for that extra layer of flavor.
- Icing sugar: Used to create a thick yet pipeable icing that helps glue the bones in place.
- Tesco Finest red velvet cakes: Using two sizes (serves 6 and serves 14) makes assembly easier and gives the cake a tiered effect.
Variations
One of the things I adore about this Halloween Bone Cake Recipe is how easy it is to customize. You can tweak flavors, decorations, or even make it allergy-friendly to suit your needs.
- Egg-free Version: I once swapped meringue bones for cookie bones made from a vegan sugar cookie dough—still spooky and delicious!
- Different Flavors: Instead of red velvet, you could try chocolate or carrot cake layers for a different twist.
- Color the Bones: Adding a drop of food coloring to the meringue mix makes for eerie green or ghostly white bones.
- Spiced Icing: Mixing a tiny pinch of cinnamon into the icing gives a warm surprise with every bite.
How to Make Halloween Bone Cake Recipe
Step 1: Whisk Your Egg White to Stiff Peaks
Start by preheating your oven to a low 130°C (fan 110°C), which is perfect for drying out those meringue bones without browning them. Crack one large egg white into a clean, grease-free bowl—plastic bowls are a no-go here since grease can stop your whites from whipping up properly. Using an electric whisk, start slow and build up the speed gradually. After about three minutes, you’ll notice stiff, shiny peaks forming—this is when you know the meringue is ready for sugar.
Step 2: Slowly Add Sugar and Vanilla
Here’s a trick I discovered: add your caster sugar little by little—just a tablespoon at a time—whisking well between additions to keep the meringue stable and glossy. Adding it too fast makes the mixture collapse, which nobody wants! After all sugar is incorporated, whisk in half a teaspoon of vanilla extract for that subtle warmth that complements the red velvet perfectly.
Step 3: Pipe Your Meringue Bones
Fill a piping bag fitted with a 3mm round nozzle with your beautifully glossy meringue. To create bones, pipe shapes roughly 6cm long and 5mm thick on one lined baking tray, and smaller ones around 4cm on another. The shape is a fun one—start by piping a heart, then pull the tip from that heart into a narrow line ending with another heart. Pro tip: this creates the classic bone “knobs.” You should end up with about 50 bones. Pop them in the oven and bake for 45 minutes—then let them cool completely before handling.
Step 4: Make the Icing Glue
Stack your smaller red velvet cake on top of the larger one to create a tiered effect. Next, mix your icing sugar with half to a full teaspoon of cold water until it’s thick but still pipeable. The consistency is key—you want the icing just thick enough to hold those meringue bones in place, but not so stiff that it’s a struggle to pipe.
Step 5: Decorate with Bones
Now the fun part—grab a long bone, pipe a small dab of icing on the back, and gently stick it to the side of the lower cake tier. Alternate with smaller bones beside larger ones as you go around the cake. Work your way up to the top tier and fill in all the gaps with smaller bones or broken pieces for that authentic skeleton vibe. For the grand finale, finish with crossed bones on the very top. The visual effect is seriously awesome!
Pro Tips for Making Halloween Bone Cake Recipe
- Perfect Meringue Whip: Always ensure no yolk or grease touches your egg whites; it’s the secret to getting stiff, glossy peaks every time.
- Slow Sugar Addition: Adding sugar slowly was a game-changer for me—rush this, and your meringue will flop.
- Nonstick Baking Paper is Your Friend: This keeps your bones intact and makes transferring to the cake much easier.
- Icing Consistency Check: Try piping a quick line on parchment to test the icing before decorating; adjust water or sugar accordingly.
How to Serve Halloween Bone Cake Recipe
Garnishes
I usually keep garnishes simple so the bones shine as the star. A dusting of edible glitter or a few fresh berries around the base adds a little pop without overwhelming the spooky vibe. Sometimes I add a handful of Halloween-themed candies nearby for extra fun, especially when kids are around.
Side Dishes
When I serve this cake, I like pairing it with light, fresh sides like a crisp apple salad or a tangy citrus punch to balance the richness of the red velvet and sweetness of the meringue bones.
Creative Ways to Present
One year I placed this Halloween Bone Cake on a platter with dry ice underneath—it created a spooky fog effect that my guests loved. Another time, I scattered edible spiders and cobwebs made of spun sugar around the base for an extra eerie touch. Get creative with your serving table to amp up the Halloween atmosphere!
Make Ahead and Storage
Storing Leftovers
If any of this Halloween Bone Cake survives the party (rare, but it happens!), I wrap leftover slices tightly in plastic wrap and keep them in an airtight container in the fridge. This keeps the cake moist but helps protect the meringue bones from humidity, which can soften their crispness.
Freezing
Freezing fully assembled cake isn’t ideal because meringue absorbs moisture and loses crunch. Instead, I freeze leftover cake slices without the bones and pipe fresh meringue bones when you’re ready to celebrate again. Alternatively, freeze bones yourself but store in airtight containers once baked.
Reheating
When reheating, I skip it for the meringue bones because oven warmth can make them chewy. For the cake slices, a brief 20-second zap in the microwave revives softness without drying it out. Serving cold is fine too—it really depends on your texture preference.
FAQs
-
Can I make the meringue bones ahead of time?
Yes! In fact, baking your meringue bones a day or two in advance ensures they’re completely dry and crisp. Store them in an airtight container at room temperature to maintain their texture until you’re ready to decorate your cake.
-
What if I don’t have a piping bag or nozzle?
No worries! You can use a plastic sandwich bag and snip off a tiny corner to pipe your bones. The key is making sure the opening is small enough to get those neat, bone-shaped lines.
-
Can I use homemade red velvet cake instead of store-bought?
Absolutely! Homemade red velvet works wonderfully — just make sure your cakes are firm enough to handle the bones being attached. I recommend chilling the cake before decorating for the best results.
-
How do I fix meringue if it starts to weep or become sticky?
This usually happens if the sugar isn’t fully dissolved or humidity is high. Make sure to add sugar slowly and bake your bones in a low, dry oven. If sticky, pop them back in the oven at low heat for a bit longer to dry out.
Final Thoughts
I absolutely love how this Halloween Bone Cake Recipe brings a little magic and creativity to the kitchen. It’s not just a cake; it’s a conversation starter, a bit of fun crafting, and a delicious treat all in one. When I first tried piping those meringue bones, I was hooked—there’s something so satisfying about turning simple ingredients into spooky art. Trust me, whether you’re baking for family, friends, or that Halloween party crowd, this recipe will have everyone impressed and asking for seconds. So grab your whisk, preheat the oven, and let’s make some bones!
Print
Halloween Bone Cake Recipe
- Prep Time: 20 minutes
- Cook Time: 45 minutes
- Total Time: 1 hour 5 minutes
- Yield: Serves 20
- Category: Dessert
- Method: Baking
- Cuisine: British
Description
Create a spooky Halloween bone cake centerpiece perfect for festive parties. Two red velvet cakes are stacked and decorated with homemade meringue bones piped and baked to crisp perfection, then attached with simple icing for a striking Halloween effect.
Ingredients
Meringue Bones
- 1 large egg white
- 70g caster sugar
- ½ tsp vanilla extract
Icing
- 50g icing sugar, sifted
- ½-1 tsp cold water
Cake
- 1 Tesco Finest red velvet cake (serves 6)
- 1 Tesco Finest red velvet cake (serves 14)
Instructions
- Whisk to stiff peaks: Preheat your oven to gas mark ½, 130°C, fan 110°C, and line two large baking trays with nonstick baking paper. In a large, clean, non-plastic bowl, place 1 large egg white and use an electric whisk starting at low speed, gradually increasing to high. Whisk for about 3 minutes or until the egg white forms stiff peaks.
- Mix in the sugar slowly: Gradually add 70g caster sugar, one tablespoon at a time, whisking thoroughly between additions to ensure a smooth and glossy meringue. Avoid adding sugar too quickly to prevent collapse. Whisk in ½ tsp vanilla extract, then transfer the meringue into a piping bag fitted with a 3mm round nozzle.
- Pipe meringue bones: Pipe bone shapes onto the lined trays—6cm long and 5mm thick on one tray, and shorter 4cm bones on the other. To form each bone, pipe a heart shape, then extend a line ending with another heart to mimic a bone shape. You should get approximately 50 bones in total. Bake these in the preheated oven for 45 minutes, then remove and allow them to cool completely.
- Make the icing: Place the smaller red velvet cake (serves 6) on top of the larger one (serves 14) to create a tiered effect. Mix 50g sifted icing sugar with ½ to 1 teaspoon of cold water to form a thick but slightly runny icing that is strong enough to hold decorations but easy to pipe. Spoon this icing into a piping bag fitted with a 3mm nozzle.
- Decorate the cake: Once the meringue bones have cooled, pipe a small amount of icing onto the back of a larger bone and press it gently onto the side of the larger cake tier. Next to it, stick a smaller bone. Continue around the cake, alternating between large and small bones until the entire lower tier is covered.
- Fill in the gaps: Repeat the decoration process with the top tier, filling any spaces with smaller bones or broken meringue pieces to create a cohesive, full look.
- Finish with crossed bones on top: Complete your spooky cake by arranging crossed meringue bones decoratively on the top of the cake tiers for a dramatic Halloween effect.
Notes
- Use a clean, non-plastic bowl for whipping egg whites to ensure maximum volume.
- Add sugar slowly to prevent the meringue from collapsing.
- Allow meringue bones to cool fully before attaching to avoid melting.
- Adjust icing thickness as needed to ensure it holds the meringue bones without dripping.
- Store any leftover cake in an airtight container to keep fresh.
Nutrition
- Serving Size: 1 slice (approx. 1/20th of cake)
- Calories: 320 kcal
- Sugar: 30 g
- Sodium: 120 mg
- Fat: 15 g
- Saturated Fat: 6 g
- Unsaturated Fat: 7 g
- Trans Fat: 0 g
- Carbohydrates: 40 g
- Fiber: 1 g
- Protein: 4 g
- Cholesterol: 35 mg


