
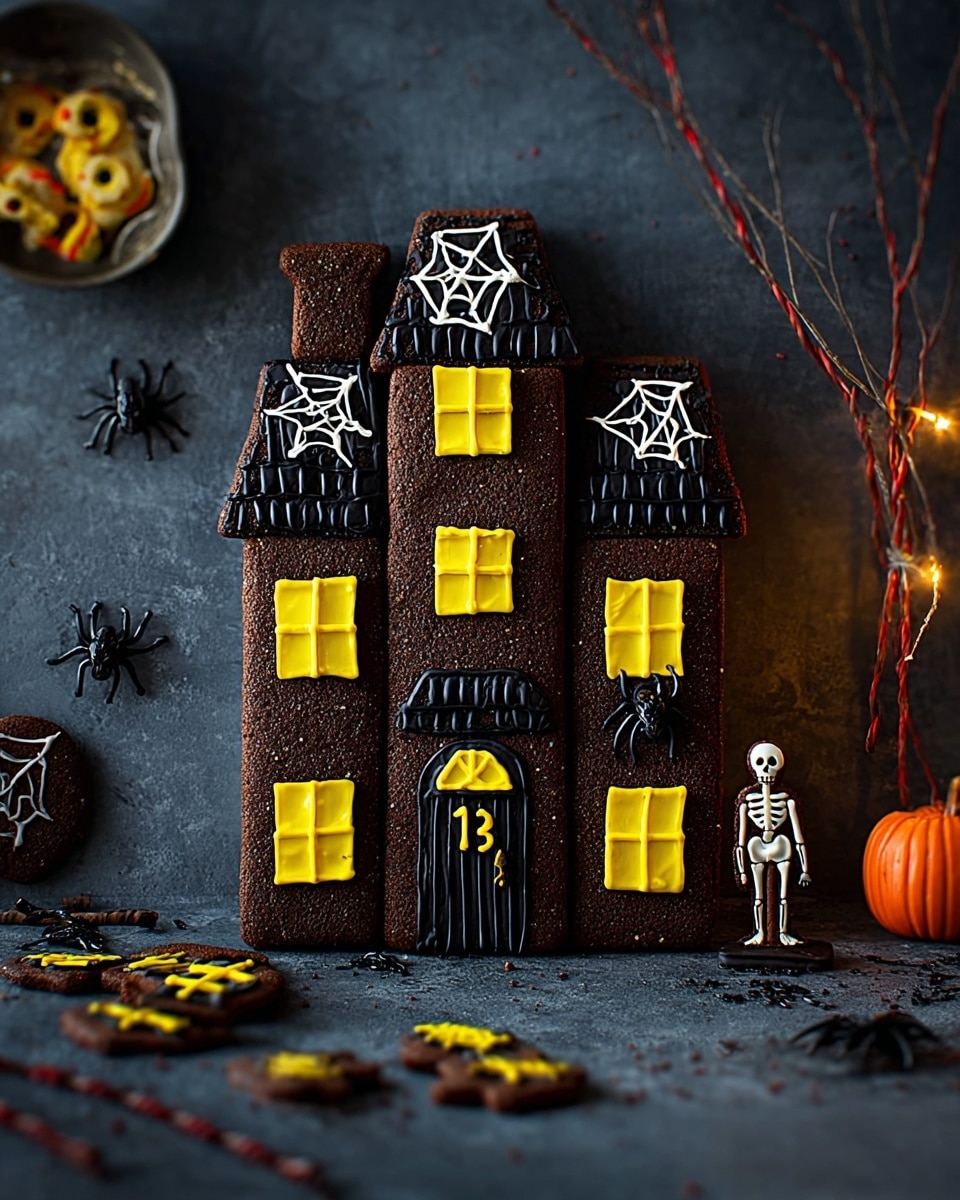
If you’re searching for a spooky, fun, and utterly delicious Halloween treat, you’ve come to the right place! I’m so excited to share this Halloween Brownie House Cake Recipe with you because it’s not only a crowd-pleaser but also such a joy to make. Imagine a rich, fudgy brownie sculpted into a haunted house, decorated with creepy-cute details that’ll have everyone talking. Whether you’re baking for a party or just want something festive for your family, this chocolatey masterpiece is totally worth it. Stick with me, and I’ll walk you through every step to help you create your own edible Halloween hideaway!
Why You’ll Love This Recipe
- Rich and Fudgy: The brownies are perfectly moist with deep chocolate flavor, which means the “house” tastes as good as it looks.
- Fun to Decorate: You get to get creative with fondant, writing icing, and candy for that spooky-cute vibe—making it a great family activity.
- Impressive Yet Easy: The shaping and assembling might seem fancy, but I’ve broken down every step so you can do it stress-free.
- Make Ahead Friendly: You can bake the brownie base in advance and even freeze it undecorated, saving time on the big day.

Ingredients You’ll Need
These ingredients work together beautifully to create a dense, chocolatey base that’s perfect for sculpting your Halloween house. Before you start, make sure to pick good-quality dark chocolate and fresh eggs for best results. I like to have everything prepped and ready, so decorating feels like the fun part—not a rush.
- Unsalted Butter: Melting it with chocolate helps create a silky batter.
- Dark Chocolate (54% cocoa solids): Adds deep chocolate flavor without bitterness.
- Large Eggs: Help give the brownie structure and richness.
- Caster Sugar: Dissolves easily, giving the brownies a tender crumb.
- Vanilla Extract: Just a touch to round out the chocolate.
- Plain Flour: Keeps the brownies firm enough to cut shapes.
- Salt: Balances the sweetness and enhances flavor.
- Chocolate Flavour Frosting: For icing the house and acting as glue.
- Matchmakers: These long chocolate sticks make perfect “roof tiles” and architectural details.
- Yellow Ready-to-Roll Fondant Icing: Cut out for spooky glowing windows.
- Biscuits (Nice and jam sandwich cream): The base for windows and door details.
- White and Black Fondant Icing: For ghosts, spiders, and striking accents.
- White and Yellow Coloured Writing Icing Pens: Ideal for drawing cobwebs, spider legs, and fun details.
- Purple Smarties: Mini “mini spiders” adding pops of color.
Variations
One of the best things about this Halloween Brownie House Cake Recipe is how easy it is to tweak to your liking. I like to play around with decorations or swap out candies depending on what my family loves or what I have on hand—feel free to get creative!
- Gluten-Free Version: Substitute plain flour with a gluten-free blend and double-check that your decorations are GF-friendly. I’ve done this for friends, and it still held together beautifully.
- Vegan Adaptation: Use vegan butter, a flax egg replacement, and dairy-free chocolate to make it plant-based. I recommend chilling the batter a bit longer before baking for the best texture.
- Decoration Swaps: Instead of Matchmakers, you can use pretzel sticks or candy canes for “roof tiles”—just watch out for melting if it’s warm where you live.
- Flavor Boosters: Add a teaspoon of cinnamon or a splash of espresso powder to the batter for a subtle twist. My family loves the hint of warmth it adds.
How to Make Halloween Brownie House Cake Recipe
Step 1: Bake Your Brownie Base
Preheat your oven to 180°C (350°F). Line a 33 x 23 cm baking tin with nonstick paper—that step’s key so your brownie comes out of the pan easily. Melt the butter and dark chocolate together over a low heat, stirring gently until smooth and glossy. Set this aside to cool for about 5 minutes. Meanwhile, whisk your eggs, sugar, and vanilla for about a minute until just combined—you don’t want to overbeat. Stir the cooled chocolate mixture into the egg mixture, then fold in the flour and salt just until there are no streaks left. Pour the batter into your tin and bake for 30 to 35 minutes. You’re looking for a pale brown, slightly dry top and a centre that doesn’t wobble when you jiggle the pan. Let it cool completely—this is crucial before you start cutting.
Step 2: Cut Out the House Shape and Turrets
This is the fun sculpting part and where your brownie transforms into a haunted house! Place the brownie with a shorter edge facing you. From the top-left corner, cut out a vertical rectangular strip 4cm wide and 16cm long—then slice that piece in half to get two 8cm lengths. Cut those diagonally in half to form triangular turrets and set aside. Next, cut another 4 x 18 cm rectangle alongside the first strip to be the roof area. Piece the turret triangles together to form your little towers and arrange them on top of the brownie base. Trust me, the shapes sound tricky but once you start cutting it clicks.
Step 3: Ice the House and Add the Roof Tiles
Using a palette knife, spread a thin layer of chocolate frosting all over your brownie to act like “glue” and a smooth surface for decorations. Cover the right turret roof with full-length Matchmakers, and on the left one, use halved Matchmakers. For the lower roof indentation, repeat with halved Matchmakers, and for the middle roof area, use smaller chopped Matchmakers to cover halfway across, creating that layered tiled look. Save one full-length Matchmaker to place between the turrets for a neat dividing ridge. This step really brings the house to life with texture and shine.
Step 4: Make the Door, Windows, and Ghost Decorations
For the door, cut a Matchmaker to 7.5cm and arrange 3 more Matchmakers on each side, trimming their sides at an angle to form a spooky arched door. Press gently onto the brownie. Roll out the yellow fondant to about 2mm thick and cut to fit your biscuits, then attach it with a dab of water to mimic glowing window panes. Roll white fondant icing to 2mm thickness and cut out a ghost shape (about 3 x 6 cm), moisten it slightly, and fix it onto one of the windows. Use black fondant rolled to 3mm thick to cut thin strips for windowpane details, sticking them over the yellow fondant. For a creepy spider, shape the black fondant into a body and legs, then attach it to a window using a little water. Use leftover icing to make tiny door handles and eyes. This part is where your creativity shines—I love how each house gets its own personality here.
Step 5: Create Cobwebs and Mini Spiders
Use white writing icing to draw delicate spider eyes and cobwebs across the windows and roofs—don’t worry if your first try isn’t perfect; it gets easier! Stick purple Smarties randomly to represent mini spiders, then with yellow writing icing, draw spider legs and eyes on the Smarties. Add a fun number plate to the door for a quirky finish. This last detail is the cherry on top for spooky appeal. Your Halloween brownie house will definitely become the star of any dessert table.
Pro Tips for Making Halloween Brownie House Cake Recipe
- Cool Completely Before Cutting: This prevents cracks and crumbling—trust me, it makes shaping the house way easier.
- Use a Sharp Knife for Clean Edges: I like to warm mine slightly under hot water and dry it before slicing for precise cuts.
- Work on a Sturdy Board: Placing your brownie house on a thick board or cake board gives you stability to move and decorate easily.
- Don’t Overdo the Frosting Layer: A thin spread works best—it helps stick decorations without hiding the brownie’s rich texture.
How to Serve Halloween Brownie House Cake Recipe
Garnishes
I love garnishing this brownie house with a few extra Halloween candies around the base for a festive vibe—think candy corn, gummy spiders, or edible glitter for a magical touch. Adding some chocolate shavings or colored sugar sprinkles on top gives the roof that eerie sparkle, which always impresses guests, especially kids.
Side Dishes
If you’re serving this at a party, I recommend pairing the Halloween Brownie House Cake Recipe with simple vanilla ice cream or whipped cream to balance the chocolate intensity. A cup of spiced hot chocolate or pumpkin latte nearby also makes for a cozy, themed combo that your guests will adore.
Creative Ways to Present
One year, I placed the brownie house on a “graveyard” board made of crushed Oreos and green-tinted coconut flakes acting as moss. Little candy tombstones and skeleton figurines surrounded it, turning dessert into a theatrical centerpiece. You could also place it on a mirror tray with flickering LED tea lights for a spooky glow. Trust me, presentation adds a whole new level of excitement!
Make Ahead and Storage
Storing Leftovers
Once decorated, you can keep your Halloween Brownie House Cake Recipe in a cool, dry place for up to 5 days. I recommend covering loosely with a cake dome or large container to keep it from drying out while preserving the decorations. If it’s warm in your kitchen, the fridge is okay but bring it back to room temperature before serving so the brownie and icing soften beautifully.
Freezing
I freeze the undecorated brownie base wrapped tightly in cling film and foil. This way, I can bake ahead without worrying about the delicate decorations. When ready, just thaw overnight in the fridge before decorating. Freezing the decorated house isn’t recommended since the candy and icing can get sticky or cracked.
Reheating
If you want warmed brownie, slice individual pieces and microwave briefly for 10–15 seconds—just enough to get a slight warmth without melting your decorations. Alternatively, serve with a scoop of cold ice cream for perfect temperature contrast. I find this keeps the flavors and textures spot on.
FAQs
-
Can I make this Halloween Brownie House Cake Recipe gluten-free?
Absolutely! Swap out the plain flour with your favorite gluten-free flour blend. Just make sure that the blend you choose is suitable for baking, and you might need to adjust the baking time slightly. The texture might be a bit different, but it’ll still be delicious and hold together well.
-
How long does this brownie house stay fresh?
You can keep your decorated brownie house in a cool, dry place for up to 5 days. Make sure it’s covered to prevent the brownie from drying out and the decorations from getting dusty. If your home is especially warm, storing it in the fridge is best—just bring it back to room temperature before serving.
-
Can I prepare the decorations ahead of time?
Yes! Fondant shapes and some icing details can be made a day or two ahead and stored in an airtight container. This really reduces stress on the day you assemble your Halloween Brownie House Cake Recipe.
-
What if I don’t have Matchmakers for the roof?
No worries! You can use thin pretzel sticks, candy canes cut to size, or even chocolate fingers broken up. Just pick something that sticks well to the frosting and resembles roof tiles for the best effect.
-
Can this recipe be made vegan?
Definitely possible with some adjustments: swap butter for vegan margarine, use flax eggs or another egg substitute, and pick vegan dark chocolate. I recommend chilling the batter a bit longer before baking for a dense but fudgy texture.
Final Thoughts
This Halloween Brownie House Cake Recipe holds a special place in my heart because it turns baking into an event full of laughter, creativity, and togetherness. I love how it brings out the kid in everyone, with spooky decorations and a chocolatey home that’s as fun to build as it is to eat. If you want to impress your friends or delight your family this autumn, take the plunge with this recipe—you won’t regret a single bite or moment spent making it!
Print
Halloween Brownie House Cake Recipe
- Prep Time: 30 mins
- Cook Time: 35 mins
- Total Time: 1 hr 50 mins
- Yield: 24 servings
- Category: Dessert
- Method: Baking
- Cuisine: Western
Description
This Halloween brownie cake is a fun and festive treat perfect for spooky celebrations. Rich dark chocolate brownies are baked into a giant sheet cake, then creatively cut and decorated to resemble a haunted house complete with turrets, a spider, cobwebs, and creepy details made from colorful fondant icing, Matchmakers, and Smarties. The moist, fudgy brownies are topped with chocolate frosting and transformed into an eye-catching centerpiece that serves 24. It’s an ideal dessert to impress guests and delight kids during Halloween festivities.
Ingredients
For the Brownie
- 400g unsalted butter, cubed
- 400g dark chocolate (54% cocoa solids), broken into pieces
- 6 large eggs
- 500g caster sugar
- 1 tbsp vanilla extract
- 250g plain flour
- 1 tsp salt
To Decorate
- 300g chocolate flavour frosting
- 2 x 120g packs Matchmakers
- 100g yellow ready-to-roll fondant icing
- 5 biscuits (4 Nice and 1 halved jam sandwich cream)
- 20g white fondant icing
- 50g black fondant icing
- White and yellow coloured writing icing pens
- 3 purple Smarties
Instructions
- Preheat and Prepare: Preheat your oven to gas mark 4 (180°C) or 160°C with a fan setting. Line a 33 x 23 cm baking tin with nonstick baking paper so that the brownie doesn’t stick and bakes evenly.
- Melt Butter and Chocolate: Place the cubed butter and broken dark chocolate pieces in a heavy-based saucepan over low heat. Stir occasionally until the mixture is smooth and glossy. Remove from heat and allow to cool for 5 minutes.
- Mix Wet Ingredients: In a large bowl, whisk the eggs, caster sugar, and vanilla extract using an electric whisk for about 1 minute, until the mixture becomes pale and just combined. This will aerate the batter and help the brownies rise slightly.
- Combine Mixtures: Stir the cooled melted chocolate and butter mixture into the whisked eggs and sugar. Then gently fold in the plain flour and salt until just combined, being careful not to over-mix to maintain a fudgy texture.
- Bake the Brownie: Pour the batter into the prepared baking tin and spread evenly. Bake for 30-35 minutes until the top is pale brown and dry, and the center no longer wobbles when gently shaken. Let the brownie cool completely in the tin.
- Cut Out House Shapes and Turrets: With the brownie chilled and set, place it with a short edge facing you. Cut a vertical strip 4 x 16 cm from the top left corner, then slice this piece in half lengthwise twice diagonally to create two triangular turret shapes. Cut a second rectangle measuring 4 x 18 cm next to the first strip for additional turret structure. Arrange the triangular pieces to form turrets on top of the main brownie base.
- Ice the Brownie: Using a palette knife, spread a thin, even layer of chocolate frosting all over the brownie and turrets. This will act as the ‘glue’ for your decorative elements and add richness.
- Add Matchmakers Roofing: Cover the right roof turret entirely with full-length Matchmaker sticks, reserving one for later use. Cover the left turret with halved Matchmakers. Repeat this pattern at the lowest indentation of the brownie for the lower roof. Use smaller broken Matchmakers to cover the middle roof halfway across. Place the reserved Matchmaker stick between the turrets as a decorative separator.
- Create the Door: Cut one Matchmaker stick to 7.5 cm length and arrange it in the middle of the front of the brownie. Place three additional Matchmaker sticks on each side angled downward to form an arched door shape. Gently press them onto the frosting to adhere.
- Make the Windows: Roll out the yellow fondant icing to 2 mm thickness and cut into pieces slightly larger than your biscuits. Lightly dab water on the icing pieces and press them onto the biscuits, folding the edges to wrap the backs for a neat finish. Roll out white fondant icing to 2 mm and cut out a small ghost shape about 3 x 6 cm. Attach the ghost onto one window using a little water. Roll out half of the black fondant icing to 3 mm thickness and cut into 2 mm strips to mimic windowpane details, then glue these onto the yellow icing and press the windows onto the brownie.
- Craft the Spider and Ghost Details: Halve the remaining black fondant icing. Shape one half into an egg form to create the spider’s body. Roll the other half into a thin long sausage, cut into four equal segments to form legs, arrange legs parallel with a pinch in the middle for articulation and attach the body on top using water. Stick the spider onto a window, adding eyes drawn with white icing. Use leftover icing bits to create a door handle and ghost eyes.
- Draw Cobwebs and Final Decorations: Use white writing icing to draw spooky cobwebs on the windows and roof areas and add eyes to the spider. Attach purple Smarties where you want mini spiders and draw their legs and eyes with yellow writing icing. Add a number to the door as a fun finishing touch.
- Storage: Keep the decorated Halloween brownie cake in a cool, dry place for up to 5 days. The undecorated brownie can be frozen for longer storage.
Notes
- The brownie can be baked in advance and frozen undecorated to save time on the day of your Halloween event.
- Using low heat to melt the butter and chocolate prevents the mix from seizing or burning, which is essential for a smooth batter.
- Be careful not to overbake; the center should still be moist and just set to keep the brownie fudgy.
- Use a sharp knife for clean cuts when shaping the brownie to avoid crumbling.
- If fondant icing is not available, colored buttercream piping can be used as an alternative decoration.
- Adjust decorations and colors based on personal preference or Halloween themes.
Nutrition
- Serving Size: 1 slice (1/24th of cake)
- Calories: 350 kcal
- Sugar: 30 g
- Sodium: 150 mg
- Fat: 22 g
- Saturated Fat: 13 g
- Unsaturated Fat: 7 g
- Trans Fat: 0.2 g
- Carbohydrates: 38 g
- Fiber: 3 g
- Protein: 5 g
- Cholesterol: 110 mg
