
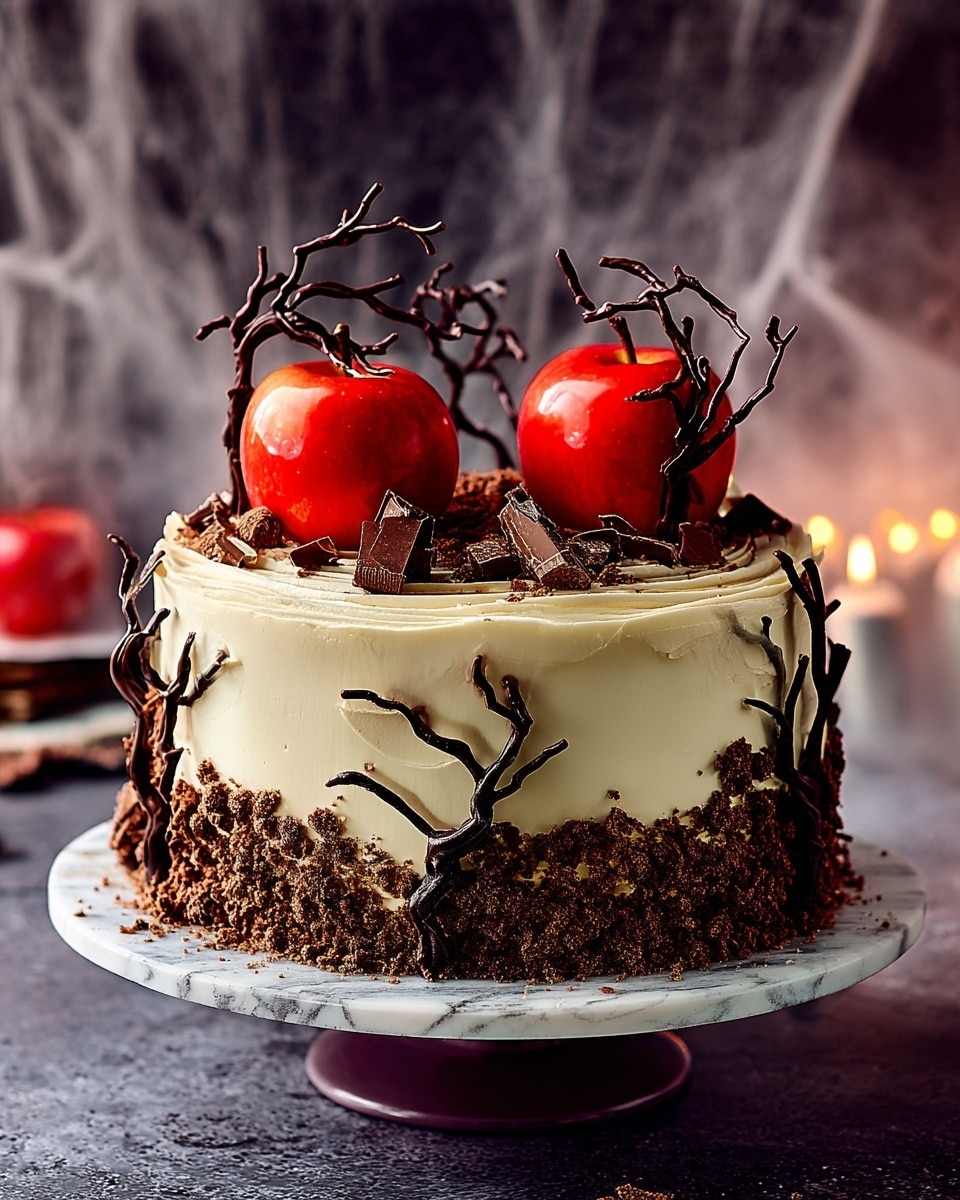
If you’re looking for a show-stopping dessert to impress your guests this spooky season, look no further than this fan-freaking-tastic Poisoned Apple Halloween Cake Recipe. It’s got that perfect mix of creepy and delicious, with moist cocoa-spiced sponge layers, that devilishly glossy toffee apple topping, and the creamiest, dreamy icing that pulls everything together beautifully. Trust me, once you make this, it’ll be your new go-to Halloween centerpiece!
Why You’ll Love This Recipe
- Ultimate Halloween Vibes: The ‘poisoned apple’ look is spooky yet elegant, perfect for any Halloween gathering.
- Moist & Flavorful Layers: The cocoa-infused sponge with a hint of buttermilk is irresistibly tender.
- Fun Toffee Apple Decoration: Making the toffee apples is a neat trick that adds a dramatic touch to the cake.
- Rich Cream Cheese Icing: Smooth and tangy, it balances the sweetness and holds everything together perfectly.

Ingredients You’ll Need
Gathering your ingredients ahead of time makes baking this Poisoned Apple Halloween Cake Recipe a breeze. Everything works harmoniously, from the velvety cocoa powder in the sponge to the fresh apples for that authentic toffee topping. When shopping, pick firm, crisp apples that’ll hold their shape well when dipped in toffee.
- Vegetable oil: Keeps the cake moist without weighing it down.
- Plain flour: The backbone of the sponge, make sure it’s fresh for best rise.
- Cocoa powder: Adds that rich, chocolatey undertone perfect for Halloween.
- Baking powder: Helps the cake rise beautifully.
- Bicarbonate of soda: Works with buttermilk to tenderize the crumb.
- Light soft brown sugar: Gives a subtle caramel depth to the cake.
- Buttermilk: Ensures a tender crumb and slight tang.
- Vanilla extract: Enhances the warm flavors of the cake.
- Red food colouring gel: For that eerie red tint inside the sponge.
- Large eggs: Bind everything and add richness.
- Red apples: Choose firm ones like Granny Smith or Braeburn for the toffee apples.
- Caster sugar: For making the glossy toffee coating.
- Lemon juice: Prevents sugar crystallization in the toffee.
- Golden syrup: Adds chewiness and shine to the toffee.
- Dark chocolate: For piping spooky chocolate trees decorating the cake.
- Bourbon creams (crushed): Adds texture and a hint of cookie flavor around the cake base.
- Salted butter (room temperature): For the luscious cream cheese icing.
- Icing sugar: Sweetens and thickens the frosting.
- Full-fat soft cheese: Balances the sweetness and adds creaminess.
Variations
I love how versatile this Poisoned Apple Halloween Cake Recipe can be — feel free to tweak it for your taste or dietary needs without losing the spooky charm. Experimenting with this recipe has been part of the fun for me, and you’ll find you can really make it your own.
- Dairy-Free/Icing Swap: I swapped the cream cheese for vegan cream cheese once, and it still came out silky and delicious – perfect if you’re avoiding dairy.
- Spice It Up: Adding a pinch of cinnamon or nutmeg to the cake batter gave it a warm fall twist that my family went crazy for.
- Alcohol Infusion: Try mixing a tablespoon of bourbon or spiced rum into the icing for adults-only parties – it adds a delightful depth.
- Chocolate Variation: Replace the cocoa powder with melted dark chocolate for an even richer cake if you’re a chocolate fanatic like me.
How to Make Poisoned Apple Halloween Cake Recipe
Step 1: Prep and Mix the Sponges
First things first, preheat your oven to 180°C (160°C fan) or gas mark 4. Grease and line two 20cm deep cake tins — this helps the cakes release cleanly after baking. Sift together your flour, cocoa powder, baking powder, and bicarbonate of soda. Stir in the brown sugar and a pinch of salt. In a separate jug, whisk the oil, buttermilk, vanilla extract, red food colouring, water, and eggs until smooth; avoid overmixing here to keep the sponge tender. Pour the wet over the dry and give it a gentle whisk until just combined. Divide the batter evenly into your tins and bake for 35 to 40 minutes — keep an eye for a clean skewer test. Let the cakes cool in the tins for 10 minutes before turning them onto a wire rack to cool completely. This is the base of your Poisoned Apple Halloween Cake Recipe magic!
Step 2: Skewer and Coat the Apples
While the cakes cool, it’s time for the fun part — making the toffee apples! Remove the stalks from your apples carefully, then insert wooden skewers where the stalk was, about halfway in so they hold steady. This took me a couple of tries to get perfect — make sure they don’t wobble when you give a gentle shake. Line a baking tray with baking paper so the apples have a safe spot to cool. This prep means the apples are ready to become your “poisoned” centerpiece.
Step 3: Make the Toffee Coating
In a saucepan, warm the caster sugar, lemon juice, and water over low heat without stirring — I’ve learned swirling gently helps prevent crystallization, which otherwise ruined one of my first attempts. Once the sugar dissolves, stir in golden syrup and turn the heat up to medium. Let the toffee bubble for about 4 to 5 minutes until it reaches 150°C or the hard crack stage. No sugar thermometer? No problem! Drop a teaspoonful into cold water — it should stiffen and snap right away. If not, let it cook a bit longer. Be patient here; the toffee is super hot and forgiving only when you’re attentive.
Step 4: Dip the Apples in Toffee
Hold the apple skewers by their ends and dip each apple in the toffee, twisting to coat fully. I found tilting the pan slightly really helps cover the whole surface without thick clumps. Let excess drip back into the pan, then place the apple on your lined tray. The trick I learned? Pull the skewer out carefully as soon as the toffee sets but is still slightly soft — it comes out clean without cracking the coating. If the toffee starts setting while you work, just warm it up gently again.
Step 5: Prepare the Cream Cheese Icing
For the icing, whip the butter and icing sugar until light and fluffy — I love doing this by hand because it feels so satisfying watching it puff up. Add the soft cheese tablespoon by tablespoon, beating well after each addition to avoid lumps, then stir in the vanilla extract. The result is a luscious, creamy frosting that’s tangy and sweet — perfect to cut through all that toffee sweetness.
Step 6: Layer and Ice the Cake
Slice each cooled sponge horizontally to create four equal layers — here’s a tip: I use a serrated bread knife and gently score a shallow guideline all around each sponge to keep the layers even. Spread a few tablespoons of icing between each layer, then slather the leftover frosting on top and around the sides. For that professional touch, use a palette knife or icing scraper to smooth the surface and create gentle swirls by swirling from the base upwards on the sides, and from the center out on top. Then give it a chill for an hour to set perfectly.
Step 7: Pipe Chocolate Trees
On lined baking paper, pipe spooky chocolate trees to decorate — I drew a simple template underneath the paper to guide my shapes. Melt the dark chocolate gently in a bain-marie and transfer it into a piping or freezer bag, snipping off a tiny tip. The chocolate should be just warm enough to pipe smoothly but not too hot or it won’t hold shape. Chill the piped trees for 15 minutes or until firm. This step adds that eerie forest vibe to your Poisoned Apple Halloween Cake Recipe.
Step 8: Assemble and Decorate
Sprinkle some of the crushed bourbon creams in the center of the cake, arrange your stunning toffee apples on top, pressing lightly to set them into the icing. Add more crushed biscuit crumbs around the apple edges and press the rest around the base in a wavy pattern — it creates a “poisoned ground” effect. Finally, stick your chocolate trees on the sides and around the apples, pressing gently so they stay in place. Then, slice and get ready for those wide eyes and “wow”s!
Pro Tips for Making Poisoned Apple Halloween Cake Recipe
- Use Fresh Ingredients: I always check my baking powder and cocoa powder freshness for the fluffiest, richest sponge.
- Don’t Overmix the Batter: Stir until just combined to keep the cake light and airy.
- Swirl, Don’t Stir the Toffee: Avoid stirring the sugar mix to prevent grainy toffee – swirling keeps it smooth.
- Chill Your Icing Well: Letting the cake chill after icing helps the toffee apples and decorations stay secure.
How to Serve Poisoned Apple Halloween Cake Recipe
Garnishes
I love garnishing this cake with a few extra crushed bourbon cream biscuits around the edges and a light dusting of cocoa powder—it adds a little mysterious dirt-like effect around the “poisoned” apples. Sometimes, I throw in a sprig of fresh rosemary or thyme; it not only looks like twisted vines but gives a subtle herbal aroma that contrasts nicely with the sweetness.
Side Dishes
Serve up this Poisoned Apple Halloween Cake alongside a warm cup of spiced apple cider or your favorite black tea to balance out the richness. For a party, a scoop of vanilla or cinnamon ice cream also pairs beautifully, making every bite a little more decadent.
Creative Ways to Present
Once at a Halloween party, I presented this cake on a black slate platter surrounded by fake cobwebs and little plastic spiders—it was a hit! You can also place the toffee apples on skewers standing upright in the cake for a dramatic “poison apple” display or scatter edible glitter around the base for an eerie shimmer.
Make Ahead and Storage
Storing Leftovers
After the party, wrap leftover slices tightly in plastic wrap or store in an airtight container and keep them in the fridge. The icing stays firm, and the toffee apples soften a bit but still taste fantastic for up to 3 days.
Freezing
If you want to freeze your cake, do it before decorating with the toffee apples and chocolate trees. Wrap the undecorated sponge layers tightly and freeze for up to 3 months. When ready, thaw overnight in the fridge, then assemble and decorate as usual for best results.
Reheating
I don’t recommend reheating the whole cake, but if you want to enjoy leftovers at room temperature, just take slices out 30 minutes before serving so the frosting softens slightly. If you’re feeling adventurous, a few seconds in the microwave (about 10 seconds) can warm it gently, but watch it closely to avoid melting the icing.
FAQs
-
Can I make the Poisoned Apple Halloween Cake Recipe in advance?
Absolutely! The sponge layers can be baked up to two days ahead, and the cake can be assembled and decorated the day before your event. Just keep it covered in the fridge and take it out 30 minutes before serving.
-
How do I know when the toffee for the apples is ready?
The toffee should reach 150°C on a sugar thermometer (hard crack stage) or pass the cold water test: drop a spoonful of hot toffee into cold water and see if it hardens instantly and breaks when bent.
-
Can I use different types of apples for the toffee apples?
Yes! Firm, tart apples like Granny Smith or Braeburn are ideal since they hold up well when dipped in hot toffee and balance the sweetness nicely.
-
What if my toffee becomes grainy?
This usually happens if you stir the sugar too much or if sugar crystals form on the pan edges. Swirling gently and adding lemon juice helps prevent this, and reheating gently can sometimes fix the texture.
-
Can I make the chocolate trees ahead of time?
Definitely! Make the chocolate trees a day or two ahead and store them in an airtight container in a cool place until you’re ready to decorate your cake.
Final Thoughts
This Poisoned Apple Halloween Cake Recipe holds a special place in my heart. It’s that perfect blend of fun, spooky presentation, and irresistible taste that always brings smiles and oohs around the table. Whether you’re baking with kids or impressing grown-up friends, I promise you’ll enjoy every step, every bite. So go on, give it a try — I’m cheering you on from my kitchen, and I can’t wait to hear about your own Poisoned Apple Halloween Cake adventures!
Print
Poisoned Apple Halloween Cake Recipe
- Prep Time: 30 mins
- Cook Time: 40 mins
- Total Time: 1 hr 40 mins plus chilling
- Yield: Serves 18
- Category: Baking
- Method: Baking
- Cuisine: British
Description
This ‘poisoned’ apple Halloween cake is a spooky and delicious treat perfect for a Halloween party. Featuring moist chocolate sponge layers dyed with red food coloring, layered and covered with creamy soft cheese icing, and topped with shiny toffee apples, crushed bourbon creams, and dark chocolate trees, this cake combines rich flavors and festive decorations for a showstopping centerpiece.
Ingredients
Cake
- 200ml vegetable oil, plus extra for greasing
- 350g plain flour
- 2 tbsp cocoa powder
- 2 tsp baking powder
- 1 tsp bicarbonate of soda
- 300g light soft brown sugar
- 284ml pot buttermilk
- 1 tbsp vanilla extract
- 25ml (5 tsp) red food colouring gel (e.g., Dr. Oetker)
- 3 large eggs
For the Decoration
- 3 red apples
- 200g caster sugar
- ½ tsp lemon juice
- 2 tbsp golden syrup
- 75g dark chocolate
- 50g bourbon creams, finely crushed
Icing
- 150g salted butter, at room temperature
- 400g icing sugar
- 200g tub full-fat soft cheese
- 1 tsp vanilla extract
Instructions
- Preheat and prepare tins. Preheat the oven to gas mark 4 (180°C, fan 160°C). Grease and line two deep 20cm cake tins with baking paper on base and sides to prevent sticking.
- Mix dry ingredients. Sift together plain flour, cocoa powder, baking powder, and bicarbonate of soda into a large mixing bowl. Stir in the light soft brown sugar and 1 tsp fine salt, mixing well to combine.
- Prepare wet ingredients. In a large jug, combine vegetable oil, buttermilk, vanilla extract, 4 tsp red food colouring, and 50ml water. Add the eggs and whisk the mixture until smooth and well combined.
- Combine wet and dry. Pour the wet ingredients over the dry mixture and whisk gently until just combined, being careful not to overmix to maintain a tender crumb.
- Divide and bake. Evenly divide the batter between the two prepared cake tins. Bake in the preheated oven for 35-40 minutes, or until the cake has risen and a skewer inserted into the center comes out clean.
- Cool cakes. Allow the cakes to cool in the tins for 10 minutes before turning out onto wire racks to cool completely, ensuring even layers and easier icing.
- Prepare apples for toffee. Remove stalks from the apples and firmly push wooden skewers halfway into their cores. Ensure the skewers are secure to hold the apples during dipping. Line a baking tray with baking paper for the toffee apples.
- Make the toffee. In a medium-large saucepan, combine caster sugar, lemon juice, and 50ml water. Warm over low heat for 3-4 minutes until sugar dissolves, swirling the pan gently but not stirring. Then, add golden syrup, increase heat to medium, and let bubble gently for 4-5 minutes until the toffee reaches 150°C on a sugar thermometer or reaches ‘hard crack’ stage.
- Test the toffee. To test without a thermometer, drop a teaspoon of toffee into cold water; it should harden and become brittle immediately. If not, cook a little longer and retest.
- Dip apples in toffee. Holding the skewer ends, dip each apple into the hot toffee, turning to coat fully. Allow excess to drip off, then place on lined baking tray. Once toffee has set but remains slightly soft, gently wiggle and twist the skewer to remove it without cracking the coating. Reheat toffee gently if it starts setting.
- Prepare icing. In a bowl, beat salted butter and icing sugar until light and fluffy. Gradually beat in the full-fat soft cheese spoonful by spoonful, then add vanilla extract, mixing until smooth and combined.
- Slice cake layers. Using a serrated bread knife, carefully slice each cooled sponge horizontally to create four evenly sized layers. Use a small guideline about 0.5cm deep to assist in even cutting.
- Assemble cake layers. Sandwich the sponge layers together by spreading a few tablespoons of icing between each. Then spread the remaining icing thickly over the entire cake, smoothing the top and sides with a palette knife or icing scraper. Create swirls and slight ridges on the icing sides and top for texture. Chill the assembled cake for 1 hour to set the icing.
- Pipe chocolate trees. Line a baking tray with nonstick paper. Melt dark chocolate in a heatproof bowl over simmering water, then transfer to a piping bag or freezer bag with the tip snipped off. Pipe 15-20 chocolate trees of various sizes onto the paper, using a drawn template underneath to guide shapes. Chill for 15 minutes or until chocolate is firm.
- Decorate cake. Spoon crushed bourbon creams into the cake center. Arrange the toffee apples on top, pressing them gently into the icing to secure. Sprinkle more crushed biscuits around the apple edges and press the rest around the cake base creating a wavy pattern. Attach chocolate trees around the cake sides and among the toffee apples by pressing gently into the icing and sponge to secure. Your spooky poisoned apple Halloween cake is now ready to slice and serve.
Notes
- Freeze the undecorated cake layers separately; use within 3 months for best flavor and texture.
- Do not stir the sugar mixture while making toffee to prevent graininess; swirl gently instead.
- Use a sugar thermometer for best accuracy with toffee, aiming for 150°C (hard crack stage).
- Be careful when handling hot toffee to avoid burns.
- Ensure cake layers are cooled completely before slicing and icing to prevent melting.
- Chill the decorated cake to set the icing and decorations before serving.
Nutrition
- Serving Size: 1 slice (1/18th of cake)
- Calories: 320 kcal
- Sugar: 28 g
- Sodium: 150 mg
- Fat: 18 g
- Saturated Fat: 7 g
- Unsaturated Fat: 8 g
- Trans Fat: 0 g
- Carbohydrates: 36 g
- Fiber: 2 g
- Protein: 4 g
- Cholesterol: 55 mg


