
If you’re looking to wow your friends and family with something fun, colorful, and downright adorable, you’ll absolutely want to try this Monster Mouthful Cupcakes Recipe. I love this because it’s not only beginner-friendly, but it’s also a ton of creative fun to decorate. You’ll find that each cupcake turns into a little monster with its own personality, perfect for parties or a quirky treat any day!
Why You’ll Love This Recipe
- Creative Decorating: The icing stars and candy eyeballs let you craft whimsical monsters with just a few simple tools.
- Beginner Friendly: Even if you’re new to baking, this cupcake recipe is straightforward with easy frosting techniques.
- Perfect for All Occasions: Great for kids’ parties, Halloween, or whenever you want a playful dessert.
- Flavor Packed: The cupcakes taste as good as they look, no compromises here!

Ingredients You’ll Need
Picking the right ingredients here is half the fun. I usually go with a tried-and-true cupcake mix to keep it simple, but I’m sharing tips for all the decorating supplies too — it’s those colorful icing pouches and candy eyeballs that really bring these Monster Mouthful Cupcakes Recipe to life.
- Favorite Cupcake Recipe Mix: Feel free to use your go-to mix or homemade batter; the fluffiness makes all the difference.
- Large Candy Eyeballs: These instantly create character, and I love the impact they have on each monster’s face.
- Black Icing Pouch: Essential for piping mouths and fine details like lashes.
- Blue Icing Pouch: Great for round tip decorations, adding playful textures.
- Red Icing Pouch: Perfect for zigzag lines that give monsters that extra quirky charm.
- Yellow Icing Pouch: Use for bold triangular shapes around the mouth.
- Orange Icing Pouch: (When in stock) Adds warm, star-shaped texture to your orange monsters.
- Green Icing Pouch: (When in stock) Creates spiky star designs for green monsters.
Variations
One of the things I love about the Monster Mouthful Cupcakes Recipe is how easy it is to put your own spin on it. Whether you want to play with different icing colors or make the monsters kid-friendly with fun flavors, there’s plenty of room for customization!
- Dairy-Free Version: I’ve swapped regular buttercream for coconut oil-based frosting, and it still pipes beautifully!
- Fruit-Flavored Icing: Adding a bit of fresh raspberry puree to the red icing pouch gives a zing that my family went crazy for.
- Mini Monsters: I once made half-sized cupcakes and found the decorating just as fun but perfect for smaller bites.
- Gluten-Free Batter: Using a gluten-free cupcake mix kept the taste just as delightful without any texture changes.
How to Make Monster Mouthful Cupcakes Recipe
Step 1: Bake Your Cupcakes to Perfection
Start by baking your cupcakes according to your favorite recipe or package instructions. I like to line my tins with colorful paper liners for an extra pop. Make sure they’re completely cool before you move on to decorating — piping frosting on warm cupcakes is a no-go, trust me! Cooling usually takes about 30 to 40 minutes. Patience here definitely pays off.
Step 2: Pipe the Monster Mouth with Black Icing
Using the black icing pouch, pipe a simple mouth shape on each cupcake. You can get as creative as you want here: a wide grin, a toothy smirk, or a scary frown. After piping, smooth the shape gently with a spatula to give it that perfect bite-ready look. This step really sets the stage for your monster’s personality!
Step 3: Frost Each Monster According to Its Color and Style
This is where the fun multiplication begins! Grab the icing pouch matching your monster’s color and the correct tip — star or round — and start decorating:
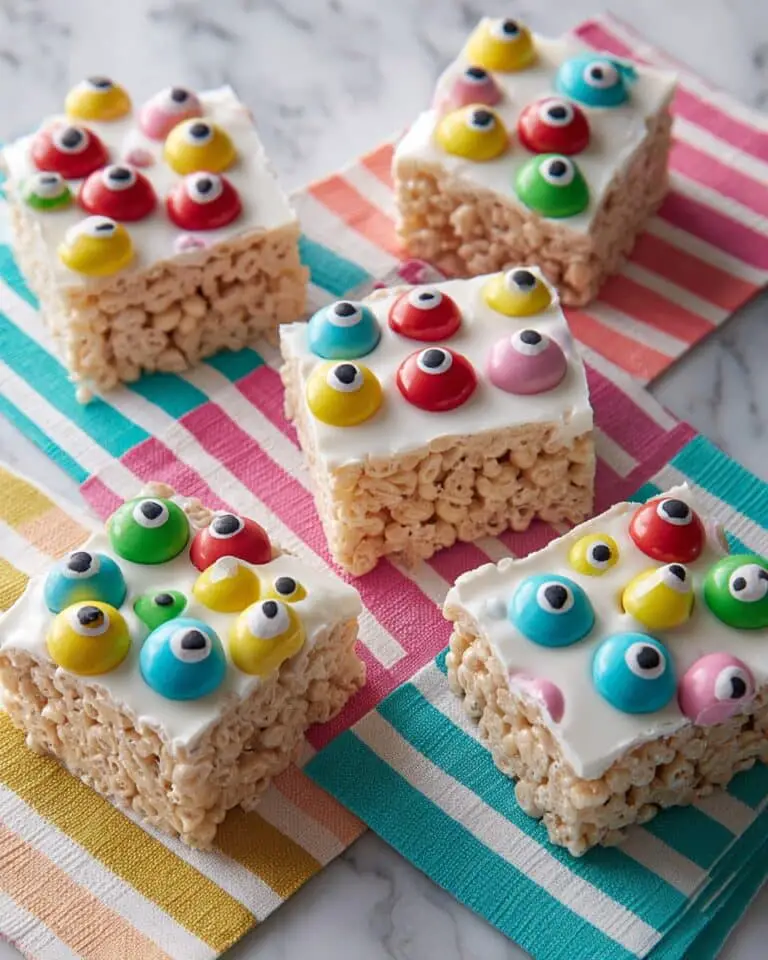
- Green Monster: Use the star tip to pipe stars close together, pulling the tip straight away with each star to create a textured surface. Finish by placing one candy eyeball right on top.
- Orange Monster: Same star tip technique as green, but pipe the orange stars dense enough so your cupcake looks like it’s covered in fiery spikes. Two candy eyeballs on top make it really pop.
- Blue Monster: Switch to the round tip and pipe overlapping squiggly loops for a fun, furry texture. Add three candy eyeballs clustered on top, then use black icing to add lashes to the center eye for character.
- Red Monster: Using the round tip, pipe zigzag lines around the mouth opening for a wild, uneven look. Two candy eyeballs spaced apart finish this intimidating monster. Don’t forget to add those pull-out lash lines with black icing on each eyeball.
- Yellow Monster: Pipe overlapping triangle shapes around the mouth with the round tip — yes, triangles! They create almost a spiky crown around your monster’s grin. Two candy eyeballs and matching black lash lines complete the look.
Pro Tips for Making Monster Mouthful Cupcakes Recipe
- Let Your Cupcakes Cool Completely: Warm cupcakes will melt your frosting and make piping tricky — I always set a timer to remind myself.
- Practice Piping on Parchment: Before decorating the cupcakes, I test my icing strokes on parchment paper to get a feel for pressure and speed.
- Use a Steady Hand for Eyeball Placement: Tweezers or a small spatula help position the candy eyeballs perfectly without smudging your designs.
- Keep Icing Bags Cool: I keep my icing bags in the fridge until I’m ready, which helps the icing hold its shape longer while piping.
How to Serve Monster Mouthful Cupcakes Recipe

Garnishes
I like to keep garnishes simple since the cupcakes themselves are so colorful and full of character. Sometimes I add fun Halloween-themed sprinkles or edible glitter dust if it’s for a party, but the candy eyeballs usually do all the work. They give each cupcake that wild monster vibe without overwhelming the design.
Side Dishes
Since these cupcakes are quite the showstopper, I usually pair them with light and fresh sides like fruit skewers or a colorful veggie tray. If it’s a kid’s party, a simple glass of milk or a fruity punch pairs perfectly and keeps the balance just right.
Creative Ways to Present
One of my favorite presentation tricks for the Monster Mouthful Cupcakes Recipe is to arrange them on a dark serving tray layered with shredded Halloween grass (or colored tissue paper) — it really makes the colors pop and adds a playful, spooky vibe. For birthdays, I’ve placed each cupcake on mini cake stands topped with decorative monster figurines for an unforgettable centerpiece.
Make Ahead and Storage
Storing Leftovers
I store leftover Monster Mouthful Cupcakes in an airtight container in the fridge to keep the frosting fresh and the candy eyeballs intact. They stay good for 2-3 days, but honestly, they rarely last that long in my house because they’re so irresistible!
Freezing
If you want to freeze these cupcakes, I recommend doing so before decorating. Bake and cool the cupcakes completely, freeze them wrapped individually, then thaw and decorate fresh when you’re ready. Freezing after frosting often leads to texture changes, which I try to avoid based on experience.
Reheating
These cupcakes are best enjoyed at room temperature – so if you’ve kept them in the fridge, I pull them out about 30 minutes before serving. I don’t recommend microwaving as it can melt the frosting and candy decorations.
FAQs
-
Can I use homemade cupcake batter for the Monster Mouthful Cupcakes Recipe?
Absolutely! While the recipe mentions using your favorite cupcake mix, a homemade batter works perfectly. Just make sure your cupcakes are fully cooled before icing so your decorations don’t melt or slide off.
-
What can I use if some of the colored icing pouches are out of stock?
Don’t worry! You can easily swap out the missing colors with other icing colors you have on hand or tint plain buttercream with gel food coloring to match. The decorating techniques stay the same, so you won’t miss out on the fun.
-
How do I prevent the candy eyeballs from sliding off the frosting?
Make sure your frosting is cool and firm before placing the candies. Press the eyeballs gently into the frosting so they stick without tipping over. If needed, refrigerate the cupcakes for 10–15 minutes after decorating to help set everything in place.
-
What’s the best icing tip for piping stars?
I recommend a star tip with medium size — it gives you great control to pipe tight stars without gaps. I like to practice the motion a few times on parchment paper before frosting the cupcakes to get the spacing just right.
-
Can I make Monster Mouthful Cupcakes vegan?
You sure can! Use a vegan cupcake recipe and swap buttercream for a plant-based frosting. Just be mindful to check that candy eyeballs and decorations are vegan-friendly as well.
Final Thoughts
I’ve gotta say, this Monster Mouthful Cupcakes Recipe holds a special place in my baking arsenal. It’s perfect for pulling smiles out of anyone, no matter their age. I’ve made these for birthdays, Halloween, and even an impromptu bake sale, and every time people ask for the secret. The mix of easy steps and creative decorating makes baking exciting, and let’s be honest – who doesn’t want cupcakes that look as fun as they taste? So dive in, get a little messy, and create your own monster troupe in the kitchen — you’ll be so glad you did.
Print
Monster Mouthful Cupcakes Recipe
- Prep Time: 45 min
- Cook Time: 60 min
- Total Time: 1 hr 45 min
- Yield: 12 cupcakes
- Category: Dessert
- Method: Baking
- Cuisine: American
Description
Monster Mouthful Cupcakes are whimsical, colorful cupcakes decorated to look like fun and spooky monster faces using various frosting colors and candy eyeballs. Perfect for Halloween or themed parties, these cupcakes feature piped icing shapes and textures that transform ordinary cupcakes into playful edible monsters.
Ingredients
Cupcake Base
- 4 1/2 cups of your favorite cupcake batter (enough for 12 cupcakes)
Decorations
- Large Candy Eyeballs
- Large Edible Black and White Candy Eyeball Sprinkles, 1 oz.
- Blue Icing Pouch (Ready-to-Use Red Vanilla-Flavored Icing Pouch with Tips, 8 oz.)
- Yellow Icing Pouch (Ready-to-Use Red Vanilla-Flavored Icing Pouch with Tips, 8 oz.)
- Red Icing Pouch (Ready-to-Use Red Vanilla-Flavored Icing Pouch with Tips, 8 oz.)
- Orange Icing Pouch (Orange Buttercream Icing Pouch with Star and Round Tips, 8 oz.)
- Green Icing Pouch (Green Buttercream Icing Pouch with Star and Round Tips, 8 oz.)
- Black Icing Pouch (Black Buttercream Icing Pouch with Star and Round Tips, 8 oz.)
Instructions
- Bake Cupcakes: Prepare the cupcake batter according to your favorite recipe or package instructions. Bake the cupcakes as directed, typically at 350°F (175°C) for about 18-22 minutes or until a toothpick inserted in the center comes out clean. Allow the cupcakes to cool completely before decorating.
- Pipe Mouth Shape: Using the black icing pouch, pipe a mouth shape onto each cooled cupcake. Smooth the piped icing gently with a spatula to create a neat mouth base.
- Decorate Green Monster: With the green icing pouch fitted with a star tip, pipe star shapes by pulling the tip straight up and away from the cupcake surface. Pipe stars closely together, adjusting the tip slightly after each star to avoid gaps, covering the entire cupcake top. Place one candy eyeball on top of the frosting to complete the monster’s eye.
- Decorate Orange Monster: Using the orange icing pouch with the star tip, pipe star shapes in the same manner as the green monster, covering the cupcake surface fully. Place two candy eyeballs atop the frosting, spaced suitably.
- Decorate Blue Monster: Using the blue icing pouch with a round tip, pipe overlapping loops resembling slightly squiggly lines all over the cupcake surface. Position three candy eyeballs on top. Then, using black icing with a round tip, pipe three pull-out lines resembling lashes on the center eyeball.
- Decorate Red Monster: Use the red icing pouch with a round tip to pipe zigzag lines around the black-piped mouth. Achieve this by an up and down motion with steady pressure, stopping pressure and pulling the tip away to end each zigzag. For elongated zigzags, raise the tip height while maintaining pressure; for wider relaxed zigzags, increase width with hand movement. Place two candy eyeballs spaced apart on the frosting. Use black icing to pipe three pull-out lash lines on each eyeball.
- Decorate Yellow Monster: Using the yellow icing pouch with a round tip, pipe overlapping triangular shapes around the mouth opening, extending to the edges of the cupcake. Place two candy eyeballs atop the frosting. Pipe three black pull-out lashes on each eyeball using black icing and a round tip.
Notes
- You can substitute any preferred cupcake flavor for the base.
- Ensure cupcakes are fully cooled before decorating to prevent melting the icing.
- If specific colored icing pouches are unavailable, you can make your own by mixing food coloring into white buttercream icing and using appropriate piping tips.
- Use varying piping tips to achieve different textures and effects.
- Store decorated cupcakes in a cool place; refrigerate if necessary to maintain icing integrity.
Nutrition
- Serving Size: 1 cupcake
- Calories: 320
- Sugar: 28g
- Sodium: 180mg
- Fat: 15g
- Saturated Fat: 6g
- Unsaturated Fat: 7g
- Trans Fat: 0g
- Carbohydrates: 42g
- Fiber: 1g
- Protein: 3g
- Cholesterol: 35mg


