
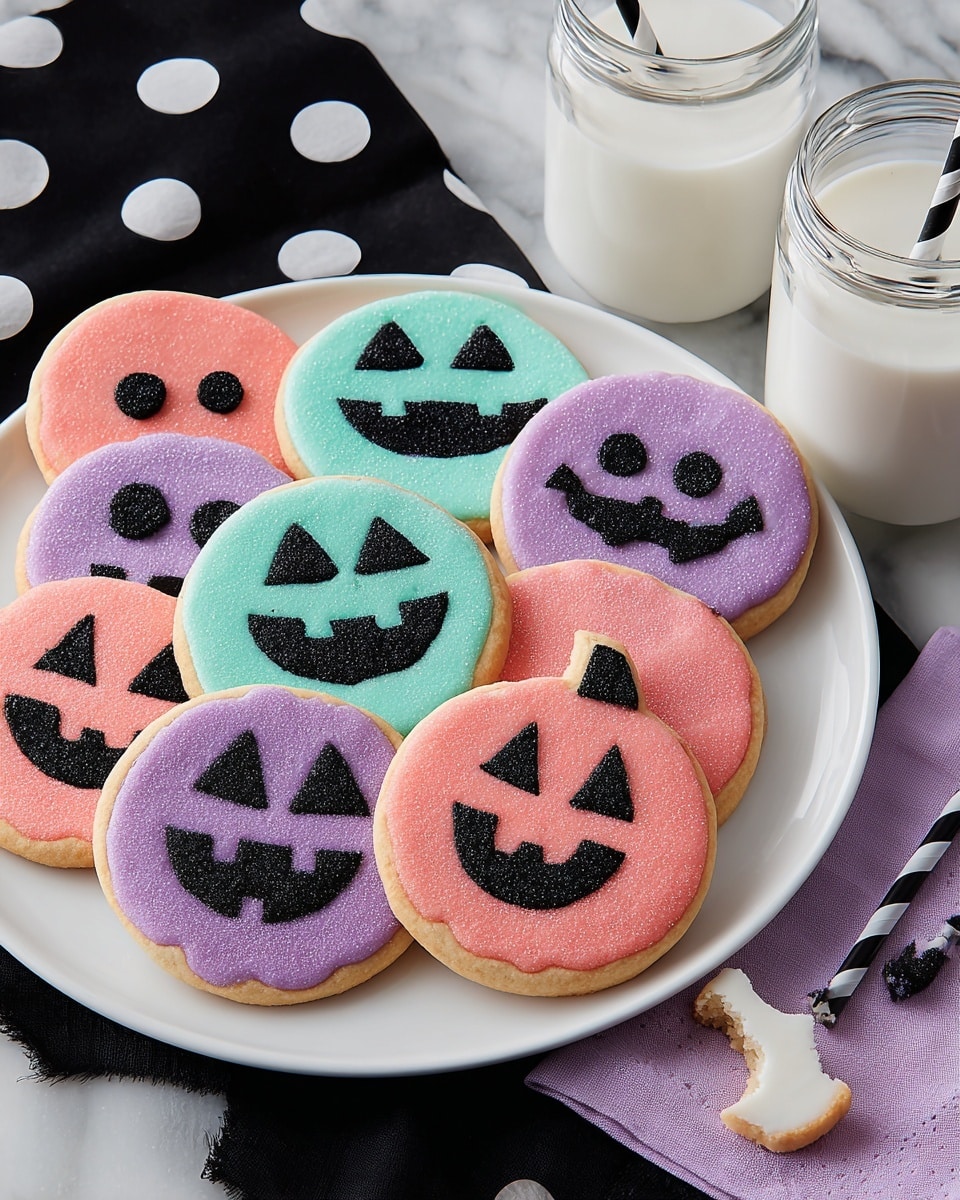
If you’re on the hunt for a Halloween treat that’s both fun to make and downright adorable to look at, I’ve got just the thing for you. This Spooky Face Halloween Sugar Cookies Recipe is a total crowd-pleaser — they’re festive, colorful, and have just the right spooky vibe without being scary. Whether you’re baking with kids or just want to impress your party guests, these cookies bring the Halloween spirit in the sweetest way possible. Stick with me, and I’ll walk you through everything so your batch turns out picture perfect every time!
Why You’ll Love This Recipe
- Simple Ingredients: You likely have most of these in your pantry, making it easy to get started with minimal fuss.
- Kid-Friendly Fun: Decorating these spooky faces is a perfect way to get little hands involved in the kitchen.
- Vibrant Colors: The gel food colorings give such beautiful, rich hues that really pop against the black sugar details.
- Perfectly Spooky: They strike a great balance between cute and creepy — just right for Halloween parties or classroom treats.

Ingredients You’ll Need
The magic of this Spooky Face Halloween Sugar Cookies Recipe largely comes from the colorful gels and that sweet black sanding sugar. I love how the gel food colorings don’t water down the dough or icing but give vibrant, lasting colors. Since you’re working with small portions of tinted dough, you really want good quality gel colors to avoid fading.
- Pink Gel Food Coloring: Choose a bright, concentrated gel for that perfect rosy tone without adding liquid.
- Violet Gel Food Coloring: Combine with pink to get a lovely deep violet that pops on the cookies.
- Sky Blue Gel Food Coloring: This gives a cool contrast color that’s fun for Halloween, especially paired with the black accents.
- Roll-Out Cookie Dough: Use your favorite sugar cookie dough recipe or pre-made dough, just make sure it’s sturdy enough for rolling and cutting.
- Black Sanding Sugar: Adds sparkle but keeps the spooky vibe—it’s a fun texture contrast when decorating the faces.
- Black Ready-to-Use Icing Tube: This is your secret weapon for piping those spooky facial features with precision, no messy bowls required.
Variations
One thing I love about this Spooky Face Halloween Sugar Cookies Recipe is how easy it is to make it your own. Don’t be afraid to switch up the colors or get creative with the spooky faces — trust me, playing around with different eyes, mouths, and designs is half the fun!
- Color Twist: I once swapped the violet for an eerie green using lime gel color, and my family thought they looked like little friendly monsters!
- Dietary Swap: If you need gluten-free, a sturdy gluten-free roll-out dough works well — just be sure to chill it a bit longer before cutting.
- Advanced Decorating: For a fancier look, try piping white royal icing faces and then layering black sanding sugar on top for dimension.
How to Make Spooky Face Halloween Sugar Cookies Recipe
Step 1: Prep and Color Your Dough
Start by preparing your roll-out cookie dough according to the recipe you’re using. Once it’s ready, divide the dough into three portions. This is where the gel food colors come into play — tint one portion pink, one sky blue, and for the violet, combine some pink with violet gel coloring. Knead the colors in until you get an even tone. This mix of shades is what makes these cookies so festive and eye-catching!
Step 2: Cut and Bake Your Cookie Shapes
Roll out each colored dough evenly, about 1/4 inch thick is perfect. Use a round cutter to punch out cookie shapes — I like rounds because they’re the perfect canvas for those spooky faces. Transfer to a parchment-lined baking sheet and bake as your dough recipe directs. Be sure to watch the edges; you want them golden but not too brown to keep that bright color on display. Let your cookies cool completely before decorating.
Step 3: Decorate Those Spooky Faces
Using a tip 3 piping nozzle on your black ready-to-use icing tube, pipe eyes, mouths, noses — whatever spooky (or silly!) faces you want. It helps to practice your designs on parchment first if you’re feeling nervous. Once piped, immediately cover the icing shapes with black sanding sugar to get that grainy, sparkling effect. Tap off the excess sanding sugar so you’re left with clean, crisp details.
Pro Tips for Making Spooky Face Halloween Sugar Cookies Recipe
- Use Gel Color for Vibrancy: I learned the hard way that liquid colors mess with dough texture—gel colors keep your dough perfect and vibrant.
- Keep the Dough Cool: Chilling dough before rolling helps prevent spreading, keeping your spooky faces crisp.
- Practice Piping Faces First: I always sketch or pipe on parchment to build confidence before decorating the actual cookies.
- Apply Sugar Quickly: Add sanding sugar immediately after piping so it sticks well without smudging the design.
How to Serve Spooky Face Halloween Sugar Cookies Recipe
Garnishes
For me, the black sanding sugar does all the work in making these cookies look festive and textured. Sometimes, I add a sprinkle of edible glitter or tiny candy eyeballs for an extra spooky touch—totally optional but super fun if you have kids helping out.
Side Dishes
These cookies pair perfectly with a cold glass of milk or a steaming cup of hot cocoa. For a Halloween party, I like setting them alongside pumpkin-shaped cupcakes or a bowl of autumnal mixed nuts and candy corn for a fun variety.
Creative Ways to Present
If you’re bringing these to a Halloween gathering, try stacking them in a clear glass jar tied with orange and black ribbons. Or arrange them on a spooky-themed platter with little artificial spiders and fake cobwebs for instant holiday vibes. I’ve found that a playful presentation makes these cookies the star of any table!
Make Ahead and Storage
Storing Leftovers
I keep any leftover cookies in an airtight container at room temperature. They usually stay fresh and soft for about 4–5 days, which is plenty of time to enjoy all those adorable spooky faces again and again.
Freezing
One trick I discovered is to freeze the baked, undecorated cookies. Just layer them between parchment paper in a freezer bag, and when you’re ready, thaw and decorate fresh. This way, you don’t lose any of that fresh-baked texture, and you avoid having soggy decorated cookies in the freezer.
Reheating
If you prefer your cookies warm, pop them in a 300°F oven for 3–5 minutes—just enough to soften them slightly without melting the decorating sugar. That little step always revives their fresh-from-the-oven charm.
FAQs
-
Can I use regular liquid food coloring instead of gel for the dough?
While you technically can, I don’t recommend it. Liquid food coloring adds extra moisture which can make your dough sticky and harder to work with. Gel food coloring is concentrated with little to no added liquid, which keeps your dough firm while delivering vibrant colors.
-
What if I don’t have a piping tip 3 for decorating?
No worries! You can cut a very small hole at the tip of the icing tube with scissors for a similar effect. Just make your cut tiny to control the flow of icing for those detailed spooky faces.
-
How do I prevent cookies from spreading too much while baking?
Chilling your cookie dough for at least 30 minutes before rolling and cutting helps a lot. Also, make sure your dough isn’t too soft from added liquid colors, and avoid overmixing once colors are incorporated.
-
Can I decorate these cookies a day ahead of serving?
Absolutely! Decorated cookies keep well at room temperature in an airtight container for a day or two. Just be sure your icing is fully set and dry before stacking or storing.
Final Thoughts
I absolutely love how this Spooky Face Halloween Sugar Cookies Recipe brings a bit of joy and creativity to the kitchen during the spooky season. Every year, I find myself baking these with friends or family, sharing laughs over who can make the scariest (or silliest) faces. Beyond just being a festive treat, it’s a fantastic way to connect and make memories. Seriously, give these a try—you’ll enjoy every crafty, colorful bite and the smiles that come with them!
Print
Spooky Face Halloween Sugar Cookies Recipe
- Prep Time: 20 minutes
- Cook Time: 12 minutes
- Total Time: 32 minutes
- Yield: Approximately 24 cookies
- Category: Dessert
- Method: Baking
- Cuisine: American
- Diet: Vegetarian
Description
Create festive Spooky Face Halloween Sugar Cookies perfect for celebrating the holiday. These colorful cookies feature roll-out dough tinted with pink, sky blue, and violet gel food coloring, shaped with round cutters, baked to golden perfection, and decorated with black icing and sanding sugar for eerie faces that delight all ages.
Ingredients
Cookie Dough and Coloring
- Roll-Out Cookie Dough, enough for 3 portions
- Pink Gel Food Coloring, 1 oz
- Sky Blue Gel Food Coloring, 1 oz
- Violet Gel Food Coloring (or mix of Pink & Violet), 1 oz
Decorations
- Black Ready-to-Use Icing Tube, 4.25 oz
- Black Sanding Sugar, 3.25 oz
Instructions
- Prepare Dough and Color: Divide the roll-out cookie dough into three equal parts. Tint one portion pink using the pink gel food coloring, color the second portion sky blue, and mix pink and violet gel food coloring to create violet for the third portion. Knead each dough portion until the color is evenly distributed.
- Cut and Bake Cookies: Roll out each colored dough portion evenly on a floured surface. Use a round cookie cutter to cut out shapes from each color. Place cookies on a baking sheet lined with parchment paper and bake according to the roll-out cookie recipe instructions until edges are lightly golden. Allow cookies to cool completely on a wire rack.
- Decorate Cookies: Using tip #3 and the black ready-to-use icing tube, carefully pipe spooky facial features such as eyes, noses, and mouths on each cookie. While the icing is still wet, sprinkle black sanding sugar over the facial features to add texture. Shake off any excess sugar gently once the icing has set slightly.
Notes
- Ensure dough portions are chilled before rolling for easier handling.
- Use gel food coloring sparingly to prevent dough from becoming too sticky.
- Let cookies cool completely before decorating to avoid icing melt.
- If you don’t have violet gel food coloring, mix pink and blue to create a similar shade.
- Store decorated cookies in an airtight container to preserve freshness.
Nutrition
- Serving Size: 1 cookie (about 30g)
- Calories: 120
- Sugar: 10g
- Sodium: 80mg
- Fat: 5g
- Saturated Fat: 3g
- Unsaturated Fat: 2g
- Trans Fat: 0g
- Carbohydrates: 18g
- Fiber: 0.5g
- Protein: 1g
- Cholesterol: 15mg

