
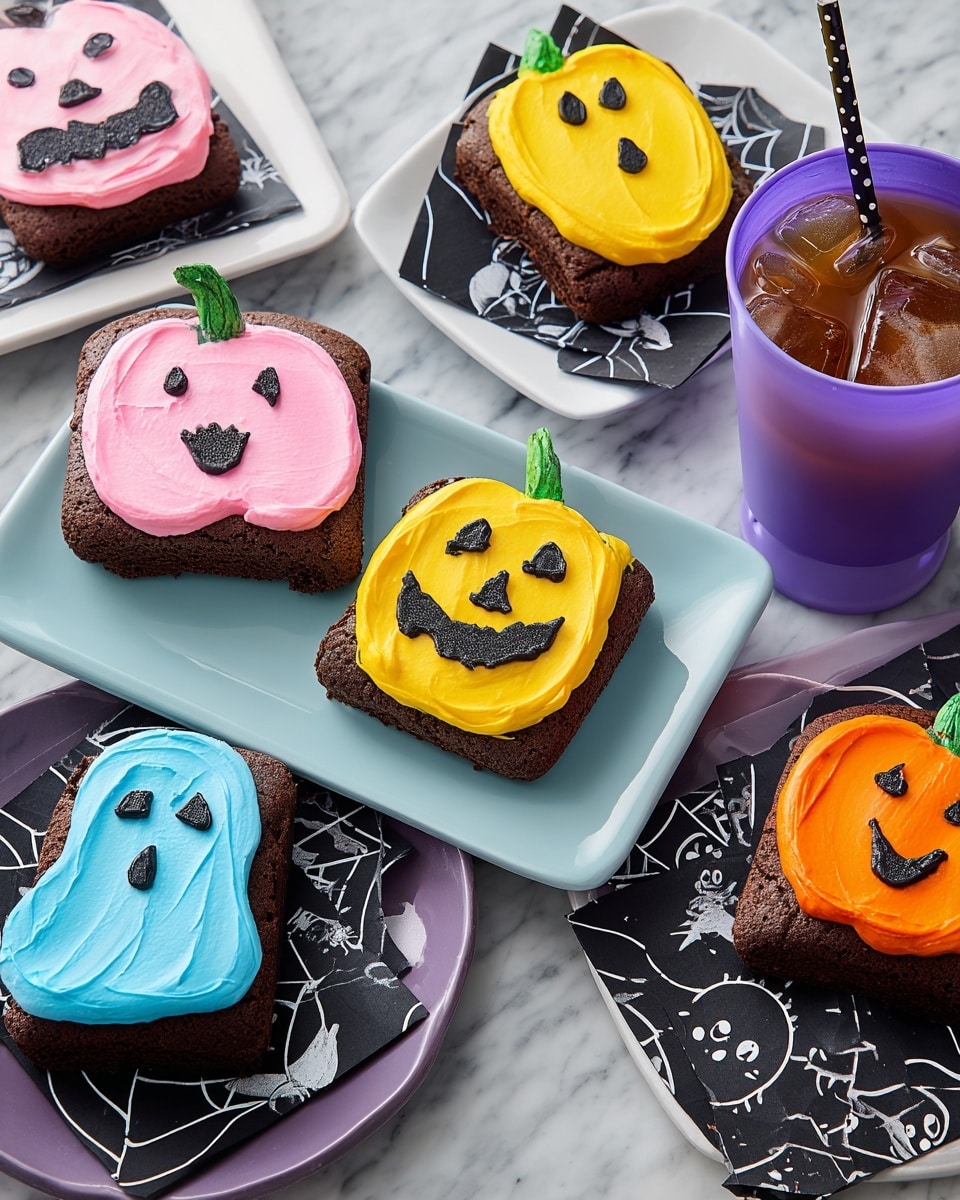
If you’re looking for a fun, festive treat to brighten up your Halloween celebrations, you’re in for a real treat with this Pumpkin and Ghost Halloween Mini Cakes Recipe. I absolutely love how these little cakes turn out — not just because they’re adorable, but because they’re surprisingly easy to make, even if you’re a beginner. You’ll find that these mini cakes pack a punch in flavor and that decorating them is just as enjoyable as eating them. Trust me, once you try this recipe, your friends and family will be begging for more!
Why You’ll Love This Recipe
- Simple Ingredients: You can use your favorite cake mix or even a brownie mix, making it super flexible and beginner-friendly.
- Creative Decorating: The fun colored frostings let you get playful with your Halloween themes — pumpkins, ghosts, and more!
- Perfect Portion Size: Mini cakes mean no leftovers to worry about and easy sharing during parties or family gatherings.
- Festive and Fun: This recipe doubles as a fantastic activity to do with kids or friends — everyone loves piping frosting in colorful shapes.

Ingredients You’ll Need
For this Pumpkin and Ghost Halloween Mini Cakes Recipe, you’ll want ingredients that come together smoothly to create moist cakes and buttercream that’s easy to pipe. I especially recommend quality gel food colors — they give your frosting that vibrant pumpkin-orange and ghostly white without thinning it out.
- Favorite Cake Mix: I often use a lemon-yellow or chocolate cake mix—both work wonderfully with the colors and flavors in this recipe.
- Lemon Yellow Icing Color: Gives your pumpkins a bright, sunny glow.
- Black Gel Food Coloring: Essential for those spooky ghost faces and detailing.
- Rose Icing Colors Pink Food Coloring: Adds a subtle rosy blush that makes the ghosts extra charming.
- Orange Icing Color: The classic pumpkin color you simply can’t skip.
- Sky Blue Food Coloring: A fun accent color—sometimes I like to add a little extra pop with this on the ghosts’ eyes or backgrounds.
- Easy Vanilla Buttercream Frosting: The base for all your coloring and decorating—creamy, sweet, and perfect for piping.
Variations
I love making this recipe my own by experimenting with colors and even cake flavors. Feel free to let your creativity run wild — that’s the best part about these Halloween mini cakes.
- Flavor Variation: I once switched out the classic cake mix for a pumpkin spice cake, and it added such a cozy, autumn vibe that my whole family went nuts for it.
- Dietary Modification: You can absolutely use gluten-free cake mix and dairy-free frosting to suit dietary needs — just make sure to test your mix so the texture stays moist for mini cakes.
- Seasonal Twist: Try swapping orange for purple icing to create a witch-themed set instead of pumpkins, which is a ton of fun for Halloween parties.
How to Make Pumpkin and Ghost Halloween Mini Cakes Recipe
Step 1: Baking the Mini Cakes
Start by preparing the cake batter according to your chosen recipe or cake mix instructions. When I first tried this, I made sure to use a small round pan or even cupcake tins so the cakes would bake evenly. Bake your cakes until a toothpick inserted in the center comes out clean, then cool them completely before removing from the pans — this prevents frosting from melting and helps with clean decorating.
Step 2: Tinting and Preparing Your Frosting
I discovered this trick when I divided my vanilla buttercream evenly into half-cup portions and tinted each with specific gel food colors: rose pink, sky blue, lemon yellow, orange, and black. Using gel colors instead of liquid keeps the frosting thick and perfect for piping—you’ll want to load each color into piping bags fitted with tip 8 for the bulk of the decoration. The black frosting goes in a piping bag with a smaller tip 3 for all the intricate pumpkin faces and ghost details.
Step 3: Decorating Your Halloween Mini Cakes
This is my favorite part! Use the colored frostings with tip 8 to pipe the base shapes — pumpkins in orange and yellow tones, ghosts with the softer pinks and blues. Then, smooth everything with a spatula for that polished look. The black icing with tip 3 is perfect for adding fun spooky faces and details. When I first tried piping faces, I made the mistake of rushing, so take your time—it really adds to the charm!
Pro Tips for Making Pumpkin and Ghost Halloween Mini Cakes Recipe
- Gel Color Concentration: Add gel coloring a little at a time — a small squeeze goes a long way, and you can always deepen the shade as needed.
- Room Temperature Buttercream: Always use frosting at room temp so it pipes smoothly but holds its shape.
- Sharp Piping Tips: Using clean, sharp tips makes decorating details like ghost faces so much easier.
- Cool Cakes: Make sure cakes are completely cool before frosting; otherwise, the icing can melt and slide off.
How to Serve Pumpkin and Ghost Halloween Mini Cakes Recipe
Garnishes
I usually keep the garnishes simple so the pumpkin and ghost designs shine. A scatter of edible glitter or some tiny candy eyes can add a whimsical touch, but honestly, the colorful frosting does all the heavy lifting in the cuteness department. If I’m feeling fancy, I might sprinkle a little crushed pecan or cinnamon on the pumpkin cakes to nod to those cozy fall flavors.
Side Dishes
These mini cakes go perfectly with a warm cup of spiced cider or a cozy mug of hot chocolate topped with marshmallows. For a party, I like to serve them alongside a fresh fruit platter or a light cream cheese dip-stuffed celery to balance the sweetness.
Creative Ways to Present
One time, I arranged the mini cakes on a black slate platter with some dry ice around for a fun “smoky ghost” effect at a Halloween party — guests loved the theatrical vibe! You can also place them on mini cupcake stands or inside glass domes decorated with cobweb decals for added spooky charm.
Make Ahead and Storage
Storing Leftovers
Since these mini cakes are small, they’re great for snacking over a couple of days. I store leftovers in an airtight container in the fridge to keep the frosting fresh and to avoid drying out the cake. When I do this, I usually bring them to room temperature before serving so the frosting is soft and delicious again.
Freezing
If I want to prep ahead, I freeze the cakes before frosting — wrap each mini cake well in plastic wrap and place them in a freezer-safe container. When ready to decorate, I thaw them overnight in the fridge. This trick saves so much time on party day!
Reheating
For reheating, I avoid the microwave because it can make frosting runny. Instead, I let the mini cakes sit at room temperature until they’re soft, or I gently warm them in an oven at low heat (around 275°F) for 5 minutes. This helps keep their lovely texture intact without melting the decoration.
FAQs
-
Can I use homemade cake batter instead of a cake mix for this recipe?
Absolutely! Homemade cake batters work beautifully with this Pumpkin and Ghost Halloween Mini Cakes Recipe. Just be sure your batter is thick enough to hold the mini cake shape when baked, and follow the cooling instructions carefully to avoid frosting mishaps.
-
What if I don’t have all the gel food colors listed?
Don’t worry! You can substitute with any gel food coloring you have on hand. If orange is missing, mixing red and yellow gels usually does the trick. Just take it slow and test your colors on a small amount of frosting first.
-
How long can I store these mini cakes before decorating?
You can store baked mini cakes, tightly wrapped, for up to 2 days at room temperature or up to a week in the fridge before decorating. Just bring them back to room temperature before frosting for the best results.
-
Any tips for piping perfect ghost faces?
Yes! Use a small piping tip like size 3 and keep your hand steady. It helps to practice on parchment paper before decorating your cakes. Also, don’t be afraid to let the black icing settle a bit if it’s too runny—it takes a few minutes to thicken perfectly.
Final Thoughts
This Pumpkin and Ghost Halloween Mini Cakes Recipe has become a go-to in my house every spooky season because it’s a perfect mix of simple baking and creative fun. Whether you’re baking solo or making it a family project, these mini cakes bring smiles, sweet flavors, and adorable Halloween vibes to any gathering. I can’t recommend it enough — grab your frosting bags and get ready to make some magical mini treats that everyone will adore!
Print
Pumpkin and Ghost Halloween Mini Cakes Recipe
- Prep Time: 1 hr 45 min
- Cook Time: 1 hr 45 min
- Total Time: 3 hr 30 min
- Yield: 6 mini cakes
- Category: Dessert
- Method: Baking
- Cuisine: American
Description
Create festive Pumpkin and Ghost Halloween Mini Cakes perfect for celebrating the spooky season. This beginner-friendly recipe uses your favorite cake mix and colorful buttercream frostings to decorate charming mini cakes with pumpkin and ghost faces, making them delightful treats for Halloween parties.
Ingredients
Cake:
- Favorite Cake Mix or Chocolate Cake Recipe (as per package or recipe instructions)
Frosting Colors:
- Easy Vanilla Buttercream Frosting (enough to divide into multiple portions)
- Lemon Yellow Icing Color, 1 oz.
- Lemon Yellow Gel Food Coloring, 1 oz.
- Black Food Coloring Icing Color, 1 oz.
- Black Gel Food Coloring, 1 oz.
- Rose Icing Colors Pink Food Coloring, 1 oz.
- Rose Gel Food Coloring, 1 oz.
- Orange Icing Color, 1 oz.
- Orange Gel Food Coloring, 1 oz.
- Sky Blue Food Coloring, 1 oz.
- Sky Blue Gel Food Coloring, 1 oz.
Instructions
- Bake cakes: Prepare the cake batter following your chosen cake mix or chocolate cake recipe directions. Pour batter into mini cake pans and bake until cooked through. Allow cakes to cool completely before removing from pans to maintain their shape.
- Tint frosting and prepare decorating bags: Divide the vanilla buttercream frosting into portions of about 1/2 cup each. Tint each portion with different colors: rose, blue, yellow, orange, and black. Place the rose, blue, yellow, and orange frostings into decorating bags fitted with a tip 8. Place about 1/4 cup of black tinted frosting into a decorating bag fitted with a smaller tip 3 for detailed piping.
- Decorate cakes: Use the colored frostings with tip 8 to pipe the base layers and shapes on the mini cakes to create pumpkins and ghosts. Smooth the frosting with a spatula for an even finish. Using the black frosting and tip 3, pipe facial features like eyes, noses, and mouths to bring your Halloween mini cakes to life. Smooth any rough edges gently with a spatula.
Notes
- You can substitute the cake mix with your favorite homemade brownie or cake recipe if preferred.
- Make sure cakes are completely cooled before decorating to prevent frosting from melting.
- Use gel food coloring for more vibrant frosting colors without thinning out the frosting consistency.
- Tip numbers (8 and 3) refer to standard piping tips; adjust based on available tools.
- Store decorated mini cakes in a cool place to keep frosting firm.
Nutrition
- Serving Size: 1 mini cake
- Calories: 320
- Sugar: 28g
- Sodium: 250mg
- Fat: 15g
- Saturated Fat: 9g
- Unsaturated Fat: 5g
- Trans Fat: 0g
- Carbohydrates: 41g
- Fiber: 1g
- Protein: 3g
- Cholesterol: 45mg
