
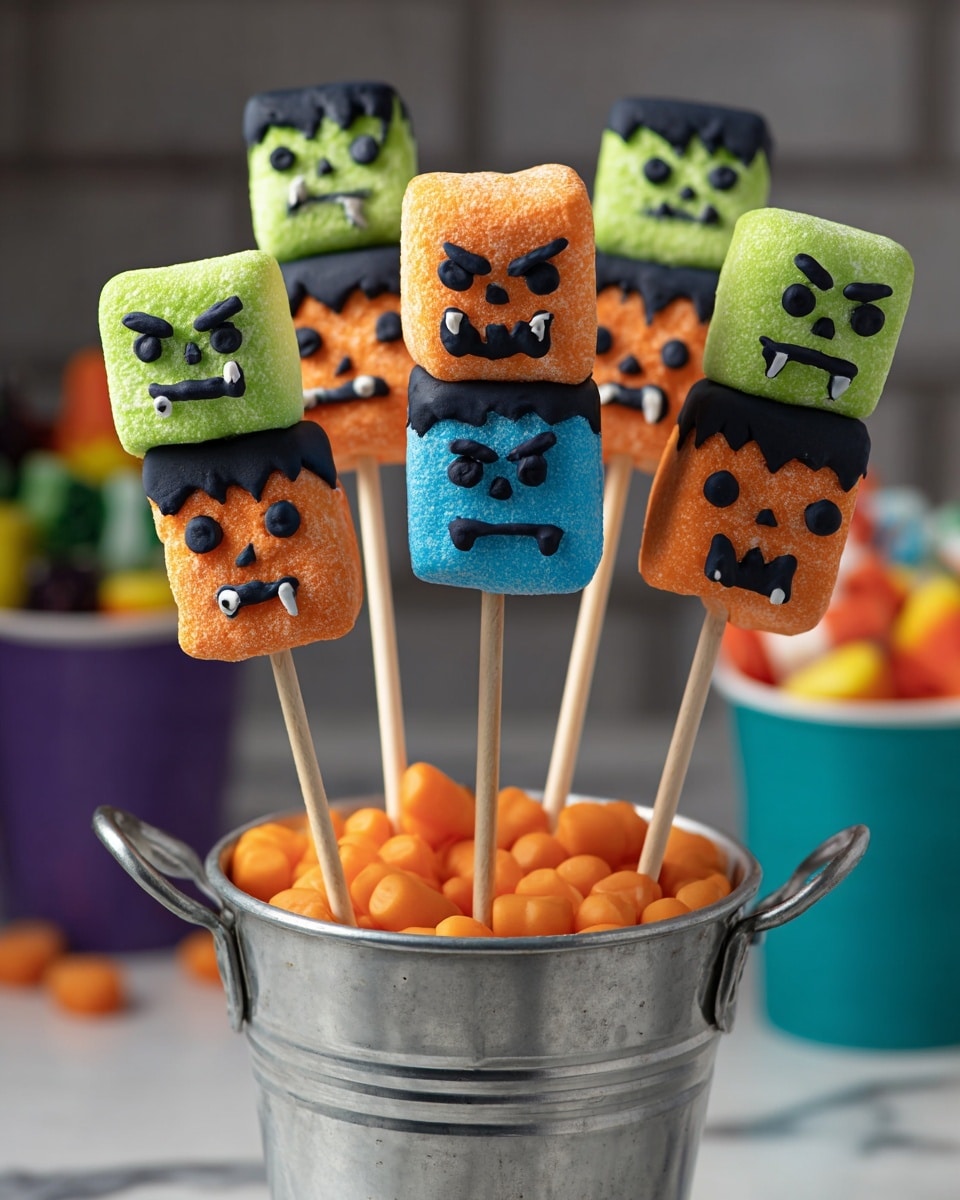
If you’re looking for a super fun, colorful treat that’s as playful as it is tasty, you’re in for a real treat with the Meanie Marshmallows on the March! Recipe. These whimsical marshmallow stacks sprayed with vibrant colors and decorated with sweet candy details bring that perfect mix of creativity and yum factor that I absolutely love. Whether you’re crafting for a party or just a playful snack for the kiddos (or yourself, no judgment here!), this recipe is simple, surprisingly quick, and always a crowd-pleaser. Stick around, because I’m about to share everything I’ve learned to make your marshmallow creations truly march off the plate!
Why You’ll Love This Recipe
- Playful Fun for All Ages: These marshmallows are a creative treat that kids and adults will both get excited about making and eating.
- Simple Steps, Stunning Results: You don’t need fancy skills to get these colorful, fun marshmallow stacks looking professionally crafted.
- Customizable Colors and Designs: The color mist sprays let you get playful with your palette every time you make them.
- Perfect for Parties and Gifts: These make fantastic party favors or homemade gifts that bring smiles instantly.

Ingredients You’ll Need
The magic of the Meanie Marshmallows on the March! Recipe lies in the simple combination of fluffy marshmallows brought to life with colorful food sprays and rich black candy melts that add personality and detail. I always pick fresh, high-quality marshmallows because they hold their shape best when stacked and decorated.
- Marshmallows: Go for classic white large marshmallows; they’re perfect for spraying vibrant colors and stacking stable shapes.
- Blue Color Mist® Food Color Spray: I love this spray for a quick, even splash of color without sogginess.
- Orange Color Mist® Food Color Spray: Adds a pop of warmth and contrast that really catches the eye.
- Green Color Mist® Food Color Spray: Gives a fresh, fun look perfect for the ‘marching’ theme.
- Black Candy Melts® Candy: Essential for the signature candy hair, eyebrows, mouth, and eyes details – makes everything pop!
Variations
One of the best things about the Meanie Marshmallows on the March! Recipe is how easy it is to make it your own. I love switching up the color combos or even adding edible glitter sometimes to add a little extra sparkle. You can also experiment with different candy coating colors depending on what look you’re aiming for!
- Color Mix Ups: I once swapped out the orange for a vibrant pink mist spray and it totally changed the vibe to something more playful and whimsical—my guests loved it!
- Chocolate Candy Coating: Instead of black Candy Melts, try white or colored melts if black’s out of stock (which it sometimes is, btw!). Just remember it changes the overall look so plan accordingly.
- Flavored Marshmallows: For a seasonal twist, try peppermint or strawberry marshmallows to add flavor notes beyond just visual appeal.
- Nut-Free or Allergy-Friendly: All ingredients here are naturally nut-free, but always double-check packaging if allergies are a concern.
How to Make Meanie Marshmallows on the March! Recipe
Step 1: Spray the Marshmallows with Color
First up, get your marshmallows ready for their colorful makeover. Insert a toothpick into the bottom of each marshmallow—it’s a small hack that made all the difference for me in spraying evenly without sticky fingers. Lightly spray each marshmallow with the blue, orange, and green Color Mist food sprays, giving them a fun, vibrant look. I usually move them around on parchment paper to dry so none stick. After the first round, flip them and spray the bottom before letting them air dry for 10 to 15 minutes. This drying time is crucial—if you rush it, the colors might smudge or transfer when you stack.
Step 2: Assemble Your Marshmallow Marchers
Next, melt the black Candy Melts candy. I find using a disposable decorating bag works wonders for controlling the flow of the melted candy—once melted according to package directions, cut a tiny point off the end. Insert a lollipop stick into the bottom of your blue marshmallow, leaving about 4 inches exposed to hold everything together nicely. Cover the top and just a bit of the side with the melted candy to form the marshmallow’s hair, then slide the orange marshmallow down the stick. Add a small dab of melted candy on the orange one to help it stick, then stack the green marshmallow on top. Cover that top with the candy hair again and let it drip down—the drip effect is a fun touch I discovered by accident that really adds personality! Place your assembled treats upright in a craft foam block and chill for 10 to 15 minutes until firm.
Step 3: Decorate with Candy Details
Now the real fun—bringing each marshmallow marcher’s face to life! Use the melted black candy to pipe on outlines for eyebrows and a mouth. I like to dot on eyes and little teeth to make each one uniquely expressive. Don’t worry if your first tries aren’t perfect—I found that chilling the marshmallows for 3 to 5 minutes after decorating helps set the candy details beautifully without smudging. It’s those little details that make the Meanie Marshmallows on the March! Recipe so memorable and fun to share.
Pro Tips for Making Meanie Marshmallows on the March! Recipe
- Toothpick Trick: Using a toothpick to hold marshmallows while spraying really keeps your hands clean and helps the color apply evenly; it’s my go-to trick for food spray projects.
- Controlled Candy Melting: Melt the Candy Melts slowly and avoid overheating to prevent grainy texture—microwave in short bursts and stir often.
- Patience on Drying: Don’t rush the drying times between spraying and assembling, or you’ll risk smudging the colors or losing crisp candy details.
- Keep Chill Time in Mind: Chilling after assembly firms everything perfectly so your marshmallows don’t slide or candy decorations melt—skip this at your own flavor risk!
How to Serve Meanie Marshmallows on the March! Recipe
Garnishes
I typically keep garnishes simple since the marshmallows themselves are such a showstopper. Sometimes I sprinkle edible glitter or tiny sugar crystals around the base of the marshmallow stack when plating, which catches the light beautifully. I also love scattering a few colored mini chocolate chips nearby to complement the misted colors—adds a little playful extra crunch and color contrast.
Side Dishes
This treat really shines as a fun dessert or snack on its own, but when I serve it at parties, I like to pair it with simple sides like fruit skewers, colorful popcorn mixes, or even mini cupcakes that pick up the marshmallow’s color themes. It makes a whimsical dessert table that’s both eye-catching and delicious.
Creative Ways to Present
For youth parties, I’ve put the marshmallows on popsicle sticks inside decorative jars layered with colored sugar or sprinkles—instant candy soldiers ready to march right off the table. Another favorite is assembling them as a “marching band” lined up on a cake board for a charming centerpiece. Trust me, the kids go crazy for it!
Make Ahead and Storage
Storing Leftovers
I store any leftovers in an airtight container at room temperature, but honestly, they don’t last long in my house. If you’re prepping in advance, just make sure the marshmallows are fully dry and the candy is firm before storing, so nothing sticks together or gets soggy.
Freezing
I’ve frozen marshmallows before, but for the Meanie Marshmallows on the March! Recipe, I don’t recommend freezing because the color mist can fade and the candy melts might crack or turn grainy after thawing.
Reheating
Since these treats are meant to be enjoyed as they are, reheating isn’t really necessary—or recommended. But if you want to soften the candy melts slightly for decorating touch-ups, I warm the melted candy gently in short bursts and work quickly before it sets again.
FAQs
-
Can I use regular food coloring instead of Color Mist sprays?
Regular liquid food coloring usually makes marshmallows soggy, which can mess with the texture and make stacking tricky. Color Mist sprays are designed to add color without moisture, so I highly recommend using those for the best results in the Meanie Marshmallows on the March! Recipe.
-
What can I substitute for black Candy Melts if they’re out of stock?
If black Candy Melts are unavailable, try using regular black decorating gel or melting dark chocolate carefully. Just keep in mind that the texture and ease of piping might be a bit different, but you can still get that bold contrast needed for decorating.
-
How should I handle the marshmallows to prevent them from sticking together?
Letting each sprayed marshmallow dry fully before stacking is key. Also, avoid stacking or storing them in humid environments, and always use parchment paper or food-safe surfaces during the drying stage to keep them from sticking.
-
Can I prepare these in advance for a party?
Yes! Just assemble and decorate your marshmallows a day ahead, then store them in an airtight container at room temperature. Chill them briefly before serving to refresh the candy melts’ firmness if needed.
Final Thoughts
I honestly can’t get enough of this Meanie Marshmallows on the March! Recipe. It’s one of those fun little projects that brings out my inner kid while also impressing friends and family with something that looks way more complicated than it really is. I love how each marshmallow comes to life with color and a mischievous little face—it’s a mini treat that feels extra special. Give it a go, and watch your marshmallows march right into everybody’s heart!
Print
Meanie Marshmallows on the March! Recipe
- Prep Time: 20 minutes
- Cook Time: 10 minutes
- Total Time: 30 minutes
- Yield: 1 treat per serving
- Category: Dessert
- Method: No-Cook
- Cuisine: American
Description
Create spooky and colorful Meanie Marshmallows on the March treats using vibrant food color sprays and melted black candy melts. These fun marshmallow stacks are perfect for Halloween or any playful event, featuring three marshmallows layered on lollipop sticks and decorated with expressive candy details.
Ingredients
Marshmallow Treats
- Marshmallows (quantity as needed for serving size)
- Blue Color Mist® Food Color Spray (1.5 oz.)
- Orange Color Mist® Food Color Spray (1.5 oz.)
- Green Color Mist® Food Color Spray (1.5 oz.)
- Black Candy Melts® Candy (10 oz.)
- Lollipop sticks (one per treat)
Instructions
- Spray marshmallows. Insert a toothpick into the bottom of each marshmallow to hold while spraying. Lightly spray the marshmallows with blue, orange, and green Color Mist food color sprays on all sides, including the bottom after removing the toothpick. Place them on a parchment-covered cake board and allow to dry for 10 to 15 minutes.
- Assemble marshmallows. Melt the black Candy Melts candy in a disposable decorating bag according to package directions, then cut a small point off the bag tip. Insert a lollipop stick into the bottom of the blue marshmallow, leaving about 4 inches of the stick exposed. Cover the top and slightly over the sides of the blue marshmallow with melted black candy to create “hair.” Slide the orange marshmallow down onto the stick and pipe a small dot of melted candy on the orange marshmallow to secure the green marshmallow on top. Cover the top green marshmallow with melted candy “hair,” allowing the candy to drip over the sides. Insert the completed marshmallow treats into a craft foam block and chill until firm, about 10 to 15 minutes.
- Decorate marshmallows. Use melted black candy to pipe outline eyebrows and mouths, and dot eyes and teeth onto the marshmallows for a mean expression. Chill again until firm, approximately 3 to 5 minutes, before serving.
Notes
- Use parchment paper or a non-stick surface to prevent marshmallows from sticking.
- Handling with toothpicks or lollipop sticks helps keep hands clean during spraying and assembly.
- Melt Candy Melts gently to prevent burning and to ensure smooth piping.
- Chilling the assembled treats allows the candy to set firmly and keeps the shape intact.
- These treats are best enjoyed fresh but can be stored in an airtight container at room temperature for up to 2 days.
Nutrition
- Serving Size: 1 treat
- Calories: 150
- Sugar: 25g
- Sodium: 20mg
- Fat: 3g
- Saturated Fat: 2g
- Unsaturated Fat: 1g
- Trans Fat: 0g
- Carbohydrates: 30g
- Fiber: 0g
- Protein: 1g
- Cholesterol: 0mg

