
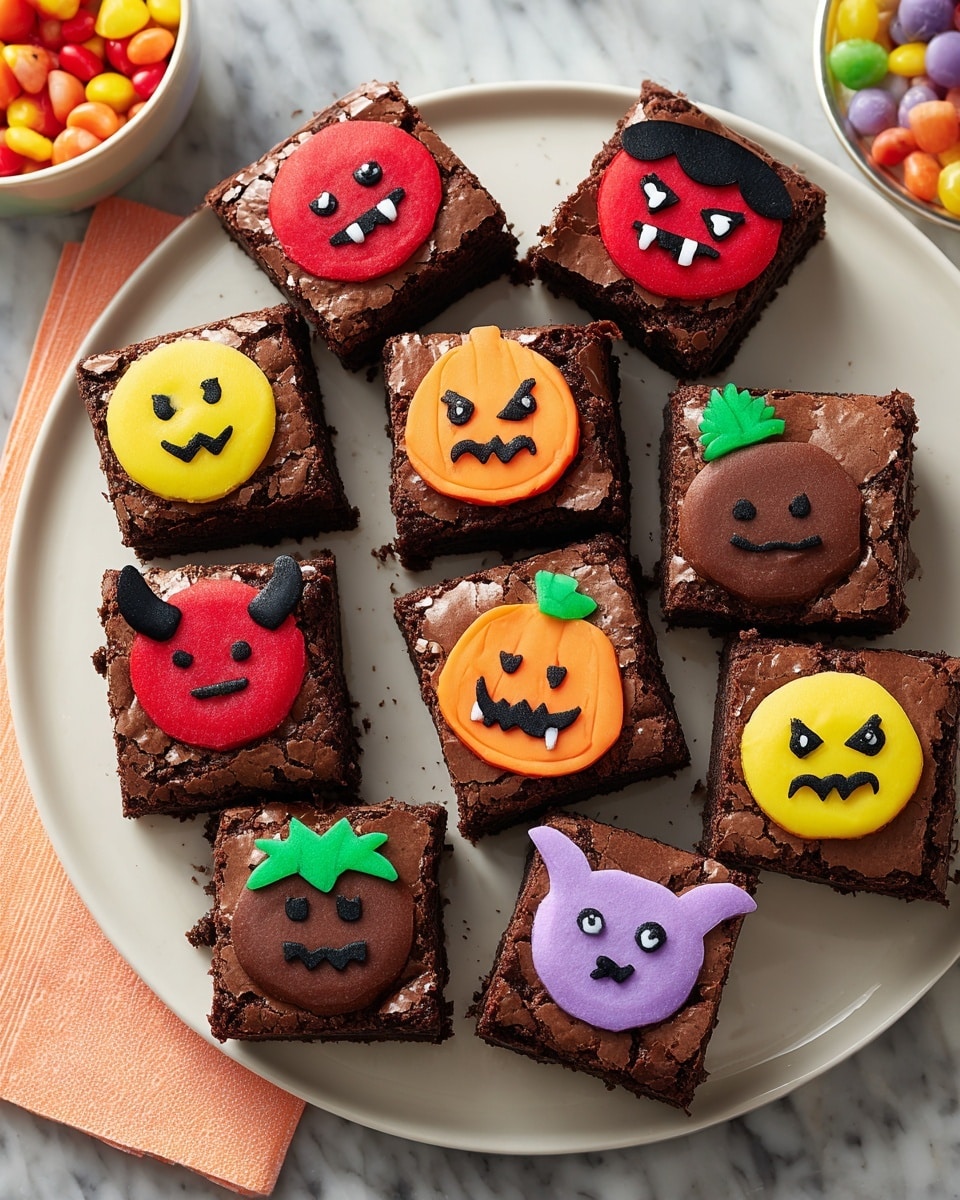
If you’re looking to bring some festive fun to your Halloween treats, you’ve just found the ultimate Cute Halloween Brownies Recipe that’s as playful as it is delicious. I absolutely love how these brownies combine rich fudginess with colorful candy decorations, making them perfect for parties, school events, or just a sweet surprise. Stick with me because you’ll find this recipe delightfully easy and totally worth the effort!
Why You’ll Love This Recipe
- Festive & Fun: These brownies bring Halloween spirit to your dessert table with colorful candy accents.
- Beginner-Friendly: Even if you’re new to baking or decorating, this recipe walks you through the process clearly.
- Customizable Decor: You can switch up the candy colors and emoji designs to fit your vibe.
- Perfect for Sharing: Makes about 30 treats—just right for parties, classrooms, or friendly gatherings.

Ingredients You’ll Need
You’re going to need a solid fudgy brownie base and some colorful candy melts and decorator icings to bring your cute Halloween brownies to life. I always keep a stash of candy melts because they’re so versatile for decorating — just melt and pipe!
- Fudgy Brownie Batter: Choose your favorite homemade or boxed brownie recipe—just be sure it’s nice and fudgy for that soft, chewy texture.
- Orange Candy Melts: These make adorable pumpkin-colored dots perfect for Halloween.
- Kelly Green Food Coloring: For tinting your icing to a bright green, essential for fun little pumpkin stems and spooky accents.
- Red Candy Melts: Adds pops of juicy red—love them for spider eyes or candy apple vibes.
- Black Food Coloring: A must for outlining and adding spooky details on your icing.
- Lavender Candy Melts: A fun unexpected color that adds visual interest and variety to your dots.
- Creamy White Decorator Icing: Vanilla-flavored and smooth, this is your canvas for turning candies into cute Halloween emojis.
Variations
I know everyone has their own vibe, so I love encouraging you to customize this Cute Halloween Brownies Recipe however you like. Whether you want to swap colors or try different shapes, don’t be shy to make it yours!
- Nut-Free Version: I’ve made these with nut-free brownie mixes and candy melts—just check labels, especially if serving to kids at school.
- Spooky Spider Brownies: I once piped little spider legs around the candy dots—trust me, it made them the hit of the party!
- Gluten-Free Option: Use a gluten-free brownie mix or homemade recipe and the candy melts and icing still work perfectly.
- Vegan-Friendly: Try vegan brownie recipes and substitute vegan candy melts if you want to keep it plant-based.
How to Make Cute Halloween Brownies Recipe
Step 1: Bake Your Brownies Slightly Underdone
The trick I learned is to remove your brownies from the oven 2 to 3 minutes before they’re fully baked. This way, you avoid an overly hard crust and keep them nicely fudgy, which is perfect for pressing on your candy dots later. Make sure to spray your pan with cooking spray so nothing sticks when you cut.
Step 2: Make Your Candy Discs
While brownies bake, melt your candy melts in separate bowls—the orange, red, green, and lavender colors make such a festive palette! Then, using decorating bags or even a plastic bag with a tiny snip, pipe one-inch puddles onto parchment paper. Chill these discs in the fridge for 5 to 10 minutes until they’re set but still soft enough to press gently into brownies later.
Step 3: Press Candy Dots into Brownies and Finish Baking
Once the brownies are out of the oven but still warm, lightly press a candy disk flat side up into each brownie, alternating colors as you like. Put the tray back in the oven for another 2 to 3 minutes—this softens the candy dots inside the brownies without melting them into a mess. Remove and cool completely to room temp.
Step 4: Chill and Tint Your Icing
Pop the brownies into the fridge until the candy is fully solidified—this usually takes about 30 minutes. While they’re chilling, tint your creamy white decorator icing with black, green, and red colors to prep for cute little emoji faces. I like to reserve some white icing too for highlights and eyes.
Step 5: Decorate Your Halloween Brownies
This is the fun part! Using decorating bags fitted with fine tips, pipe funny or spooky emoji faces directly onto the candy dots. I love doing smiley pumpkins, creepy eyes, and sometimes little ghosts with white icing. When you’re done, cut into squares and get ready for compliments!
Pro Tips for Making Cute Halloween Brownies Recipe
- Timing is Everything: Don’t skip removing brownies a bit early so they stay fudgy and press candy discs gently to avoid breaking.
- Choose Quality Candy Melts: I learned the hard way that cheaper melts don’t set as nicely or have vibrant colors—invest a little for better results.
- Use Fine Decorating Tips: Small tips make drawing emoji expressions easy and neat, which really ups the “cute” factor.
- Chill the Brownies Before Decorating: This keeps the candy disks solid so your icing won’t melt or slide off.
How to Serve Cute Halloween Brownies Recipe
Garnishes
I usually keep it simple with this recipe because the candy dots and icing decorations steal the show. But if you want to add extra flair, a light dusting of powdered sugar or some edible glitter can make your brownies sparkle like Halloween magic.
Side Dishes
Pair these brownies with a tall glass of cold milk or maybe pumpkin spice latte if you’re feeling cozy. They also go great alongside some fresh fruit like sliced apples or clementines for a balanced snack.
Creative Ways to Present
I once arranged mine on a black platter surrounded by mini candy pumpkins and fake spider webs to amp up the spooky vibe at a Halloween party. You can also wrap each brownie in a cute clear bag tied with orange and black ribbons — instant festive gifts!
Make Ahead and Storage
Storing Leftovers
These brownies store best in an airtight container in the fridge, where they stay fresh and the candy decorations keep their shape. I’ve found they last about 4 to 5 days chilled without losing that perfect fudgy texture.
Freezing
If you want to freeze them, wrap brownies tightly in plastic wrap and place in a freezer-safe container. In my experience, the candy dots might lose a little of their shine but the flavor stays fantastic. Thaw overnight in the fridge before serving.
Reheating
I prefer eating these cold from the fridge, but if you want them warmer, microwave a brownie for about 10 seconds. Be gentle so you don’t melt the decorations—warming just enough to soften the chocolate is perfect.
FAQs
-
Can I use a store-bought brownie mix for this Cute Halloween Brownies Recipe?
Absolutely! I often use boxed brownie mixes to save time, just make sure to slightly underbake as suggested to keep that soft texture perfect for pressing on the candy dots.
-
What if I can’t find all the candy melt colors?
No worries at all. You can substitute with whatever candy melts or even colored chocolate chips you have on hand. Get creative with your color combos or even try white candy melts tinted with gel food coloring.
-
How do I prevent cracking when pressing the candy dots into the brownies?
Press gently and only after removing the brownies from the oven while still warm—but not hot. This heat softens the brownie just enough to avoid cracking, and the candy disk won’t break apart if chilled properly before pressing.
-
Can I decorate these brownies ahead of time?
Yes! You can decorate and refrigerate them, but just know that the longer they sit, the more delicate the icing may become. I recommend decorating up to a day ahead for best results.
Final Thoughts
This Cute Halloween Brownies Recipe quickly became my go-to treat every spooky season—it’s festive, fun, and a joy to make with loved ones. Whether you’re baking with kids or just want to impress at your Halloween gathering, these brownies hit all the right notes. Give this recipe a try and watch the smiles appear—it’s the kind of kitchen memory you’ll treasure year after year!
Print
Cute Halloween Brownies Recipe
- Prep Time: 2 hr
- Cook Time: 2 hr
- Total Time: 4 hr
- Yield: 30 treats
- Category: Dessert
- Method: Baking
- Cuisine: American
Description
These Cute Halloween Brownies combine fudgy baked brownies with colorful candy melts and vibrant decorator icings to create festive treats perfect for Halloween celebrations. The brownies are topped with candy dots pressed into the batter near the end of baking, then chilled and decorated with tinted icing to resemble fun emojis.
Ingredients
Fudgy Brownies
- Brownie batter (prepared according to your favorite recipe)
- Cooking spray for pan
Candy Melts
- Orange Candy Melts
- Red Candy Melts
- Kelly Green Candy Melts
- Lavender Candy Melts
Decorator Icing
- 4 lb Creamy White Decorator Icing (vanilla flavored)
Food Coloring
- Black Gel Food Coloring (1 oz.)
- Kelly Green Gel Food Coloring (1 oz.)
- Christmas Red Gel Food Coloring (1 oz.)
Instructions
- Bake brownies: Prepare your chosen fudgy brownie batter following your favorite recipe instructions. Spread the batter evenly into a baking pan sprayed with cooking spray. Bake according to the recipe timing but remove the brownies 2 to 3 minutes before the recommended finish to allow for candy dots to be added.
- Make candy discs: While the brownies are baking, melt each of the Candy Melts colors (orange, red, green, lavender) separately according to package directions. Prepare piping bags with the melted candy. On a parchment-covered board, pipe 1-inch round puddles and chill them for 5 to 10 minutes until set into solid discs.
- Add candy dots to brownies: Take the brownies out of the oven just before they finish baking. Lightly press one candy disc, flat side up, onto each brownie square, alternating colors as desired.
- Finish baking brownies: Return the brownies to the oven for an additional 2 to 3 minutes until the candy dots become soft but do not fully melt. Remove from oven and allow the brownies to cool completely to room temperature.
- Chill brownies: Place the cooled brownies in the refrigerator to chill until the candy dots harden again, about 30 minutes.
- Tint icing: While the brownies chill, divide the creamy white decorator icing into portions. Tint 1/4 cup black using black gel food coloring, 1/8 cup green using Kelly green gel food coloring, and 1/4 cup red using Christmas red gel food coloring. Reserve the remaining white icing.
- Decorate brownies: Fill four piping bags fitted with tip #2 with the black, green, red, and white icings. Pipe fun Halloween emoji designs on top of each candy dot to complete the festive look. Once decorated, cut and serve the brownies as individual treats.
Notes
- Remove the brownies slightly early from the oven to prevent overbaking once candy dots are added.
- Be careful not to fully melt the candy discs when finishing the baking; they should soften but maintain their shape.
- Use gel food coloring to achieve vibrant icing colors without thinning the frosting.
- Chilling the brownies after baking helps set the candy decorations firmly.
- These brownies are perfect for parties or Halloween treat bags.
Nutrition
- Serving Size: 1 brownie (1/30th of batch)
- Calories: 180
- Sugar: 20g
- Sodium: 110mg
- Fat: 9g
- Saturated Fat: 5g
- Unsaturated Fat: 3g
- Trans Fat: 0g
- Carbohydrates: 24g
- Fiber: 1g
- Protein: 2g
- Cholesterol: 30mg
