
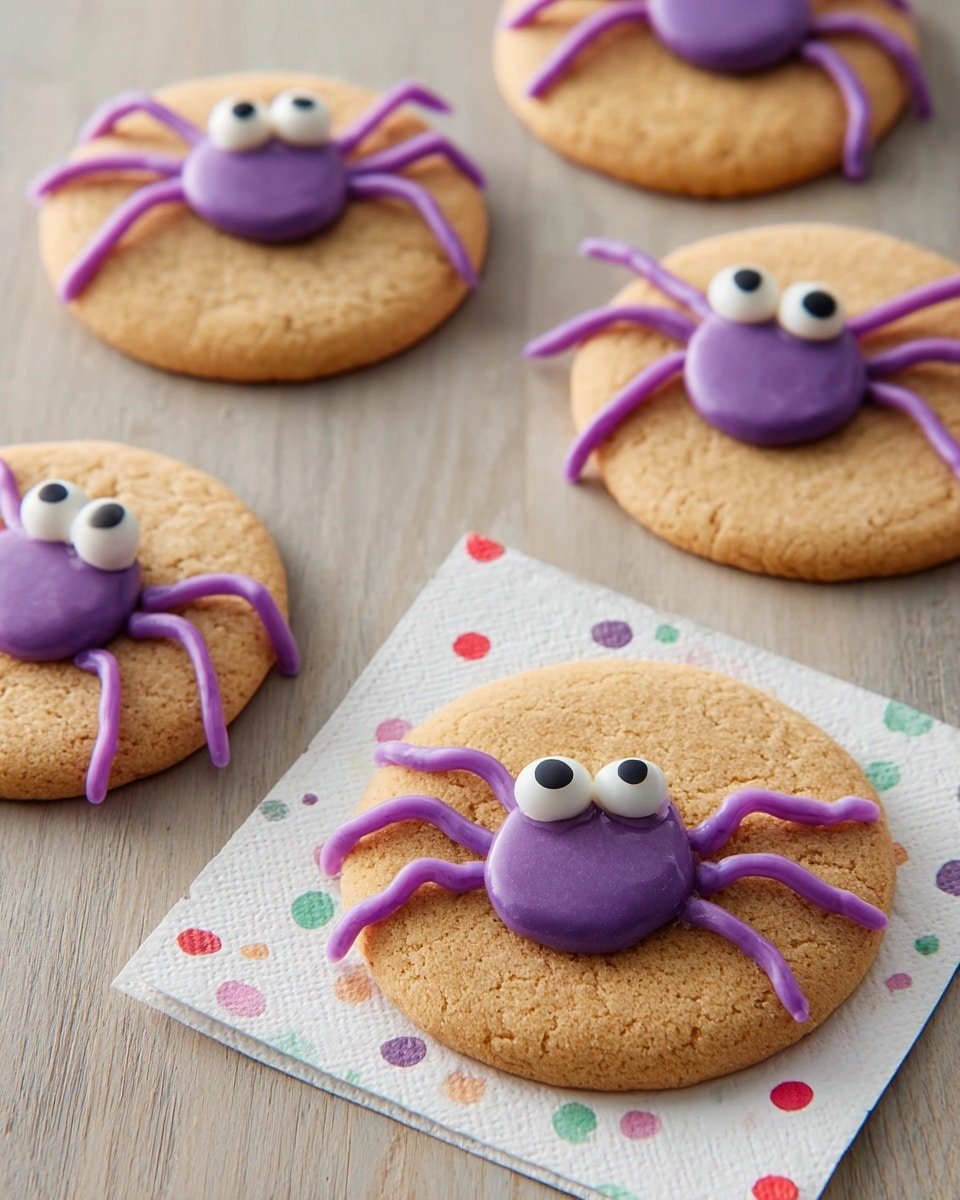
If you’re on the hunt for a delightfully spooky treat this season, let me share with you my absolute favorite **Halloween Spider Sugar Cookies Recipe**. These aren’t just any sugar cookies; they’re charmingly creepy, super fun to make, and perfect for bringing some Halloween joy to your kitchen. You’ll find that these little spider-shaped cookies look impressive but are surprisingly easy to whip up, even if baking isn’t your everyday thing. Stick around because I’m about to walk you through every tasty detail!
Why You’ll Love This Recipe
- Effortlessly Festive: You don’t have to be a pro baker to nail these spooky spider cookies that look straight out of a Halloween party spread.
- Kid-Friendly Fun: Decorating these little critters is such a blast, your kids or friends will want to join in (and probably eat all the candy melts).
- Customizable Candy Magic: With just a few easy tweaks, this recipe can be tweaked for color themes, flavors, or even diet preferences.
- Perfect Make-Ahead Treat: Bake and decorate ahead of time without losing that festive freshness and charm.

Ingredients You’ll Need
The magic behind this Halloween Spider Sugar Cookies Recipe lies in simple, quality ingredients that come together beautifully. You probably already have most of these at home, but there are a couple of fun Halloween-specific items that really add character and that perfect spooky look.
- Favorite sugar cookie dough: I usually use my go-to sugar cookie dough recipe or store-bought dough for speed — either works great as long as it’s sturdy enough to hold the candy decorations.
- Edible Candy Eyeballs: These are the stars of the show – adding that unsettling spider vibe. You can find them at craft stores or online, and they’re usually about 0.88 oz per pack.
- Lavender Candy Melts Candy: I love how these soften quickly and harden fast to let you pipe those perfect spider legs. The lavender color pops on the cookie, but you can swap for any color you like.
Variations
One of the reasons I love this Halloween Spider Sugar Cookies Recipe is how easy it is to personalize. Don’t hesitate to tweak it to match your tastes or party theme—there’s always room to get creative in the kitchen, and your spiders can be as wild or classic as you like.
- Color Variations: I’ve swapped out the lavender candy melts for bright orange or black to match other Halloween colors. It’s fun to mix and match legs and eyes for a creepy-cute spider collection!
- Flavor Boost: Adding a splash of almond or vanilla extract to your sugar cookie dough or even in the melted candy can give these spiders an extra twist that surprised my family in the best way.
- Dietary Options: For gluten-free friends, I’ve had success using a gluten-free sugar cookie dough, and vegan candy melts can make this recipe inclusive without sacrificing taste or texture.
How to Make Halloween Spider Sugar Cookies Recipe
Step 1: Bake Your Sugar Cookies to Perfection
Start by preheating your oven and baking the sugar cookies according to your dough recipe or package directions. I love using Wilton’s Mega Cookie Baking Sheet for this — it helps the cookies bake evenly while giving you perfectly round shapes to work with. Remember to keep an eye on the cookies because you want them lightly golden, soft but firm enough to hold toppings.
Step 2: Add Candy Eyes and Melts While Warm
The trick I discovered here is to press one Lavender Candy Melt disc right in the center of each cookie while they’re still warm—place it smooth side up so it melts just enough to stick. Then, top each cookie with two candy eyes near the top, positioning them so your spiders come alive with personality. Don’t push too hard or you might crack the cookies. Let these cool in the pan for about five minutes before transferring them to a wire rack to finish cooling completely. This cooling step keeps your cookies from breaking and lets the candy set nicely.
Step 3: Melt Candy Melts and Pipe Spider Legs
Once the cookies are cool, it’s time for the spider legs — my favorite part! Melt your candy melts in a disposable decorating bag according to package instructions (usually short bursts in the microwave, stirring in between). Cut a tiny hole at the tip for fine control. Pipe four legs on each side of your spider body with steady, gentle pressure. Don’t worry if your legs aren’t perfect; they’ll still look spook-tacular! Pop the finished cookies in the fridge for 10-15 minutes to set the legs solid.
Pro Tips for Making Halloween Spider Sugar Cookies Recipe
- Use the Right Cookie Sheet: I found that Wilton’s Mega Cookie Baking Sheet ensures your cookies don’t spread too thin and gives you great shape hold.
- Don’t Over-Melt Candy Melts: Melt in short bursts and stir often to avoid grainy or burnt candy melts, which can be frustrating to pipe.
- Chill Between Steps: Let cookies cool completely before piping legs, and chill again after to set legs perfectly without smudging.
- Be Patient When Transferring: Use a thin spatula to lift cooled cookies carefully, preventing cracks or broken legs—a little patience pays off!
How to Serve Halloween Spider Sugar Cookies Recipe
Garnishes
I love keeping the garnish simple—those adorable candy eyeballs are enough to make these cookies stand out! Sometimes, I sprinkle a tiny pinch of edible glitter or use a little black sugar around the edges to enhance the spider vibe. If you’re feeling festive, a drizzle of colored royal icing can add an extra eerie web effect around your plate.
Side Dishes
These cookies pair beautifully with classic Halloween drinks — think rich hot chocolate with a marshmallow spider or sparkling fruit punch served with glowing ice cubes. For a party, I often set them alongside pumpkin-shaped cupcakes or caramel apples for an irresistible dessert table.
Creative Ways to Present
For parties, I love arranging these spider sugar cookies on a black serving tray lined with faux spider webs—you get instant spooky vibes! You can also wrap individual cookies with clear cellophane and tie them with orange or purple ribbon for cute party favors kids can take home. Another fun idea is stacking them like a spider web “tower” using a small cake stand.
Make Ahead and Storage
Storing Leftovers
I’ve found the best way to keep these Halloween Spider Sugar Cookies fresh is in an airtight container at room temperature. They last beautifully for up to 5 days, and the candy melts keep their shape without becoming sticky or dull. Just make sure they’re fully set and cooled before storing to avoid smudged legs or melted eyes.
Freezing
Yes, these cookies freeze well! When I want to prep for a party ahead of time, I freeze them fully cooled and decorated in a single layer on a baking sheet first, then transfer to a freezer-safe container with parchment between layers. They’ll keep for about a month. Just thaw at room temp before serving, keeping them wrapped until ready to avoid condensation.
Reheating
Since these are best enjoyed at room temperature, I don’t recommend heating. However, if you like your cookies a bit softer, a quick 5-6 second zap in the microwave can soften the cookie slightly without melting candy decorations. Try to avoid overheating to keep the spider legs intact.
FAQs
-
Can I use any sugar cookie dough for this Halloween Spider Sugar Cookies Recipe?
Absolutely! Any sturdy sugar cookie dough that holds its shape well during baking will work. I recommend avoiding dough that spreads too much. Homemade or store-bought options both work great, just watch baking time accordingly.
-
What can I substitute for lavender candy melts?
If you don’t have lavender candy melts, no worries—any color of candy melts or colored melting chocolate will do. I’ve used orange, black, or even white candy melts with festive sprinkles for a different look.
-
How do I prevent the candy melts from cracking on the cookies?
Make sure to press the candy melts onto the cookies while they’re still warm so they stick properly. Cooling them slowly on the wire rack helps prevent cracking. Also, avoid overheating your candy melts when melting for piping legs, as that can cause brittleness.
-
Can I prepare these Halloween Spider Sugar Cookies Recipe ahead of time?
Yes! You can bake the cookies and store them in an airtight container for a couple of days, or freeze them fully decorated for up to a month. Just thaw fully before serving to enjoy the best texture and flavor.
Final Thoughts
Honestly, this Halloween Spider Sugar Cookies Recipe has become a staple in my fall baking lineup because it’s just as fun to make as it is to eat. I love the way these little spider friends bring both whimsy and a touch of spooky excitement to my kitchen, and every year my family goes crazy for them. I promise, once you try it, you’ll find yourself reaching for candy eyeballs and candy melts long after October is over. So go ahead, give these a try—you’re going to adore the way they turn out and the smiles they bring. Happy baking, friend!
Print
Halloween Spider Sugar Cookies Recipe
- Prep Time: 25 minutes
- Cook Time: 10 minutes
- Total Time: 1 hour 30 minutes
- Yield: 3 dozen cookies
- Category: Dessert
- Method: Baking
- Cuisine: American
- Diet: Vegetarian
Description
Create spooky and delicious Halloween Spider Sugar Cookies that are perfect for your festive celebrations. These charming treats feature classic sugar cookie bases topped with melted lavender candy melts and edible candy eyeballs, decorated with piped spider legs for a creepy-cute finish. Easy to make and fun for all skill levels!
Ingredients
Cookie Ingredients
- Favorite sugar cookie dough (enough for 3 dozen cookies)
Decorations
- 0.88 oz. Edible Candy Eyeballs
- 12 oz. Lavender Candy Melts
Instructions
- Bake Sugar Cookies: Using Wilton’s Mega Cookie Baking Sheet, bake your favorite sugar cookie dough according to the package or recipe directions until golden and cooked through.
- Add Candy Melt and Eyes: Remove cookies from the oven and while still warm, place one lavender candy melt disc at the center of each cookie with the round side facing up. Then, position two candy eyeballs at the top edge of each cookie to resemble eyes.
- Cool Cookies: Allow the cookies to cool in the pan for about five minutes. Then carefully transfer them to a cooling rack to cool completely for 20 to 30 minutes.
- Melt Candy Melts: Place the remaining lavender candy melts in a disposable decorating bag and melt in the microwave following package instructions until smooth.
- Pipe Spider Legs: Cut a small hole at the tip of the decorating bag and pipe four spider legs extending from each candy melt center on the cookies.
- Set and Serve: Chill the decorated cookies for 10 to 15 minutes to set the candy melts. Serve and enjoy your spooky Halloween spider sugar cookies!
Notes
- You can use store-bought or homemade sugar cookie dough for convenience.
- If you don’t have lavender candy melts, white melts can be tinted with purple food coloring for a similar effect.
- Be careful piping the spider legs—practice on parchment paper first if needed.
- Store cookies in an airtight container at room temperature for up to 3 days.
- These cookies also make fun party favors or classroom treats.
Nutrition
- Serving Size: 1 cookie
- Calories: 120
- Sugar: 12g
- Sodium: 80mg
- Fat: 5g
- Saturated Fat: 3g
- Unsaturated Fat: 2g
- Trans Fat: 0g
- Carbohydrates: 18g
- Fiber: 0.5g
- Protein: 1g
- Cholesterol: 10mg


