
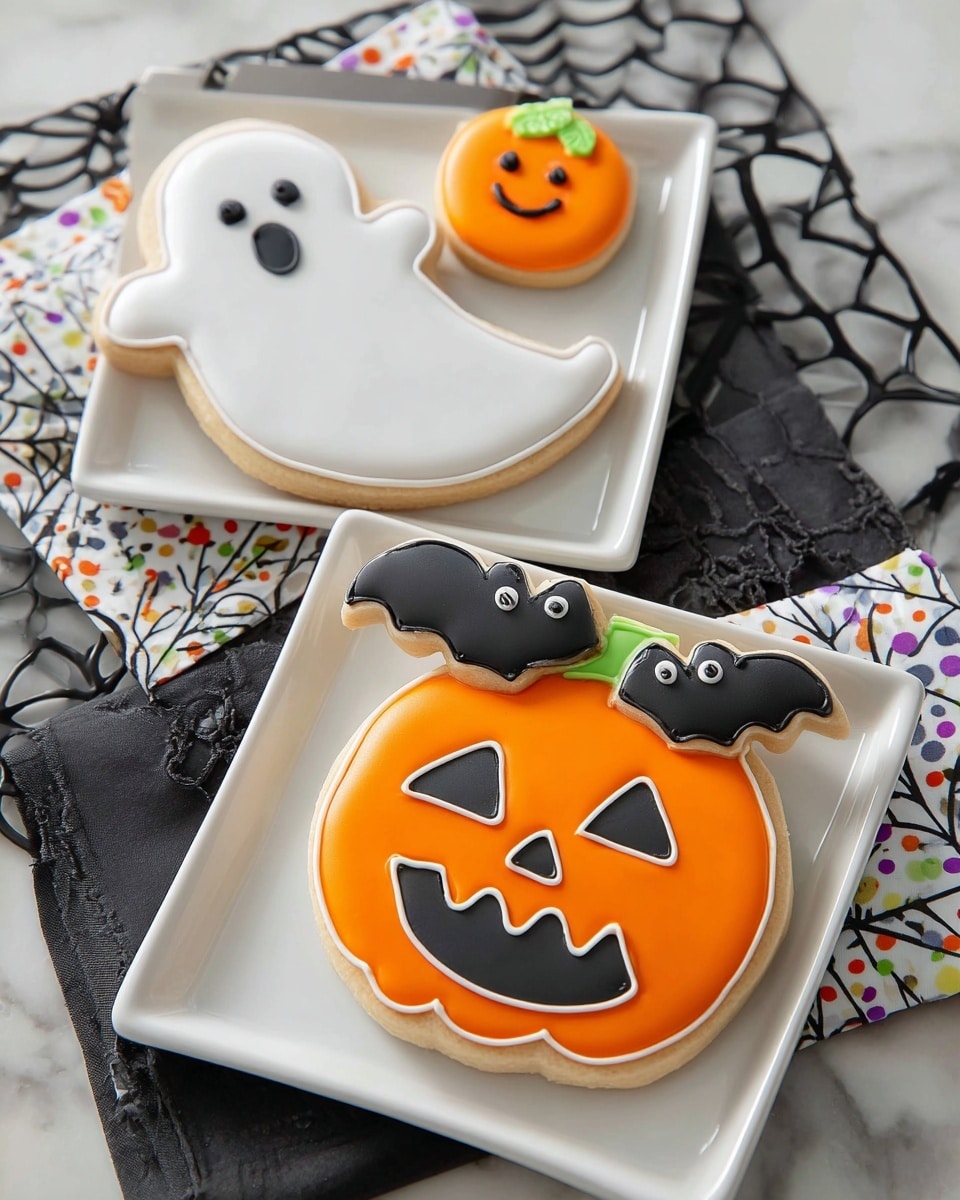
If you’re planning a spooktacular celebration and want to impress your guests with some seriously cute and delicious treats, I’ve got just the thing for you. This Halloween Party Cookies Recipe is a fun twist on classic decorated sugar cookies that are perfect for little ghouls, ghosts, and bats. I absolutely love how these cookies turn out — vibrant, festive, and totally irresistible. Trust me, once you try this recipe, you’ll find everyone begging for more!
Why You’ll Love This Recipe
- Super Festive Design: Each cookie is decorated to bring the Halloween spirit to life with pumpkins, ghosts, and bats.
- Royal Icing Magic: Using royal icing with meringue powder guarantees those crisp edges and smooth finishes that everyone loves.
- Perfect for All Skill Levels: Whether you’re a seasoned baker or just starting, this recipe breaks down the decorating steps for success.
- Make-Ahead Friendly: You can bake and decorate your cookies a day in advance so you’re stress-free at the party.

Ingredients You’ll Need
Choosing the right ingredients makes a huge difference, especially for decorated sugar cookies. I like to use a good roll-out cookie dough that keeps its shape in the oven and royal icing tinted with gel colors for vibrant, lasting hues.
- Lemon Yellow Gel Food Coloring: Brings a sunny pop to pumpkin and ghost details.
- Leaf Green Gel Food Coloring: Perfect for stems and tiny bat eyes.
- Black Gel Food Coloring: Essential for spooky bat wings and facial features.
- Meringue Powder: This helps your royal icing get its perfect pipeable consistency.
- Roll-Out Cookie Dough: Use a sturdy dough that rolls out smoothly and holds shapes without spreading.
- Orange Gel Food Coloring: The star of the pumpkin coloring, bright and cheerful.
- Royal Icing with Meringue Powder: Makes decorating detailed and long-lasting.
Variations
I love personalizing this Halloween Party Cookies Recipe depending on the crowd or the occasion. Sometimes I swap out the traditional shapes or colors to switch things up, and it always adds a fun twist I’ll bet you’ll enjoy too.
- Gluten-Free Option: I’ve tried this with gluten-free roll-out cookie dough, and it worked beautifully without sacrificing taste or texture.
- Vegan-Friendly: Substitute meringue powder royal icing for a vegan egg white alternative to keep it plant-based.
- Color Mix-Up: Try purple and lime green icing instead of traditional orange and black for a quirky, modern Halloween vibe.
- Miniature Cookies: Making bite-sized versions is a hit with kids — and easier to snack on during parties!
How to Make Halloween Party Cookies Recipe
Step 1: Bake Your Cookie Cut-Outs
The day before your party is perfect for baking. I prepare the roll-out cookie dough and use small cutters — one small pumpkin, a large ghost, two small bats, and a large pumpkin shape. This mix gives your cookie platter variety and visual interest. Remember to chill your dough before cutting to prevent the shapes from spreading in the oven. Bake the cookies until they’re just lightly golden on the edges and then cool them completely on wire racks. Cool cookies mean your icing will stick better without melting.
Step 2: Prepare Your Royal Icing and Colors
While your cookies cool, mix up your royal icing following the package directions. This is where the magic begins! I mix leaf green and lemon yellow gel colors to get that perfect shade of green for stems and bat eyes. Divide your icing for different colors—reserve some white for the ghost and blend orange, black, and green separately. Pro tip: use gel food coloring instead of liquid to keep the icing consistency perfect for piping and flooding.
Step 3: Outline and Flood the Cookies
Use a piping tip #2 to outline each cookie in the appropriate color—this keeps your filling from spilling over. Then thin some icing for each color to flood inside the outlines smoothly: white for ghosts, orange for pumpkins, black for bats and for the large pumpkin’s mouth, and green for stems. Thinning the icing just right is key here — too watery and it won’t cover well, too thick and it won’t spread evenly. Let these layers dry completely—eight hours or overnight works best to get a firm, smooth base.
Step 4: Add the Finishing Details
Once your base layer is dry, pull out the full-strength icings again and pipe on eyes, mouths, and other facial features using tip #2 for precision. I love how the little touches like black on ghost faces or green for bat eyes really bring these cookies to life. If you’re new to this, practicing your piping on parchment paper first can help a lot. Let these final details dry fully before storing or serving.
Pro Tips for Making Halloween Party Cookies Recipe
- Chill Dough for Clean Cuts: I discovered this trick when I noticed dough warmed up in my hands and started sticking — chilling helps keep shapes crisp.
- Gel Food Coloring Over Liquid: Using gel colors prevents your dough and icing from getting too soft or runny.
- Use a Toothpick for Detail Fixes: If you mess up a line or spot, a toothpick gently moves icing back in place without ruining your whole design.
- Let Each Layer Dry Fully: I used to rush this step and ended up smudging details — patience pays off in perfectly decorated cookies.
How to Serve Halloween Party Cookies Recipe
Garnishes
When I serve these Halloween cookies, I love adding a sprinkle of edible glitter or a dash of colored sugar around the plate to enhance that festive glow. Sometimes I also place mini candy pumpkins or spooky-shaped sprinkles alongside as little garnishes that double as treats.
Side Dishes
Pair your cookies with a big batch of homemade hot cocoa or a fun “witches’ brew” punch. These sweet drinks complement the cookies perfectly and make your Halloween party spread look like a dream.
Creative Ways to Present
I once used a tiered cookie stand decorated with spiderweb lace and plastic spiders — it was a total showstopper! Wrapping individual cookies in clear cellophane tied with orange and black ribbons also works great if you want to hand them out as party favors.
Make Ahead and Storage
Storing Leftovers
I store leftover cookies in an airtight container layered with parchment paper to keep them from sticking together. They last about a week this way without losing their crispness or flavor — perfect for enjoying after the party when the sugar craving hits again.
Freezing
If you want to prepare ahead of time, freeze the undecorated cookies after baking by wrapping them tightly in plastic wrap and then placing them in a freezer-safe bag. When you’re ready, thaw completely before decorating. I tried freezing fully decorated cookies once and found the icing sometimes cracked, so I recommend freezing prior to decorating for best results.
Reheating
Since these are cookies, reheating isn’t necessary, but if you want to freshen them up, pop them in a warm oven (about 300°F) for 3–5 minutes to soften edges slightly. Be careful not to melt your decorations—leaving the icing intact is key!
FAQs
-
Can I use regular egg whites instead of meringue powder in the royal icing?
Yes, you can substitute fresh egg whites for meringue powder, but meringue powder is safer and more convenient since it’s pasteurized. Fresh egg whites do give great results but use them within a few hours and be sure to handle them carefully to avoid any contamination.
-
How do I make sure my cookies don’t spread too much during baking?
Chill your cookie dough well before cutting and baking. Also, using a roll-out cookie dough designed for decorated cookies will help maintain crisp edges. Avoid over-mixing ingredients, and bake on a cool baking sheet for consistent results.
-
What if I don’t have cookie cutters in these shapes?
No worries! You can create simple shapes using a knife or look for printable templates online to cut around. Alternatively, try other festive shapes like witches, cats, or skulls to make the cookies your own.
-
How long does royal icing take to dry?
Royal icing usually takes about 8 hours to dry completely at room temperature — it’s best to let your cookies sit overnight for the icing to harden fully before stacking or packing.
Final Thoughts
This Halloween Party Cookies Recipe has become a tradition in my house because it’s as much fun to decorate as it is to eat. It’s a hands-on activity that creates memories, and those beautifully spooky treats bring smiles to everyone’s faces. I really hope you give this a try—with a little patience and these tips, you’ll nail your cookie game and wow your guests. Happy baking and have a fang-tastic Halloween!
Print
Halloween Party Cookies Recipe
- Prep Time: 45 minutes
- Cook Time: 12 minutes
- Total Time: 8 hours 57 minutes (including icing drying time)
- Yield: 6 Treats
- Category: Dessert
- Method: Baking
- Cuisine: American
Description
Delight your guests this Halloween with these festive Halloween Party Cookies featuring spooky ghosts, pumpkins, and bats decorated with vibrant royal icing colors. Perfectly baked roll-out cookie dough cut into themed shapes and meticulously iced to create an eye-catching treat for any Halloween celebration.
Ingredients
Cookie Dough
- Roll-Out Cookie Dough, quantity as needed to cut cookies
Royal Icing
- Meringue Powder, 4 oz (Egg White Substitute)
- Royal Icing prepared using meringue powder following package directions
Food Coloring
- Lemon Yellow Icing Color, 1 oz
- Lemon Yellow Gel Food Coloring, 1 oz
- Leaf Green Icing Color, 1 oz
- Leaf Green Gel Food Coloring, 1 oz
- Black Icing Color, 1 oz
- Black Gel Food Coloring, 1 oz
- Orange Icing Color, 1 oz
- Orange Gel Food Coloring, 1 oz
Instructions
- Prepare Cookies: One day in advance, prepare the roll-out cookie dough and cut into Halloween shapes: one small pumpkin and large ghost; two small bats; and one large pumpkin. Bake the cookies and allow them to cool completely before decorating.
- Make Royal Icing: Prepare royal icing according to the meringue powder package directions. Divide the icing into portions and tint with gel food colors: combine Leaf Green and Lemon Yellow for a special green shade. Reserve 1/4 cup each of black and green icing, 1 cup orange icing, and keep remaining icing white for later use.
- Outline and Flood Cookies: Using piping tip 2 and full-strength icings, carefully outline each cookie based on desired design colors. Thin the white icing and flood to fill the ghost shape; thin the orange icing to flood both small and large pumpkin shapes; thin the black icing to flood the bats and the large pumpkin mouth; thin the green icing to flood the pumpkin stems. Allow the iced cookies to dry for 8 hours or overnight.
- Decorate Details: Once dry, use tip 2 and full-strength icings to add detailed decorations: black facial features on the ghost and small pumpkin; green icing to add bat eyes and pumpkin stems. Let the details set completely before serving or packaging.
Notes
- Allowing the royal icing to dry overnight ensures the colors do not blend and the decorations remain crisp.
- Use gel food coloring to avoid thinning the royal icing consistency.
- Store decorated cookies in an airtight container to maintain freshness.
- Tip 2 piping tip is ideal for precise outlining and detail work.
- These cookies are best consumed within 3-4 days for optimal freshness.
Nutrition
- Serving Size: 1 cookie
- Calories: 150 kcal
- Sugar: 15 g
- Sodium: 90 mg
- Fat: 6 g
- Saturated Fat: 2 g
- Unsaturated Fat: 3 g
- Trans Fat: 0 g
- Carbohydrates: 22 g
- Fiber: 0.5 g
- Protein: 1 g
- Cholesterol: 0 mg

