
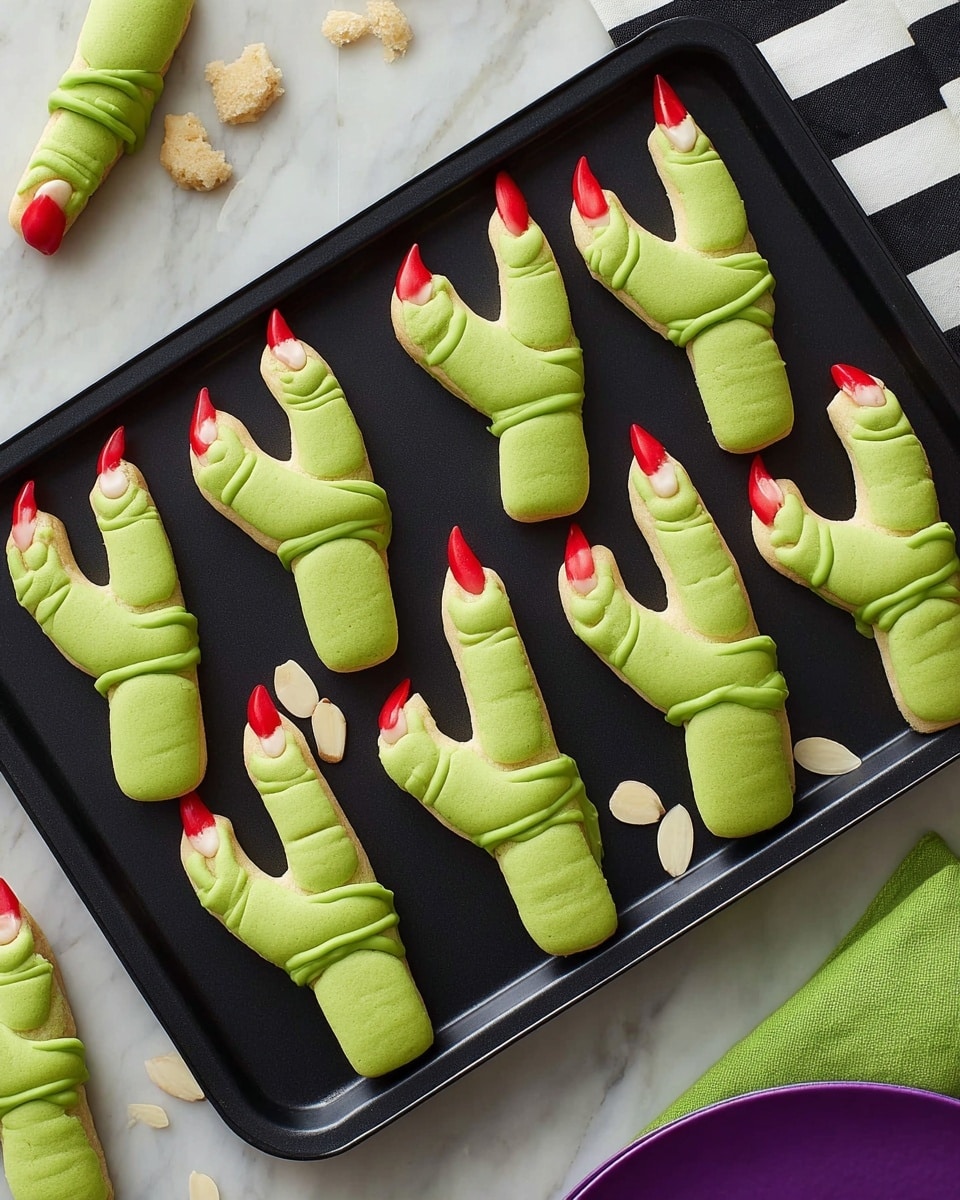
If you’re looking for a Halloween treat that’s both spooky and absolutely delicious, you’re going to love this Witches Fingers Cookies Recipe. They’re delightfully creepy with their knobby shape and almond fingernails dipped in red candy to give that perfect “just bitten” look. Trust me, this recipe isn’t just a gimmick—it’s buttery, melt-in-your-mouth goodness that always impresses guests and has my family begging for more every year. Stick around, and I’ll walk you through everything you need to know to nail these eerie delights!
Why You’ll Love This Recipe
- Scarily Delicious: These cookies look spooky but taste buttery soft and sweet, perfect for Halloween.
- Fun to Make: Shaping the fingers and adding details is like a craft project for grown-ups and kids alike.
- Unique Presentation: The red candy “blood” and almond fingernails create that extra creepy wow factor.
- Make Ahead Friendly: Dough chills well, so you can prep in advance and bake fresh on party day.

Ingredients You’ll Need
The magic of this Witches Fingers Cookies Recipe lies in simple pantry staples combined with a few Halloween-essential elements. The butter and confectioners’ sugar give the dough a rich, tender texture, while the green icing color adds a subtle eerie tint that really makes these stand out. Be sure to grab red candy melts and almond slices to get that iconic bloody fingertip look!
- Confectioners’ Sugar: Use this instead of granulated sugar for a smoother, softer cookie texture.
- Butter (softened): Room temperature butter creams easily, making the dough tender and rich.
- Leaf Green Icing Color: This subtle green tint gives the fingers a witchy vibe without looking fake.
- Egg: Helps bind everything together and adds moisture.
- Vanilla Extract: Pure vanilla adds warmth and depth of flavor—don’t skimp here.
- All-Purpose Flour: The base for the dough, provides structure.
- Salt: Enhances flavor and balances sweetness.
- Red Candy Melts: This gives the perfect “blood” effect on the fingertips—easy to melt and use.
- Almond Slices: These are your “fingernails” and add that creepy authentic touch.
Variations
I like to mix things up sometimes with this Witches Fingers Cookies Recipe depending on who I’m baking for or the vibe I want. The great thing is these cookies are really customizable, so you can have some fun and still nail the spooky look!
- Nut-Free Version: I swap almond slices for small chocolate chips or use colored candy melts to create nails—works well for kids’ parties.
- Chocolate Cookies: Adding cocoa powder to the dough gives a rich, dark twist; dip fingertips in white chocolate for a cool contrast.
- Gluten-Free: I’ve successfully used a 1:1 gluten-free flour blend to keep the texture soft and shape intact.
- Extra Spooky: Adding a touch of cinnamon or pumpkin spice to the dough makes the flavor warmer—perfect for fall!
How to Make Witches Fingers Cookies Recipe
Step 1: Cream, Color, and Combine
Start by beating the confectioners’ sugar, softened butter, and leaf green icing color together in a large bowl. I like using an electric mixer on medium speed—it ensures everything blends smoothly without overworking the dough. Once creamy, add in the egg and vanilla extract and beat until the mixture is well combined and fluffy. This step is crucial because a smooth base means your fingers will have the perfect tender crumb.
Step 2: Add Dry Ingredients and Form Dough
Next, mix in the all-purpose flour and salt, blending until a smooth dough forms. Don’t overmix here; once the flour just disappears, you’re good. The dough should be soft but not sticky—if it feels too sticky, add a tiny bit more flour, a tablespoon at a time. Wrap the dough tightly in plastic wrap and let it chill in the fridge for 2 to 3 hours. This chilling step is essential because it firms up the dough, making it easier to shape those creepy finger details.
Step 3: Shape Your Witch Fingers
Divide the chilled dough into 24 equal portions. This is where the fun begins! Roll each piece into a log about 4 to 4 ½ inches long. To make the knuckles, use a small pairing knife to gently make indents – I think this is the best part because it really brings the fingers to life. Don’t forget to make a slight depression at one end of each finger—this will become the fingernail.
Step 4: Bake to Perfection
Place the cookies on parchment-lined baking sheets and bake in a preheated 325°F oven for 15 to 18 minutes. You’ll know they’re ready when the edges turn a light golden brown. Pro tip: Keep an eye on them after the 15-minute mark—overbaking can make these dry, and you want them tender with just a bit of firmness. Let the cookies cool on the baking sheet for a minute before transferring to a rack to cool completely.
Step 5: Add the Creepy Fingertips
Melt your red candy melts according to the package instructions—usually gentle microwave bursts and stirring do the trick. Use a small amount of the melted candy to attach one almond slice to the “nail” end of each cookie. Then dip the opposite end of the finger into the melted red candy for that bloodied effect. Chill the cookies again for 10-15 minutes until the candy sets solid. This final touch makes all the difference and really sells the spooky vibe!
Pro Tips for Making Witches Fingers Cookies Recipe
- Chill the Dough Thoroughly: This step makes shaping so much easier and prevents the fingers from spreading while baking.
- Use a Sharp Knife for Details: A pairing knife or small kitchen knife lets you make precise knuckle indentations for a realistic look.
- Don’t Overbake: Keep an eye near the end of baking time to maintain a tender, buttery texture rather than a hard cookie.
- Attach Almond Nails with Candy Melts: Using melted candy as glue keeps the nails firmly in place and makes cleanup easy.
How to Serve Witches Fingers Cookies Recipe
Garnishes
I love that these cookies don’t need a fancy garnish, but if you want to amp up the Halloween vibe, consider serving them on a platter sprinkled with crushed Oreo “dirt” or alongside a cup of hot cocoa topped with marshmallow “eyeballs.” The red candy melts give such a fun, realistic blood effect—I usually skip extra garnish to let those shine.
Side Dishes
Pair these with spooky-themed drinks like a black cherry punch or a green apple cider to complement the witchy look. My family also likes to nibble them alongside simple vanilla or chocolate milk—kids especially savor the creepy factor!
Creative Ways to Present
One year, I arranged these witches fingers on a bed of candy eyeballs and plastic spider webs for a Halloween party centerpiece. Another favorite is placing them in a “cauldron” bowl with some dry ice for dramatic fog. If you want to make serving interactive, set up a “build your own scary finger” station with extra candy melts and nuts for toppings—the kids love it!
Make Ahead and Storage
Storing Leftovers
I keep leftover witches fingers in an airtight container at room temperature—they stay fresh and tender for up to 4 days. If the candy coating starts to lose its shine, a quick chill in the fridge refreshes their look and texture nicely.
Freezing
This dough freezes wonderfully! I usually shape the fingers, freeze them on a tray until firm, then store in a freezer bag so I can bake fresh fingers whenever I need. Once baked and decorated, the cookies can also be frozen (wrapped tightly) for up to 2 months—just thaw at room temp before serving.
Reheating
If you want your witches fingers warm, pop them in a 300°F oven for 5-7 minutes. Be careful not to melt the candy melts again, so keep a close eye. Alternatively, serving them at room temperature works perfectly since they’re made to be tender, not crispy.
FAQs
-
Can I use regular food coloring instead of leaf green icing color?
Yes! You can substitute regular green gel or liquid food coloring, but icing color is specially designed for baking and won’t affect dough consistency or color as much. Using leaf green icing color gives a more natural, muted green which fits the witchy theme better.
-
What if I don’t have candy melts—can I use chocolate instead?
You definitely can use melted chocolate, but keep in mind regular chocolate can be trickier to work with because it melts differently and might not set as shiny or quickly as candy melts. If you go this route, temper the chocolate for best results.
-
How do I make the dough less sticky?
If your dough feels too sticky for rolling, add a little extra flour, one tablespoon at a time, until it feels firm but still soft. Just be cautious—too much flour can make the fingers dry and crumbly.
-
Can kids help with this recipe?
Absolutely! Kids love shaping the fingers and adding the almond fingernails, making this a fun and creative Halloween baking activity for the family. Just supervise the baking and candy melting steps for safety.
-
Why do I need to chill the dough so long?
Chilling helps the dough firm up so it’s easier to shape and hold the detailed knuckle marks without spreading during baking. It also gives the cookies a better texture—tender but sturdy enough to handle dipping in candy melts.
Final Thoughts
I absolutely love how the Witches Fingers Cookies Recipe brings a little playful fright to my Halloween celebrations each year. These cookies are not just for show—they’re delicious, buttery, and the perfect combination of spooky and sweet. When I first tried making them, shaping those knobby fingers was a little tricky, but once I got the hang of it, it became my favorite Halloween baking tradition. I promise you’ll find the process relaxing and the results spectacular. So go ahead, gather your ingredients, and bake some witches’ fingers that’ll have everyone talking (and maybe a little creeped out—in the best way!). Happy haunting in your kitchen!
Print
Witches Fingers Cookies Recipe
- Prep Time: 20 minutes
- Cook Time: 15-18 minutes
- Total Time: 2 hours 45 minutes
- Yield: About 2 dozen (24 cookies)
- Category: Dessert
- Method: Baking
- Cuisine: American
Description
Witches Fingers Cookies are spooky, fun Halloween treats featuring buttery almond-flavored cookies shaped like crooked fingers. They’re decorated with green-tinted dough, almond slice fingernails, and red candy melts to resemble bloody fingertips, perfect for a festive party or themed dessert.
Ingredients
Cookie Dough
- 3/4 cup confectioners’ sugar
- 3/4 cup (1-1/2 sticks) butter, softened
- Leaf Green Icing Color
- 1 egg
- 2 teaspoons vanilla extract
- 2-1/2 cups all-purpose flour
- 1/4 teaspoon salt
Decorations
- 24 almond slices (about 1/4 cup)
- 1 cup Red Candy Melts Candy
Instructions
- Make Dough: In a large bowl, beat confectioners’ sugar, softened butter, and leaf green icing color with an electric mixer on medium speed until well combined. Add in the egg and vanilla extract; beat again until the mixture is smooth. Gradually add the all-purpose flour and salt, mixing until a smooth dough forms.
- Shape Cookies: Line cookie pans with parchment paper. Divide the dough evenly into 24 pieces. Roll each piece into a log about 4 to 4-1/2 inches long and place on prepared pans. At one end of each cookie, make a slight depression to form the fingernail bed. Using a paring knife, create knuckle indentations along the length of each ‘finger’ cookie. Chill the shaped cookies for 2 to 3 hours until firm.
- Preheat Oven: When cookies are firm, preheat the oven to 325°F (163°C).
- Bake Cookies: Bake the chilled cookies for 15 to 18 minutes or until the edges are light golden brown. Remove from oven and let cookies cool on the pan for 1 minute, then transfer to a wire rack to cool completely.
- Decorate Fingers: Melt the red candy melts following package instructions. Use a small amount of melted candy to adhere one almond slice to the fingernail indentation of each cookie. Dip the other end of the cookie in melted red candy to create a ‘bloody’ effect, then chill the decorated cookies until the candy sets, about 10 to 15 minutes.
Notes
- Leaf green icing color can be gel or liquid depending on preference; gel generally provides more vivid color.
- Chilling the dough is essential to prevent spreading and to keep the finger shapes intact during baking.
- If red candy melts are unavailable, you can substitute with melted red chocolate or colored candy coating.
- Use caution when handling melted candy to avoid burns.
- Store cookies in an airtight container at room temperature for up to 5 days.
Nutrition
- Serving Size: 1 cookie
- Calories: 110
- Sugar: 7g
- Sodium: 50mg
- Fat: 6g
- Saturated Fat: 3.5g
- Unsaturated Fat: 2g
- Trans Fat: 0g
- Carbohydrates: 13g
- Fiber: 0.5g
- Protein: 1.5g
- Cholesterol: 15mg


