
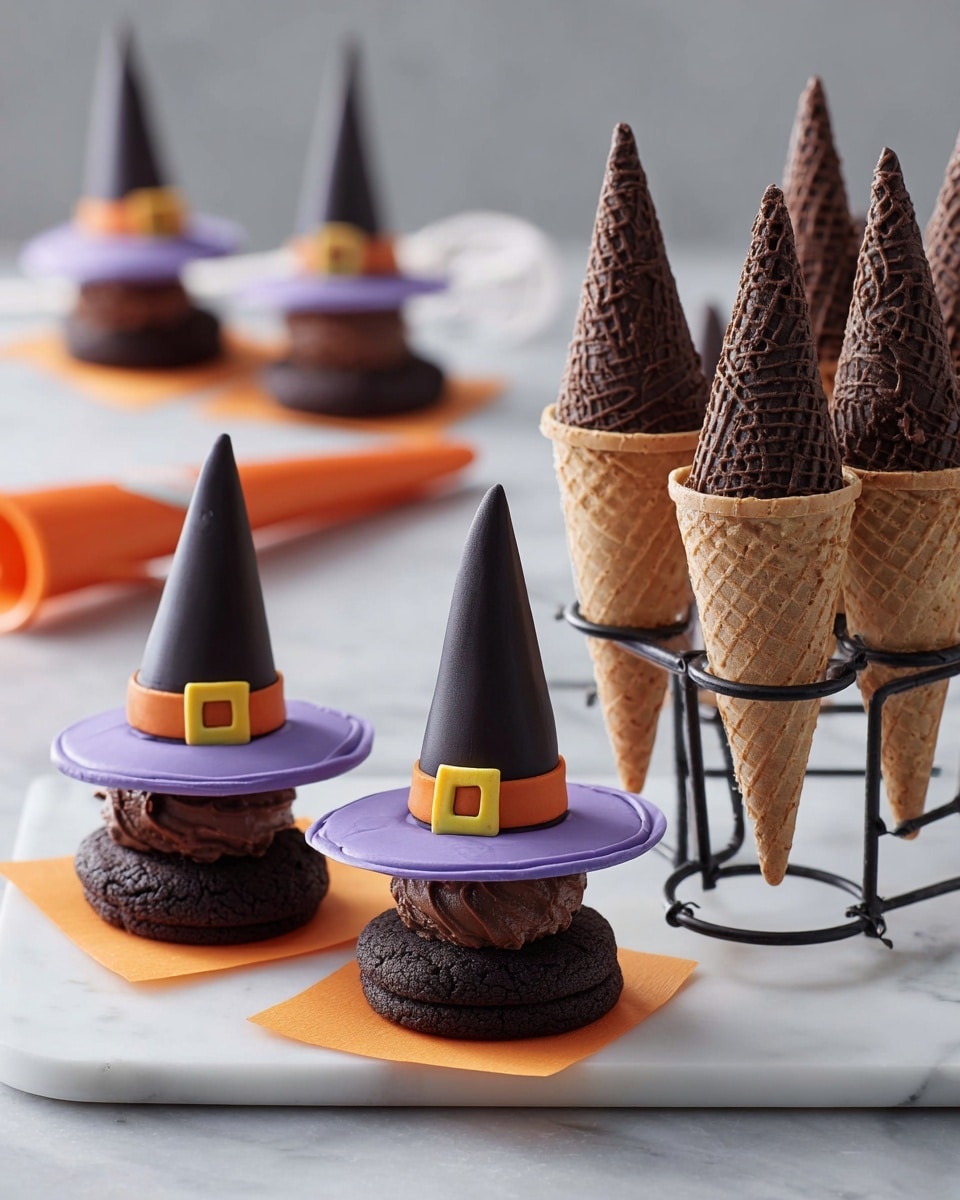
If you’re looking to wow your friends and family this spooky season, you absolutely have to try this Wicked Halloween Witch Hat Cupcake Cones Recipe. I’ve made these a bunch of times, and honestly, they’re a total showstopper. Not only do they look like adorable little witch hats straight from a Halloween storybook, but they’re also super fun to make — and even more fun to eat! Keep reading and I’ll walk you through my favorite tips to get these cupcake cones just right, so you can impress everyone at your party.
Why You’ll Love This Recipe
- Fun and Festive: These cupcake cones look like mini witch hats—perfect for Halloween celebrations.
- Easy to Customize: You can personalize the icing colors and decorations to fit your vibe.
- Great for All Ages: Kids love helping make and eat these, but adults can’t resist either.
- Portable and Mess-Free: Because they’re in cones, they’re less likely to crumble everywhere at your party.

Ingredients You’ll Need
The ingredients for this Wicked Halloween Witch Hat Cupcake Cones Recipe come together to create a playful but delicious treat. I like using store-bought cake mix for convenience, but if you’re up for it, making Wilton’s chocolate cake from scratch really helps enhance the flavor. The icing colors are key for that perfect witchy look, so make sure you get gel or icing colors that are vibrant and blend well.
- Lemon Yellow Icing Color: Gives a bright, sunny pop for the buckles on the hats.
- Black Color Mist Food Coloring Spray: Perfect for spraying the cones black, making them look like witch hats.
- Rose Icing Colors Pink Food Coloring: Adds a subtle pink that blends into the purple icing beautifully.
- Violet Icing Color Gel Food Coloring: Creates a rich purple for half of the hats—it’s my favorite color combo for Halloween.
- Golden Yellow Icing Color: Mixes nicely with lemon yellow to brighten the buckles even more.
- Orange Icing Color: Makes the other half of the hats vibrant and festive.
- Favorite Cake Mix (or Wilton’s Chocolate Cake Recipe): The base for the cupcake cones – choose your favorite for the best taste.
- Sugar Cones: This is what holds your cupcake batter and forms the witch hat shape—don’t skip this!
- Creamy White Decorator Icing: The canvas you’ll tint with colors for decorating—make sure it’s smooth and spreadable.
- Unbleached Parchment Paper: Helps keep things tidy and prevents sticking while you work.
- Disposable Decorating Bags and Tips: Essential for piping your colorful designs perfectly.
- Cupcake Cones Baking Rack: Keeps your cones upright in the oven so they bake evenly.
Variations
I love how versatile the Wicked Halloween Witch Hat Cupcake Cones Recipe is. Over time, I’ve discovered so many fun ways to switch it up depending on who’s coming over and what supplies I have on hand. You can easily customize colors, cake flavors, or even decorations to fit the mood of your party or dietary needs.
- Flavor Variations: I once swapped chocolate cake batter with red velvet for a spooky red twist — it was a hit with my family!
- Dairy-Free Version: You can use dairy-free cake mix and icing, and the cones still bake up beautifully.
- Decorating Fun: Consider adding edible glitter or tiny candy stars on the icing bands to add an extra magical touch.
- Mini Cones: Try smaller sugar cones for bite-sized witch hats that are perfect for a dessert buffet.
How to Make Wicked Halloween Witch Hat Cupcake Cones Recipe
Step 1: Prepare and Bake the Cupcake Cones
First things first — make your cake batter following your favorite cake mix or use Wilton’s chocolate cake recipe if you want homemade vibes. Then, set your Cupcake Cones Baking Rack on a cookie sheet and place the sugar cones upside down into the slots. Fill each cone with about 2 tablespoons of batter; don’t overfill, or they’ll spill over while baking. Bake according to your cake recipe’s instructions — I usually check them a few minutes before the finish time just to be safe. When they’re done, let them cool completely. If the cake rises unevenly, no worries — just trim the tops gently with a knife so they’re nice and flat for decorating.
Step 2: Spray the Cones Black
This is where your cones start looking like actual witch hats. Place the cooled cones wide side down on parchment paper and, in a well-ventilated area, spray them evenly with the black color mist. I learned the hard way to do this in short bursts — too much spray at once can make the icing sticky or runny. Let the cones dry for about 10 to 15 minutes before moving on to the next step.
Step 3: Tint Your Icing and Prepare Decorating Bags
While the cones are drying, it’s time to whip up your magical colors. I tint one cup of creamy white decorator icing orange and another cup purple by blending violet and rose colors — purple is such a classic Halloween color and I love how the little pink tint adds dimension. Then, mix a quarter cup of yellow icing by blending golden yellow and lemon yellow for the buckles. Put each color in separate piping bags fitted with decorating tips: tip 2B for the orange and purple, and tip 3 for the yellow. This trio of colors really makes your witch hat cones pop.
Step 4: Assemble the Witch Hats
Place a small dollop of the orange icing in the center of a chocolate cookie (I use store-bought cookies, but homemade works too). Then gently set the blackened cone on top, wide side down, so it resembles a witch’s hat. Pipe a neat band around the cone’s base with orange icing and smooth it with a spatula for that polished finish. Repeat the same with purple icing on the other half of the cookies and cones. Let these set for 15 to 20 minutes so the icing firms up.
Finally, use the yellow icing to pipe buckles onto the bands around the hats. It’s the little details that make these cupcake cones truly wicked and charming! Let them set again for another 15 to 20 minutes before serving or storing. I always find this step so satisfying because the cupcake cones start to look like actual little witch hats ready to cast a delicious spell.
Pro Tips for Making Wicked Halloween Witch Hat Cupcake Cones Recipe
- Even Baking Is Key: Using a cupcake cones baking rack keeps your sugar cones upright and prevents batter spills — trust me, it’s worth the investment.
- Light Spray Layers: When spraying the cones black, spray in thin layers and let dry between coats for that perfect matte finish without sticky icing.
- Icing Texture Matters: Use creamy decorator icing that’s slightly softened to pipe smoothly without clogging your tips.
- Patience to Set Icing: Let each icing step set fully before adding the next to avoid smudges and make decorating easier.
How to Serve Wicked Halloween Witch Hat Cupcake Cones Recipe
Garnishes
I typically stick with the bright colored icing for garnishes because they pop so well, but I love adding tiny edible sparkles or Halloween-themed sprinkles to the bands just before the icing sets. It adds this playful shimmer that makes each witch hat feel like it has a little extra magic.
Side Dishes
For a full Halloween party spread, I usually pair these cupcake cones with simple treats like ghostly meringues or a bowl of candy corn. They’re sweet but won’t overshadow the focal point—the witch hats!
Creative Ways to Present
One of my favorite presentation tricks is placing the cupcake cones upright in a black cauldron filled with candy corn or crushed Oreo “dirt” to mimic a witch’s cooking pot. It’s festive, easy, and your guests always get a kick out of it. Adding some twinkling orange string lights nearby amps up the whole vibe, too.
Make Ahead and Storage
Storing Leftovers
I like to store any leftover Wicked Halloween Witch Hat Cupcake Cones in an airtight container at room temperature for up to two days. The cones keep their crunch, and the icing stays fairly firm. Refrigerating them can sometimes make the sponge a bit soggy, so I avoid that if possible.
Freezing
If you want to make these ahead for a big bash, you can freeze the baked cupcake cones (without icing) by wrapping them individually in plastic wrap and placing them in a sealed freezer bag. When you’re ready, thaw them fully before decorating. I’ve found icing frozen cones can get messy, so decorating after thawing works best.
Reheating
To freshen leftover cupcake cones before serving, gently warm them in a low oven (about 300°F) for 3–5 minutes. This helps bring back some of that just-baked softness without melting the icing. I never microwave since it can ruin the texture.
FAQs
-
Can I use homemade cake batter for the Wicked Halloween Witch Hat Cupcake Cones Recipe?
Absolutely! I often use Wilton’s chocolate cake recipe when I’m up for baking from scratch. Just make sure your batter isn’t too thin so it holds well inside the cones while baking.
-
How do I prevent the sugar cones from getting soggy?
Using a cupcake cones baking rack helps the cones bake evenly and avoid sogginess. Also, don’t overfill them with batter, and be sure to bake and cool thoroughly before adding icing.
-
Can I prepare these cupcake cones ahead of time?
Yes! You can bake the cupcake cones up to a couple of days ahead and store them in an airtight container. It’s best to decorate them the day of your event for the freshest look and taste.
-
What if I don’t have black color mist spray?
You can use black gel food coloring mixed into black decorator icing and brush or pipe it on the cones, though it takes longer to dry and might cover the texture differently. The spray is super quick and gives that smooth matte finish.
-
Can kids help make the Wicked Halloween Witch Hat Cupcake Cones Recipe?
Definitely! Kids love filling the cones and decorating them with colorful icing. Just supervise any oven use and spraying steps for safety.
Final Thoughts
This Wicked Halloween Witch Hat Cupcake Cones Recipe holds a special place in my heart because it brings together the best parts of Halloween: creativity, color, and delicious fun. I love how easy it is to make something that looks so professionally festive without hours of effort. Plus, watching everyone’s faces light up when they see these miniature witch hats makes every step worth it. Give this recipe a try—you’ll have a blast making it, and your witchy treats will disappear fast!
Print
Wicked Halloween Witch Hat Cupcake Cones Recipe
- Prep Time: 45 minutes
- Cook Time: 1 hour
- Total Time: 1 hour 45 minutes
- Yield: 12 cupcake cones
- Category: Dessert
- Method: Baking
- Cuisine: American
Description
Create spooky and delicious Wicked Halloween Witch Hat Cupcake Cones perfect for Halloween parties. These fun cupcake cones combine moist cake baked inside sugar cones with colorful frosting decorations to resemble witch hats. The cones are sprayed black and decorated with bright orange, purple, and yellow icing bands and buckles, making them a festive and eye-catching treat.
Ingredients
Cake & Cone Base
- Favorite Cake Mix or Wilton’s Chocolate Cake Recipe, prepared as directed
- 12 Sugar Cones
Decorations & Icing Colors
- Black Color Mist Food Coloring Spray, 1.5 oz
- Creamy White Decorator Icing, 4 lb tub
- Lemon Yellow Icing Color, 1 oz
- Lemon Yellow Gel Food Coloring, 1 oz
- Golden Yellow Icing Color, 1 oz
- Rose Icing Colors Pink Food Coloring, 1 oz
- Rose Gel Food Coloring, 1 oz
- Violet Icing Color, 1 oz Gel Food Coloring
- Violet Gel Food Coloring, 1 oz
- Orange Icing Color, 1 oz
- Orange Gel Food Coloring, 1 oz
Tools & Equipment
- Cupcake Cones Baking Rack
- Recipe Right Non-Stick Cookie Sheet
- Unbleached Parchment Paper
- 12-Inch Disposable Decorating Bags, 12-Count
- Large Basketweave Decorating Tip 2B
- Round Cake Decorating Tip 3
- Straight Black Spatula, 9-Inch
- Knife
- Store Bought Chocolate Cookies (to place cones on)
Instructions
- Prepare & bake the cones: Prepare the cake mix according to your chosen recipe’s instructions. Place the Cupcake Cones Baking Rack on a cookie sheet and insert the sugar cones into the rack. Fill each cone with about 2 tablespoons of the cake batter. Bake the cones following the cake recipe’s timing and temperature guidelines, then allow them to cool completely.
- Spray the cones: If the cake has risen above the top of the cone, trim it with a knife to level it. Place the cones wide side down on parchment paper. Using Black Color Mist Food Coloring Spray, spray the cones evenly black. Allow them to dry for 10 to 15 minutes.
- Tint the icing and prepare decorating bags: Tint 1 cup of creamy white decorator icing orange using the orange icing colors. Tint another cup purple by combining violet and rose icing colors. Fill two decorating bags fitted with tip 2B with the orange and purple icings separately. Then tint 1/4 cup of icing yellow by mixing golden yellow and lemon yellow icing colors and place it in a decorating bag fitted with tip 3.
- Assemble the witch hats: Pipe a small dot of orange icing in the center of a chocolate cookie, then place a cone on top, wide side down. Smooth the icing to secure. For half the cones, pipe a band around the base using orange icing with the smooth side of the tip facing out. Use the spatula to smooth the band. Repeat the same process with purple icing on the remaining cones. Let the icing set for 15 to 20 minutes.
- Decorate with buckles: Using the yellow-tinted icing with tip 3, pipe buckles around the bands on each hat. Let them set for another 15 to 20 minutes before serving and enjoying your Wicked Halloween Witch Hat Cupcake Cones.
Notes
- Use the black mist spray carefully to avoid soaking the cupcake cones; a light even coat works best.
- Ensure cupcakes are fully cooled before decorating to prevent icing from melting.
- Chocolate cookies with a flat surface work best to stabilize the cones.
- Adjust food coloring quantities to achieve desired icing color intensity.
- These cupcake cones can be prepared a day ahead and stored in an airtight container.
Nutrition
- Serving Size: 1 cupcake cone
- Calories: 320
- Sugar: 25g
- Sodium: 180mg
- Fat: 15g
- Saturated Fat: 8g
- Unsaturated Fat: 6g
- Trans Fat: 0g
- Carbohydrates: 40g
- Fiber: 1g
- Protein: 3g
- Cholesterol: 30mg


