
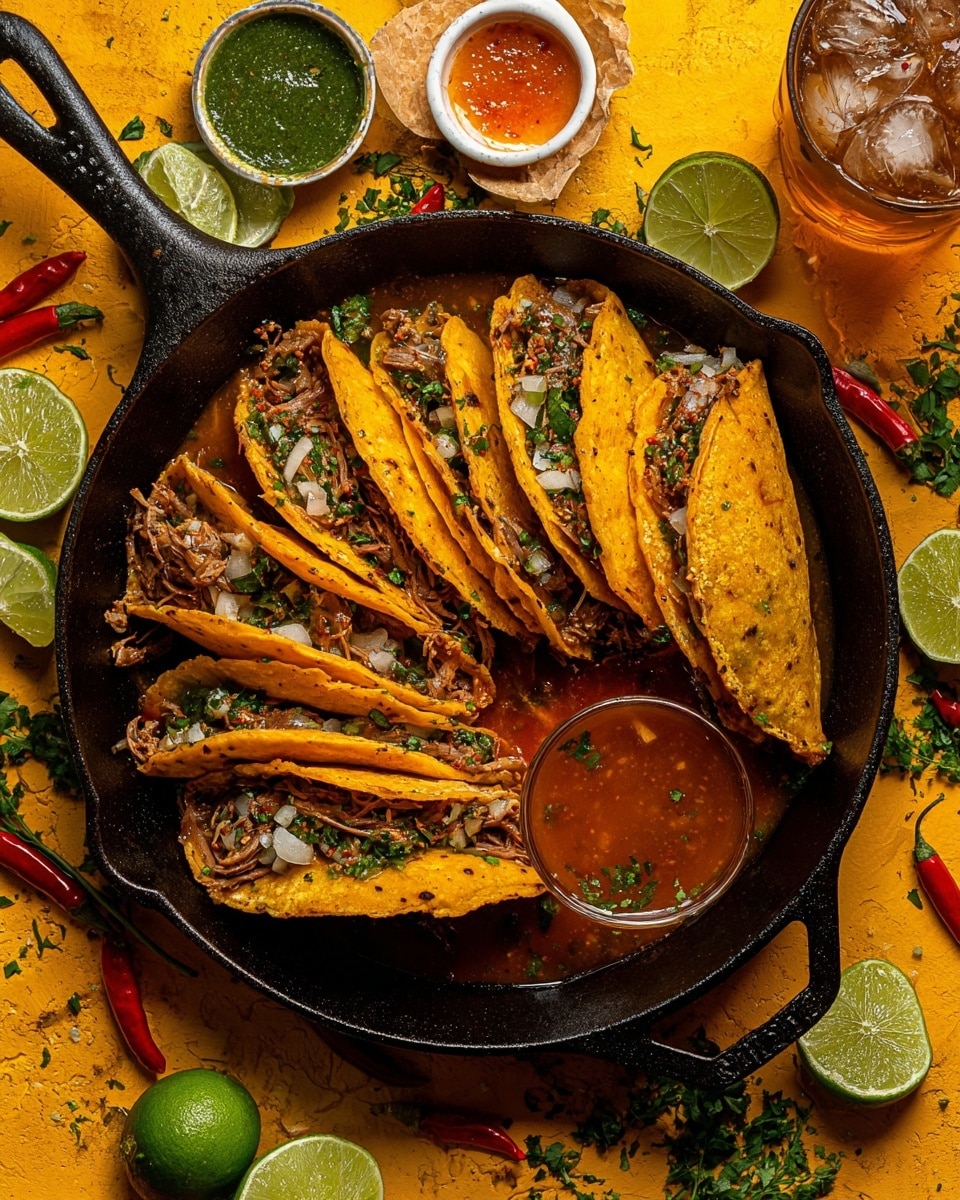
I absolutely love this recipe because it brings the rich, bold flavors of traditional Mexican birria right into my own kitchen. My Fave Birria Tacos Recipe is all about that tender, juicy beef braised in a deeply spiced chili paste, paired with warm, crispy tortillas and gooey cheese – it’s a flavor party that’s really hard to beat. Whether it’s a weekend gathering or a cozy weeknight dinner, these tacos always steal the show and get everyone asking for seconds.
When I first tried birria tacos, I was amazed at how the tender meat paired with the savory consomme dipping sauce made every bite melt in my mouth. With My Fave Birria Tacos Recipe, you’ll find it’s not only incredibly delicious but also a rewarding project that feels like a culinary adventure. Plus, learning the step-by-step made me realize it’s easier than it looks, and you’ll love impressing your friends with these tacos that taste like they’re from a street vendor in Jalisco!
Why You’ll Love This Recipe
- Authentic Flavor: The rich chili paste and slow-braised beef deliver deep, traditional Mexican flavors that pop.
- Crowd-Pleaser: Perfect for parties or family meals because everyone loves juicy, cheesy birria tacos.
- Hands-On Fun: You get to make the chili paste, braise, and assemble – a fantastic kitchen project with delicious rewards.
- Flexible Ingredients: You can swap beef for lamb or chicken depending on what you have or your cravings.

Ingredients You’ll Need
These ingredients all come together to build layers of flavor from the smoky chilies to the tender beef, creating the kind of tacos that keep you coming back for more. When shopping, look for dried guajillo and ancho chiles in the Latin aisle, and choosing organic beef stock really boosts the richness.
- Dried Guajillo Peppers: These bring a mild, smoky heat that’s foundational to birria’s flavor.
- Dried Ancho Chiles: Adds a deep, sweet smokiness that balances perfectly with the guajillo.
- Chipotle Peppers in Adobo: For a smoky, spicy kick and a touch of tang.
- Onion: Sweetens and softens the chili paste flavor.
- Garlic Cloves: A must for savory depth.
- Crushed Tomatoes: Adds body and mild acidity to the sauce.
- Organic Beef Stock: Essential for richness; you can substitute with water if needed.
- Apple Cider Vinegar: Lifts the flavors with subtle tang.
- Bay Leaves: Add fragrant depth to the braise.
- Mexican Oregano: The authentic herb choice for classic Mexican dishes.
- Dried Thyme: Layered herbal notes enhance the profile.
- Cumin: Warm and earthy, it grounds the spice blend.
- Ground Cinnamon: Just a hint for a beautiful aroma.
- Smoked Paprika: Adds color and smoky sweetness.
- Ground Allspice: Brings complexity with subtle clove notes.
- Organic Chuck Roast Beef: Perfectly marbled for shredding and soaking up the sauce.
- Extra Virgin Olive Oil: For searing and frying the tortillas.
- Sea Salt and Black Pepper: To season perfectly.
- Garlic Powder: Amplifies garlic flavor in the meat.
- Yellow Onion: Diced to caramelize and flavor the sauce.
- Corn Tortillas: Use organic if you can; they crisp up beautifully.
- Shredded Oaxaca Cheese: Melts gorgeously, the perfect gooey filling.
- Fresh Cilantro: Chopped for freshness and color on top.
- Pico de Gallo: Adds brightness and texture – feel free to use my Fresh Homemade Pico de Gallo recipe.
Variations
I love making this recipe just as it is, but I also enjoy playing around with it to suit different tastes or dietary needs. Feel free to get creative with the protein or adjust spice levels to make it your own birria masterpiece.
- Protein Swap: I’ve made this with lamb shank and chicken, both turned out wonderfully tender and flavorful.
- Vegetarian Version: Use mushrooms or jackfruit to mimic the texture and soak up the chili paste – tasty and meat-free.
- Spice Level: Reduce the chipotles if you want less heat or add extra for a fiery kick.
- Cheese Options: If you can’t find Oaxaca cheese, mozzarella or a mild melty cheese works well too.
How to Make My Fave Birria Tacos Recipe
Step 1: Soak and Blend the Chili Paste
Start by removing the stems and seeds from the dried guajillo and ancho peppers—this helps eliminate any bitterness. Next, bring the beef stock to a boil in a medium pot, then turn off the heat and soak the dried chiles in it for 15-20 minutes until they’re soft and plump. Once softened, blend them with chipotle peppers, onion, garlic, crushed tomatoes, and the rest of the spices until you get a smooth, thick paste. I sometimes add an extra splash of stock if it feels too thick—aim for a texture that’s spreadable but not watery.
Step 2: Sear the Beef Chunks
Preheat your oven to 350°F and heat olive oil in a Dutch oven over medium-high heat. Season the beef chunks with salt, pepper, and garlic powder and sear them on all sides until golden brown—usually about 3-4 minutes per batch. Searing seals in the juices and adds wonderful flavor, so don’t skip this step! If you have a lot of meat, work in batches so you don’t overcrowd the pan.
Step 3: Build the Sauce and Braise the Meat
In the same pot, sauté the diced onion until soft and fragrant, then add your freshly made chili paste and give it a good stir to combine. Let it simmer briefly for 1-2 minutes so the spices bloom. Then, pour in the beef stock and water, add your bay leaves, and return the seared meat to the pot. Stir everything together, reduce the heat to low, and transfer the whole pot to your preheated oven to braise for about 2½ hours. This slow cooking breaks down the beef to fork-tender, juicy perfection.
Step 4: Shred the Meat and Prepare Consommé
Once the meat is tender, pull it out and shred it using two forks. You want it nice and “pulled” so it soaks up all that delicious sauce. Scoop out a cup of the cooking liquid (consommé) and stir in some freshly chopped cilantro; this will be your dipping sauce—which is honestly one of the best parts of the meal. Having a tasty broth to dunk the tacos in is what makes birria so uniquely wonderful.
Step 5: Assemble and Fry the Tacos
Heat a non-stick skillet over medium heat and grease it lightly with olive oil using a paper towel for even coverage. Dip a corn tortilla briefly into the consommé, then place it in the pan to cook for a few seconds. Layer a generous amount of shredded beef, diced onion, cilantro, and shredded Oaxaca cheese on top. Fold the tortilla in half and let it fry until the cheese melts and the taco is golden on both sides, flipping carefully to get a crisp char without tearing. Repeat until all your tacos are made.
Pro Tips for Making My Fave Birria Tacos Recipe
- Searing in Batches: I learned the hard way that crowding the pan steams the meat instead of browning it—sear in batches for best color and flavor.
- Consommé Dip Magic: Don’t skimp on ladling a good amount of broth in the dipping bowl – that liquid is flavor gold and makes every bite unforgettable.
- Tortilla Fry Timing: Dip tortillas briefly so they soften but don’t fall apart; too long soaking makes them soggy and tricky to flip.
- Cheese Melting Trick: Use a non-stick pan and fold carefully – this keeps the tacos intact and lets the cheese ooze perfectly.
How to Serve My Fave Birria Tacos Recipe
Garnishes
I always top mine with fresh chopped cilantro and diced white onions straight from the fridge for that crisp, fresh bite that balances the rich meat. A squeeze of lime on top brightens everything beautifully. Don’t skip the Oaxaca cheese inside, as it melts into the folds and adds that gooey, comforting texture I can’t get enough of.
Side Dishes
My favorite sides include a zingy Pico de Gallo and a simple Mexican street corn salad with cotija cheese and lime. A bowl of black beans or Mexican rice rounds out the meal nicely for a full fiesta on your plate.
Creative Ways to Present
For special occasions, I like to set up a taco bar with little bowls of garnishes: chopped onions, cilantro, lime wedges, different salsas, and the consommé for dipping. It turns taco night into an interactive celebration, and people love customizing their plates!
Make Ahead and Storage
Storing Leftovers
If you have leftovers, keep the beef, consommé, and tortillas stored separately in airtight containers in the fridge. The meat and consommé last beautifully for up to 3-4 days. I always reheat the meat gently so it stays juicy and then assemble fresh tacos when ready to eat.
Freezing
I’ve frozen the shredded beef and chili sauce in meal-sized portions—just freeze in a sturdy container or bag. When thawed, the flavors hold up really well; just remember to defrost overnight in the fridge before reheating gently on the stove.
Reheating
To reheat, I warm the beef and sauce on low heat with a splash of water or consommé to keep it saucy. The tortillas get their crisp back when fried lightly in a pan or warmed in the oven. This method keeps your leftovers tasting fresh and delicious.
FAQs
-
Can I make My Fave Birria Tacos Recipe ahead of time?
Absolutely! You can prepare the chili paste, braised meat, and consommé in advance and store them separately in the refrigerator. When you’re ready to serve, simply reheat and assemble the tacos fresh for best texture and flavor.
-
What cut of meat works best for birria tacos?
I prefer organic chuck roast because it’s beautifully marbled and shreds perfectly after braising. That said, beef shank, lamb, or even chicken are great alternatives if you want to switch things up.
-
How spicy are these birria tacos?
They have a medium spice level thanks to chipotle and dried chiles, but you can easily adjust the heat by adding fewer chipotles or removing seeds from the dried peppers. It’s all about tailoring it to your taste buds!
-
Can I use flour tortillas instead of corn?
While traditional birria tacos are made with corn tortillas, you can absolutely use flour tortillas if you prefer. Corn tortillas hold up nicely when dipped and fried, but flour tortillas offer a softer, chewier alternative.
Final Thoughts
Honestly, My Fave Birria Tacos Recipe has become one of those dishes I turn to whenever I want to impress or just treat myself to comfort food. The magic is in that melt-in-your-mouth beef combined with the spicy, smoky chili paste and the fun of dipping each taco in that luscious consommé. I hope you give it a try—you’ll find it’s easier to make than it seems and so worth every minute in the kitchen. Your friends and family will thank you, and I’m confident you’ll love how it turns out just as much as I do!
Print
My Fave Birria Tacos Recipe
- Prep Time: 20 minutes
- Cook Time: 2 hours 30 minutes
- Total Time: 2 hours 50 minutes
- Yield: 12 tacos
- Category: Tacos
- Method: Baking
- Cuisine: Mexican
Description
Delight in these flavorful homemade Birria Tacos featuring tender, slow-braised chuck roast in a rich and smoky chili paste, served with melted Oaxaca cheese, fresh cilantro, and a zesty consomme dipping sauce. Perfectly crispy on the outside with a gooey cheesy center, these tacos bring an authentic Mexican street food experience right to your kitchen.
Ingredients
Chili Paste
- 4 dried guajillo peppers
- 4 dried ancho chiles
- 4 chipotle peppers in adobo
- 1 onion, chopped
- 4 garlic cloves
- 1/2 cup crushed tomatoes
- 1/2 cup organic beef stock (or water)
- 1 tablespoon apple cider vinegar
- 2 bay leaves
- 2 tablespoons Mexican oregano
- 1 teaspoon dried thyme
- 1/2 teaspoon cumin
- 1/2 teaspoon ground cinnamon
- 1/2 teaspoon smoked paprika
- 1/2 teaspoon ground allspice
Meat + Consomme (Dipping Sauce)
- 3 lbs organic chuck roast beef, chopped into medium-large chunks (or shank cut of beef, lamb, or chicken as alternatives)
- 1 tablespoon extra virgin olive oil
- 1 teaspoon sea salt
- 1 teaspoon black pepper
- 1 teaspoon garlic powder
- 1/2 onion, diced
- 4 cups organic beef stock
- 2 cups water
Tacos
- 12 organic corn tortillas
- Shredded Oaxaca cheese
- 1 cup chopped fresh cilantro
- Pico de Gallo (fresh homemade recommended)
Instructions
- Make the chili paste: Remove stems and seeds from dried guajillo and ancho chiles. Bring beef stock to a boil in a medium pot, add the chiles, turn off the heat, cover and let sit for 15-20 minutes to soften. Transfer softened chiles to a high-powered blender with chipotle peppers, chopped onion, garlic, crushed tomatoes, apple cider vinegar, bay leaves, Mexican oregano, thyme, cumin, cinnamon, smoked paprika, and allspice. Blend until smooth and thick. Add additional beef stock or water as needed for desired consistency.
- Prepare the meat: Preheat oven to 350°F. Heat olive oil in a dutch oven over medium-high heat. Season beef chunks with sea salt, black pepper, and garlic powder. Sear in batches, 3-4 minutes per side, until golden brown. Remove and set aside. In the same pot, sauté diced onion until translucent (1-2 minutes). Stir in the chili paste and simmer for 1-2 minutes.
- Add liquids and braise: Add beef stock and water to the pot, stir well. Return the seared beef to the pot and mix. Reduce heat to low and let everything simmer briefly. Transfer the dutch oven carefully to the preheated oven. Braise for approximately 2½ hours or until the beef is very tender and shreddable.
- Shred the beef: Remove the pot from the oven and shred the beef using forks until fully pulled apart. Ensure there is enough saucy consomme to serve over the tortillas and for dipping.
- Prepare dipping sauce: Take 1 cup of the broth/liquid from the cooked beef, add chopped fresh cilantro, and set aside for dipping.
- Assemble and fry the tacos: Heat a non-stick skillet over medium heat. Add 1 tablespoon olive oil and spread evenly with a paper towel. Dip one tortilla into the dipping sauce, then place it in the skillet. Quickly top with shredded beef, diced onions, chopped cilantro, and shredded Oaxaca cheese. Fold the tortilla in half and cook until cheese melts and tortilla is golden and slightly charred, flipping carefully as needed. Repeat for all tacos.
- Serve: Serve tacos hot with the consomme dipping sauce and fresh Pico de Gallo on the side. Enjoy your authentic and flavorful birria tacos!
Notes
- Store leftover cooked ingredients separately in airtight containers in the refrigerator for 3-4 days.
- Reheat tacos in a 350°F oven until warmed through before assembling.
- You can reduce the amount of spices/herbs to taste, but this recipe is pronounced and bold by design.
- All components except tortillas can be prepared ahead and stored for meal prep convenience.
- Use a non-stick skillet for frying for best results; avoid cast iron pans for this step.
Nutrition
- Serving Size: 2 tacos
- Calories: 450
- Sugar: 4g
- Sodium: 700mg
- Fat: 22g
- Saturated Fat: 8g
- Unsaturated Fat: 12g
- Trans Fat: 0g
- Carbohydrates: 35g
- Fiber: 6g
- Protein: 35g
- Cholesterol: 110mg


