
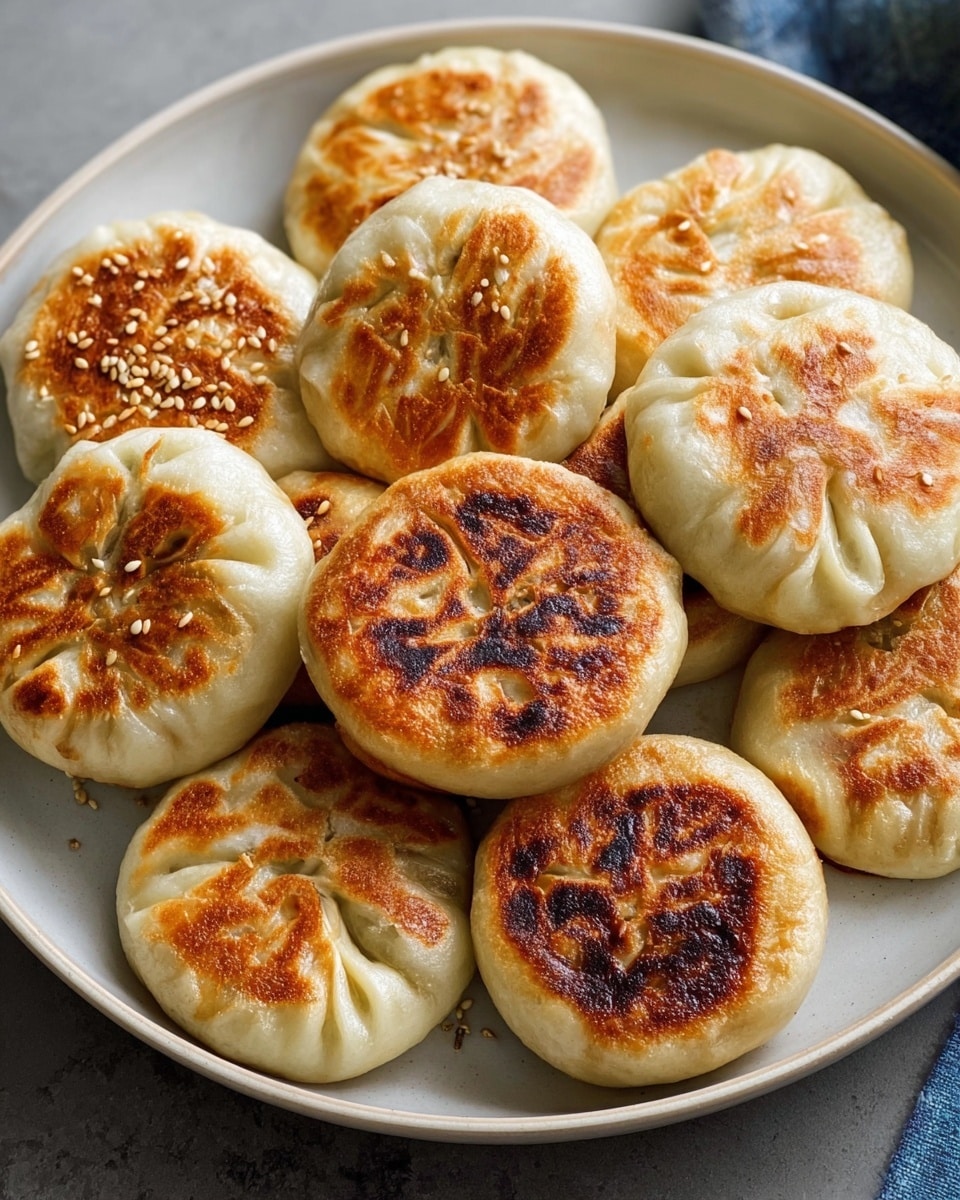
I absolutely love this Vegan Pan-Fried Buns Recipe because it delivers that perfect balance of crispy and fluffy in every bite. These buns are fantastic when you’re craving something warm and comforting but still light and packed with fresh veggies. When I first tried making them, I was amazed at how vibrant and satisfying the filling tasted without any meat or heavy sauces.
You’ll find that this recipe works wonderfully for cozy dinners, casual get-togethers, or meal prep to enjoy throughout the week. The process may take a little time, but it’s truly rewarding—you’ll get hands-on with dough and end up with buns that are way better than store-bought. Plus, each step is pretty straightforward once you know a few tricks, so let’s walk through it together!
Why You’ll Love This Recipe
- Deliciously Crispy Exterior: Pan-frying gives these buns a golden crust that’s irresistibly satisfying.
- Hearty Vegan Filling: The mix of cabbage, shredded carrot, scallions, and vermicelli noodles results in a fresh, flavorful bite every time.
- Great for Meal Prep: These buns keep well in the fridge and freezer, making them perfect for easy lunches or snacks.
- Fun to Make: Rolling and folding the wrappers is a hands-on process that’s surprisingly relaxing and rewarding.

Ingredients You’ll Need
The ingredients for this Vegan Pan-Fried Buns Recipe come together beautifully to create a dough that’s soft yet sturdy, paired with a savory vegetable and noodle filling. When shopping, look for fresh, crisp cabbage and good-quality vermicelli noodles to make the filling truly shine.
- All-purpose flour: The base for the dough, choose unbleached if possible for better texture.
- Instant dry yeast: Activates the dough rise quickly; store unopened packs in the freezer for longer shelf life.
- Sugar: Feeds the yeast and adds a subtle sweetness to the dough.
- Salt: Enhances all the flavors both in the dough and the filling.
- Roasted sesame seeds: Adds a toasty nuttiness and a bit of crunch to the dough mix.
- Soy milk (or other non-dairy milk): Keeps the dough vegan while adding moisture and mild flavor.
- Toasted sesame oil: Essential for that deep, nutty aroma in both dough and filling.
- Neutral oil (like vegetable or canola): For cooking the filling and frying the buns.
- Cabbage: Finely shredded to provide a light, crunchy filling texture.
- Vermicelli noodles: Soaked and chopped for body in the filling without overwhelming it.
- Carrot: Adds natural sweetness and vibrant color to the filling.
- Scallions or chives: Bring a mild sharpness and freshness.
- Soy sauce: Adds umami depth to the filling’s seasoning.
Variations
I like to switch up the fillings sometimes to keep things interesting or to match whatever veggies I have on hand. This Vegan Pan-Fried Buns Recipe is super flexible, so feel free to experiment with different textures and flavors for your perfect bite.
- Variation: Adding finely chopped mushrooms to the filling gives a meatier texture—my family loves this twist for heartier meals.
- Spicy Kick: Throw in some diced fresh chili or a pinch of chili flakes to the filling for an extra layer of heat.
- Gluten-Free Option: You can try substituting the all-purpose flour with a gluten-free blend that behaves similarly for the dough, but expect slightly different textures.
- Seasonal Veggies: In autumn, roasted butternut squash or pumpkin puree can add warmth and sweetness inside the buns.
How to Make Vegan Pan-Fried Buns Recipe
Step 1: Mix and Rise Your Dough
Start by combining all your dry ingredients—flour, yeast, sugar, salt, and sesame seeds—in a large bowl. Then make a well in the center and slowly pour in your warm soy milk and toasted sesame oil. I like to mix it with my hand or a wooden spoon until a shaggy dough forms. Once everything is gathered together, knead the dough gently until smooth and elastic—about 8 to 10 minutes. Placing your dough ball in a covered bowl with a damp towel on top, let it rest for around two hours or until it doubles in size. This rest is key for a soft, fluffy bun texture later.
Step 2: Prepare the Flavorful Filling
While your dough rises, soak the vermicelli noodles in boiling water for 7-8 minutes until soft, then drain and roughly chop them. Heat a pan with neutral oil and toss in your shredded cabbage, carrots, and scallions or chives. Sauté them on medium-high for 4-5 minutes until the veggies soften and the carrots are tender. Add the noodles, then season with soy sauce, salt, and toasted sesame oil. Stir well and cook for another 2-3 minutes so those flavors marry beautifully. I let the mixture drain in a strainer to remove any excess moisture, which helps prevent soggy buns.
Step 3: Roll Out Your Wrappers
Now comes the fun part: shaping the buns. Punch a hole in the center of your dough ball and stretch it into a large ring. Cut into 12 or 16 evenly sized pieces, depending on how big you want your buns. I usually go for 16 because smaller buns are easier to handle and cook evenly. Roll each piece into a smooth ball. Press the ball down to flatten slightly, sprinkle a bit of flour on top, and roll it out with a floured rolling pin into a roughly 3-4 inch circle for smaller buns. Don’t stress if they’re not perfectly round—homemade charm goes a long way! If you stack the wrappers while you work, brush flour between layers and cover with a dry towel to prevent drying out.
Step 4: Fill and Seal the Buns
Place 2-3 tablespoons of the filling in the center of each wrapper. Using one hand, start creasing the edges of the dough, then pinch each crease to seal; this is the part I learned from trial and error, and it really helps keep the bun neatly closed while cooking. Once all edges are pinched, twist the top to lock everything in place. Gently press down the tops for a nice flat bottom that will help them stand. Cover the filled buns with a towel so they don’t dry out while you finish the batch.
Step 5: Pan-Fry to Golden Perfection
Heat a non-stick pan with about a tablespoon of oil for every 4 buns. Place each bun creased-side down and lightly press to ensure contact with the pan. Let them cook over medium heat for 4-5 minutes until the bottoms turn golden brown and crisp—this is where they get that amazing texture I can’t get enough of. Flip to the other side and brown it lightly too. Now, here’s a trick I discovered: carefully pour a few tablespoons of water into the pan and immediately cover with a lid to steam the buns. This step keeps the insides tender and cooks the filling through – no dry buns on my watch! Let the water evaporate, then remove the buns and repeat with the rest. Serve warm for the best experience.
Pro Tips for Making Vegan Pan-Fried Buns Recipe
- Use Warm (Not Hot) Milk: Too hot liquid can kill the yeast; warm is just right to activate it gently.
- Drain Filling Thoroughly: Removing excess moisture prevents soggy buns and helps wrapping easier.
- Pinch and Twist Seal: This technique secures the filling without bursting during pan-frying.
- Don’t Skip the Steaming Step: Adding water and covering with a lid cooks the filling perfectly while keeping buns soft inside.
How to Serve Vegan Pan-Fried Buns Recipe
Garnishes
I like garnishing these buns with a sprinkle of roasted sesame seeds and chopped fresh scallions for an extra touch of flavor and crunch. Sometimes, I’ll drizzle a little homemade chili oil over for that subtle kick. These garnishes make the buns look as good as they taste, especially when serving guests.
Side Dishes
Pair the Vegan Pan-Fried Buns with a simple Asian-style cucumber salad or a light miso soup for a balanced meal. For something heartier, steamed or stir-fried greens like bok choy or spinach work beautifully alongside. These sides add freshness and make the meal feel complete.
Creative Ways to Present
For special occasions, I’ve served these buns stacked in a bamboo steamer lined with banana leaves to evoke an authentic feel. You can also put them on a wooden board with small bowls of dipping sauce for each guest—soy sauce combined with a bit of sugar, chili, and sesame seeds is my go-to. Wrapping each bun in a small lettuce leaf is a fun and pretty way to serve them as finger food at parties.
Make Ahead and Storage
Storing Leftovers
I store leftover cooked buns in an airtight container in the fridge for up to five days. When I want to eat them later, I usually crisp them back up in a hot pan with a little water to steam them gently before serving. This refreshes their texture close to freshly made.
Freezing
Freezing cooked buns is a lifesaver. I freeze them individually spaced on a tray until firm to prevent sticking, then transfer them to a freezer-safe bag. When I want to enjoy one, I take it straight from the freezer and reheat it in a pan or steamer—no thawing required. This keeps them wonderfully fresh anytime.
Reheating
To reheat leftovers, I prefer pan-frying with a splash of water and a lid on, just like the original cooking method, as it crisps the buns nicely while steaming them inside. You can also reheat in an oven toaster or microwave with a damp paper towel to keep moisture in. Avoid microwaving dry to prevent tough buns.
FAQs
-
Can I make the dough without yeast?
You could try a yeast-free dough using baking powder, but it won’t have the same fluffy texture that makes these vegan pan-fried buns so special. The yeast dough needs time to rise to develop that soft interior and slight chewiness.
-
Can I prepare these buns in advance?
Absolutely! You can prepare and store the shaped buns in the fridge before cooking, just cover them well to prevent drying out. They can also be frozen cooked or uncooked for later use—just thaw or cook as usual when ready.
-
What dipping sauce pairs best with these buns?
A simple mixture of soy sauce, sugar, a splash of chili sauce, and toasted sesame seeds is my favorite dipping sauce. It balances sweet, salty, spicy, and nutty flavors perfectly with the buns.
-
Can I use other vegetables for the filling?
Yes! Feel free to experiment with veggies like shredded mushrooms, finely chopped broccoli stems, or even cooked sweet potatoes. Just be mindful of excess moisture, which can make the buns soggy.
Final Thoughts
This Vegan Pan-Fried Buns Recipe has become a staple in my kitchen because it’s just so satisfying and fun to make. I love how you can get creative with the fillings and enjoy freshly pan-fried buns that everyone raves about. If you’re looking for a recipe that’s a little hands-on but incredibly rewarding, give this one a try—you’ll impress yourself and anyone lucky enough to share them with you.
Print
Vegan Pan-Fried Buns Recipe
- Prep Time: 1 hour
- Cook Time: 30 minutes
- Total Time: 2 hours 30 minutes
- Yield: 16 buns
- Category: Snack
- Method: Frying
- Cuisine: Vegan, Asian-inspired
- Diet: Vegan
Description
These Vegan Pan-Fried Buns are soft, fluffy, and filled with a savory mixture of cabbage, vermicelli noodles, and carrots. Perfectly pan-fried to golden perfection with a lightly steamed interior, these buns make a delicious plant-based snack or meal that’s both satisfying and easy to prepare.
Ingredients
Dough Dry Ingredients
- 3 cups all-purpose flour (375 g)
- 2 tsp instant dry yeast
- 2 tbsp sugar
- 1/2 tsp salt
- 1 tbsp roasted sesame seeds
Dough Wet Ingredients
- 1 cup warm soy milk or other non-dairy milk
- 1 tbsp toasted sesame oil or neutral oil
Filling
- 1 tbsp neutral oil for cooking
- 6 cups raw shredded cabbage (from 1/2 large head of cabbage)
- 3.5 oz uncooked vermicelli noodles (100 g total)
- 1 cup finely shredded or grated carrot (150 g)
- 1/2 cup chopped scallions or chives (25 g)
- 1 tbsp soy sauce
- 2 tsp salt or to taste
- 1 tbsp roasted sesame seeds
- 2 tbsp toasted sesame oil
Instructions
- Preparing the Dough: In a large bowl, combine all dry dough ingredients. Make a well in the center and pour in warm soy milk and toasted sesame oil. Mix until a dough forms, then shape into a ball. Place in a bowl, cover with a damp towel, and let it rest for at least 2 hours to rise.
- Cooking the Filling: Soak vermicelli noodles in boiling water for 7-8 minutes until cooked. Drain and chop roughly into 1/2 inch pieces. Heat 1 tbsp neutral oil in a pan over medium-high heat, then add chives, carrots, and cabbage. Cook for 4-5 minutes until carrots are tender. Add vermicelli noodles, soy sauce, salt, and toasted sesame oil. Stir and cook for another 2-3 minutes. Drain excess liquid thoroughly and let the filling cool.
- Preparing the Wrappers: Remove dough and stretch it into a large ring by punching a hole through the center. Slice into 12 or 16 pieces (38-50g each). Roll each piece into a ball. Lightly flatten each ball and roll with a floured rolling pin to 3-4 inches diameter for 38g pieces or 4-5 inches for 50g pieces. Place wrappers on a tray spaced apart or stacked with flour between layers, cover with a dry towel to prevent drying. Avoid stacking if sitting more than 30 minutes.
- Making the Buns: Place 2-3 tbsp filling in the center of a wrapper. Pleat and pinch the edges together, twisting at the top to seal the bun. Lightly press the top flat. Place the buns on a tray and cover with a towel to keep moist. Repeat for all wrappers.
- Cooking the Buns: Heat a pan with lid and add 1 tbsp oil for every 4 buns. Once hot, add buns crease-side down and press lightly. Cook over medium heat for 4-5 minutes until golden brown. Flip buns to brown the other side. Carefully add 4 tbsp water to the pan (1 tbsp per bun), cover immediately to steam for 5-6 minutes until water evaporates. Remove buns and repeat with remaining buns. Serve hot with optional dipping sauce.
- Storing the Cooked Buns: Place cooled buns in an airtight container and refrigerate up to 5 days. Reheat by pan frying with a splash of water, oven toasting at low heat, or microwaving covered with a splash of water.
- Freezing the Buns: Freeze buns on a tray spaced apart for 5-6 hours until firm, then transfer to a plastic or silicone bag. Reheat directly from frozen by pan frying, oven toasting, or steaming without thawing.
Notes
- If the wrappers sit for more than 30 minutes, keep them spaced separately to prevent sticking.
- Number of buns cooked at once depends on pan size; do not overcrowd.
- Use a dry towel to cover dough and buns to retain moisture and prevent drying out.
- Adjust salt and soy sauce in filling to taste.
- Mix a dipping sauce with soy sauce, sugar, chili sauce, and sesame seeds for extra flavor.
- Ensure to drain filling well to avoid soggy buns.
- Practice rolling dough wrappers for easier shaping, irregular shapes won’t affect cooking.
Nutrition
- Serving Size: 1 bun
- Calories: 130 kcal
- Sugar: 3 g
- Sodium: 450 mg
- Fat: 4 g
- Saturated Fat: 0.5 g
- Unsaturated Fat: 3 g
- Trans Fat: 0 g
- Carbohydrates: 22 g
- Fiber: 3 g
- Protein: 4 g
- Cholesterol: 0 mg
